| ||||
| ||||
| Moderated by: Greg Fletcher |
|
||||||||||||||
| 18711 "Miss Jensen" | Rating: 
|
| Author | Post |
|---|
| Posted: 01-05-2009 05:17 pm |
|
1st Post |
|
subwoofer Member
|
Since this forum was my suggestion, I will start the party. First post! The story so far: The car came to Norway the summer of 2007, imported fra Arizona. I bought it in April (2008), after a short test drive. She didn't smoke, but tune was way off, high idle and very low maximum revs. Body in decent condition, passenger side floor has a hole or two, the rest of the car seems sound. No electrics apart from the headlights and starter motor worked. The paint was really dull, so step one was to clean and polish her. Attachment: IMG_6126-1-1.jpg (Downloaded 342 times)
|
||||||||||||||
| |||||||||||||||
| Posted: 01-05-2009 06:05 pm |
|
2nd Post |
|
subwoofer Member
|
Next step was to get the electrics up and running, quite a few hours were spent in the "Lotus position" (head down in the foot well, feet up in the air). A new set of steering column switches was ordered from Moss Europe, installing a set for a late MGB (roughly £100 for the full set). Unfortunately, I forgot to specify that I needed the LHD version, so the switches are mounted upside down. No real problem, but looks a bit odd. Colours are the same as the JH switches, but all the pins in the connectors have to be shuffled. As you can see, John Kimbrough's schematics came in handy while debugging. While I was at it, I installed a set of headlight relays to increase reliability, and changed the sealed beam headlights with H4 replacements. Attachment: IMG_6005-1.jpg (Downloaded 229 times)
|
|||||||||||||
| ||||||||||||||
| Posted: 01-05-2009 06:35 pm |
|
3rd Post |
|
subwoofer Member
|
The radiator was clogged up, so I had it rebuilt locally, using the largest element from Nissens that would fit the tanks. She overheated a few times trying the chase down the cause of the overheating, so I may have a dodgy head gasket at the moment. The brakes also needed a good going over, so I rebuilt the calipers, changed the rear wheel cylinders, new pads and shoes. I blew out old fluid from the lines, and replaced the leaky master cylinder with a Land Rover part from Paddock's. Seems identical, and was ~£45. I managed to get licence plates on the car, and put a few miles on it, but handling still leaves a bit to be desired. Tearing the rear end apart reveals some rather sorry looking bushings: Feel free to comment, by the way! -- Joachim Attachment: IMG_8188-1.jpg (Downloaded 153 times)
|
||||||||||||||
| |||||||||||||||
| Posted: 01-05-2009 08:42 pm |
|
4th Post |
|
subwoofer Member
|
Trying to link in the pictures instead of having them as attachments.  Parked in front of the house 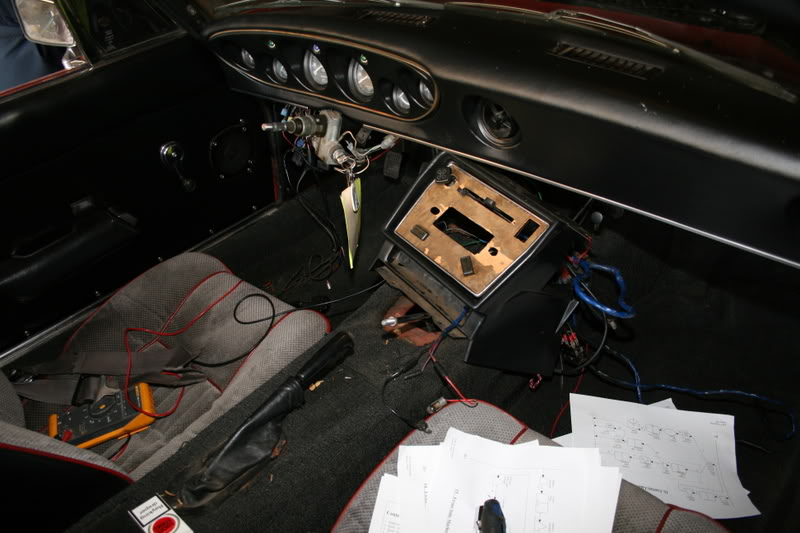 Debugging electrics  Shot rubber bushing 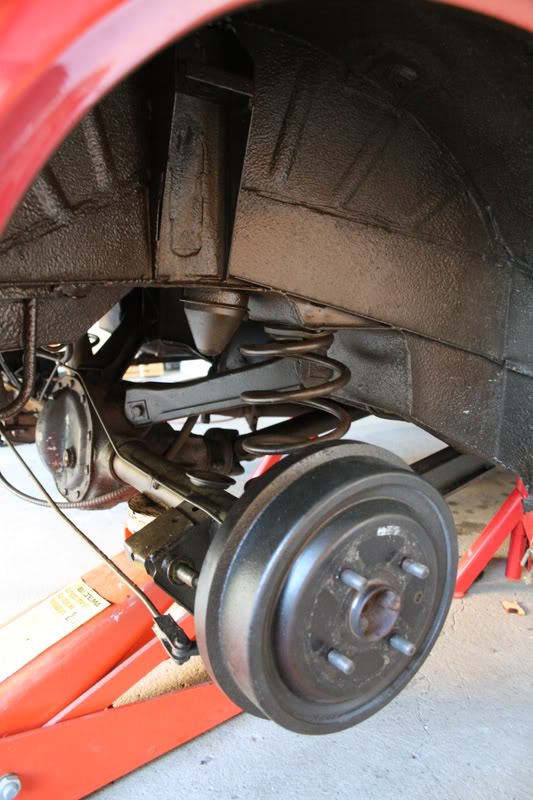 Disassembling rear suspension Winter in Norway can be rather cold, so insulating the garage has become a priority. No more work on the car until I'm able to heat the garage, but the moment is getting closer. First wooden paneling to make sure I can hang stuff from the wall wherever I want:  Then some gypsum boards to make it reasonably fire proof:  Everything is a bit of a mess, but it isn't easy to build around a car on axle stands... -- Joachim Last edited on 05-22-2020 06:43 am by subwoofer |
|||||||||||||
| ||||||||||||||
| Posted: 01-06-2009 08:34 am |
|
5th Post |
|
Harkes Member 
|
Nice Car! Keep up the good work!
|
||||||||||||||
| |||||||||||||||
| Posted: 01-10-2009 02:00 am |
|
6th Post |
|
pbahr Member 
|
Don't think you should be overheating. Suggest that you check the temperature with a thermometer or other gauge. Also, the JH uses a two stage Thermostat, not just any standard item. YELODOG
|
|||||||||||||
| ||||||||||||||
| Posted: 01-10-2009 06:50 am |
|
7th Post |
|
subwoofer Member
|
The overheating was caused by the old radiator, no doubt, so I had it rebuilt, after that I've had no problems at all. I understood what the problem was when I pointed the garden hose at the radiator while it was running, and the temperature didn't come down at all. Only a few vertical stripes on the radiator dried out quickly. The garage will hopefully be done (enough) to be heated up some time next week, I'll resume work on the car after that, wife and children permitting. -- Joachim
|
||||||||||||||
| |||||||||||||||
| Posted: 01-25-2009 05:02 pm |
|
8th Post |
|
subwoofer Member
|
I've been hard at work in the garage for the last two weeks, but nothing happening on the car yet, just the room around it. Last weekend Tonight, the garage is back in business. Floor is swept, walls and ceiling painted, electrics and lighting reinstalled. Now I can start working on the car again!  Viewed from the door  Opposite direction -- Joachim
|
|||||||||||||
| ||||||||||||||
| Posted: 02-22-2009 08:25 pm |
|
9th Post |
|
subwoofer Member
|
Working on the car again, I won't start any more work than I can finish by May 10th, I'll be ready for the Norwegian sports car rally at Øvrevoll that day. I've decided to leave the crossmember in for now, and only replace the bushings that can be removed without taking out the crossmember. Should still be a great improvement. Marine Clean works great for cleaning parts, and I hope the parts will look great after two coats of POR-15.  Parts after cleaning with Marine Clean  Spindle and steering arm after cleaning and Metal Ready  First coat of POR-15 applied I think I have identified the source of the slight contamination of the oil on the dipstick; A coolant leak at the thermostat follows a few flanges and drips down on the dipstick. Phew, hopefully no need to pull the engine yet! -- Joachim Last edited on 02-22-2009 08:26 pm by subwoofer |
||||||||||||||
| |||||||||||||||
| Posted: 02-25-2009 09:11 pm |
|
10th Post |
|
subwoofer Member
|
Two hour of trying, swearing, trying again, swearing some more before the parts fit like they should. The right rear corner is back together, you might say it's been a learning experience... The upside is that I'm not going to spend as much time on the other side. I haven't torqued the bolts down yet, but with SuperPro bushes, I can do that without weight on the wheels, right?  Right rear corner back together I had a bit of a fight with the Nylok nut on the top of the shock absorber, it spun the shock shaft rather than screw on. Pinching the rubber help quite a bit, but that is a hack in my book. Has anyone else had the same problem, or do you use a double M10 nut instead? -- Joachim
|
|||||||||||||
| ||||||||||||||
| Posted: 03-06-2009 08:45 pm |
|
11th Post |
|
subwoofer Member
|
Dismantling the suspension is almost done, cleaning parts as I go, but I will wait with painting till everything is cleaned and primed, keep the cost of paint brushes down. Fighting a bolt on the front lower left suspension arm, separate post for that in Suspension. I think this job was slightly overdue, judging by the radius rod bushing from the left side:  -- Joachim
|
||||||||||||||
| |||||||||||||||
| Posted: 04-02-2009 04:17 pm |
|
12th Post |
|
subwoofer Member
|
Just a little update. Progress is really slow at the moment, but it is happening. Prepping the rest of the suspension parts for paint, so a lot of part will soon be ready for assembly. I made a fool of myself today when removing the inner bushing from the front lower suspension arms. By mistake (I was in a bit of a hurry) I took the wrong receiver tube, didn't think more of it and proceeded to bend one arm ever so slightly (I do mean rather badly). I hope David Booth can come to the rescue, although I think I may be able to salvage the part if I really have to. Lesson learned! -- Joachim
|
|||||||||||||
| ||||||||||||||
| Posted: 04-13-2009 10:44 pm |
|
13th Post |
|
subwoofer Member
|
Finally got to paint most of the rest of the suspension parts today. Only parts not painted now are the lower wishbones. I never thought cleaning and preparing parts for paint could take that much effort!   -- Joachim Last edited on 04-13-2009 10:44 pm by subwoofer |
||||||||||||||
| |||||||||||||||
| Posted: 04-14-2009 01:29 am |
|
14th Post |
|
pbahr Member
|
You're doing great work. Thanks for the updates. Pete
|
|||||||||||||
| ||||||||||||||
| Posted: 05-01-2009 08:44 pm |
|
15th Post |
|
subwoofer Member
|
Back from Las Vegas last weekend, finally got some time to work on the car again. Putting it back together, fixing a few items here and there as I go. Left lower suspension mount in crossmember needs a bit of repair welding, the bolt has obviously rattled a bit at some stage.  Ouch! This used to be the left motor mount! -- Joachim
|
||||||||||||||
| |||||||||||||||
| Posted: 05-04-2009 09:16 pm |
|
16th Post |
|
subwoofer Member
|
Progress at last! Tonight, I was able to get some work done. Mounted most of the RHS front end last night, today I got new engine mounts in, new gaiters for the steering rack, lubed the steering rack (80W-90 gear oil, as per instructions elsewhere on the forum), mounted the master cylinder after fixing the leak due to a shoddy plastic casting, and welded up the enlarged bolt hole in the crossmember. May 10th is getting closer, but unless something unforeseen happens, I should be able to make it to the sports car gathering. Oh joy! -- Joachim
|
|||||||||||||
| ||||||||||||||
| Posted: 05-05-2009 09:48 pm |
|
17th Post |
|
subwoofer Member
|
More work done tonight. Right side front suspension done, left side more than half way. The new bushings are sometimes a bit difficult to mount, but I'm slowly learning some tricks. My little trick for getting the spring isolator mounted  Right side front suspension put together
|
||||||||||||||
| |||||||||||||||
| Posted: 05-09-2009 04:25 pm |
|
18th Post |
|
subwoofer Member
|
Dang! Road test last night, and suspension wise everything was great. What was not so great was that the coolant definately had oil in it, and there was a bit of light brown opaque oil on the dipstick. AFAIK, that is a blown head gasket, but given the total state of the engine, I think a swap is in order... Known issues with the current engine: - Oil pump is probably about to fail, takes a long time to prime - Oil leak from the crankshaft seal behind the flywheel - Leaking frost plugs in several places - Cross threaded plug hole on #4 I will call Lotusbits on monday, methinks... -- Joachim
|
|||||||||||||
| ||||||||||||||
| Posted: 06-07-2009 08:37 pm |
|
19th Post |
|
subwoofer Member
|
Current project state: stalemate... A "new" engine will be coming in from England in due time, but is likely to take at least another month before it arrives. I don't know yet if Mike at Lotusbits was able to demo an engine for ozzadavies yesterday when he was in Marton to pick up his car after an engine swap. Starting to fit the new soft top I got from Rejen Classics, fit seems fine. I will have to change a lot of the velcro on the frame, and manufacture a fastener or two before everything fits like it should.  Looks better already! -- Joachim
|
||||||||||||||
| |||||||||||||||
| Posted: 09-04-2009 02:43 pm |
|
20th Post |
|
subwoofer Member
|
Project state: Back on the priority list! The family barge is now fairly sorted (Project blog), thus releasing resources for Miss Jensen. Engine is shipped from England next week, will likely take 3 weeks before I get it. Getting an engine out of an Elite or Eclat, so I will have 9.5:1 compression and 45mm Dell'Ortos. Will do basic maintenance before fitting it, i.e. new oil seals at both ends of the crankshaft, new timing belt and tensioner bearings, new waterpump and a carb rebuild. The old engine will at some stage be rebuilt... Will have to fabricate the missing pieces for fitting the hood one of these days too.
|
|||||||||||||
| ||||||||||||||
| Posted: 09-23-2009 11:17 am |
|
21st Post |
|
subwoofer Member
|
The engine is now in transit, and should be with me within a week! I'll be replacing the old lump with a Spec 5 engine from a '78 Lotus Eclat. This translates to 45mm carbs with 36mm chokes, E cams and 9.5:1 compression. I really believe it will be a completely different beast to the torqueless wonder on Strombergs. Should be straight forward, just have to swap the sump and clutch (and possibly flywheel) over from the old engine. Will change the oil seal on the crankshaft while it is easily accessible, replace the water pump with a brand new unit, and of course rebuild the carbs so that it won't catch fire the first time I drive it. -- Joachim
|
||||||||||||||
| |||||||||||||||
| Posted: 09-24-2009 03:36 pm |
|
22nd Post |
|
Greg Fletcher Administrator 
|
Sounds like a plan, good luck with the new engine. I'd consider replacing/rebuilding the distributor as well. I have yet to see one that did not need the shaft rebushed.
|
|||||||||||||
| ||||||||||||||
| Posted: 09-24-2009 03:42 pm |
|
23rd Post |
|
subwoofer Member
|
The plan is really to stealth in a MegaSquirt for ignition control, should be able to hide it under the dash without too many noticing. I will have to add a VR pickup and a 36-1 toothed wheel to the front pulley, but not many people would notice. I would still be using the distributor, but only as a kind of "traffic director" for the sparks. I don't know if rebuilding the distributor is worthwhile in this case? Does the wear manifest itself as play (poor timing) or as an oil leak? -- Joachim
|
||||||||||||||
| |||||||||||||||
| Posted: 09-24-2009 03:52 pm |
|
24th Post |
|
Greg Fletcher Administrator
|
Yes, a sloppy shaft bushing will leak oil through the center. You'll also get a very noticeable "point float" at high speed driving that is not pleasant when your realize what it should really be like. An electronic ignition will help cover most all of that up, but in general it will be best to have the shaft to spec.
|
|||||||||||||
| ||||||||||||||
| Posted: 10-06-2009 05:43 pm |
|
25th Post |
|
subwoofer Member
|
Received the new engine today, pictures forthcoming as soon as all the kids are asleep. Can't wait to unwrap it, through the foil it looks like a nice and clean engine. Yiiiha!
|
||||||||||||||
| |||||||||||||||
| Posted: 10-06-2009 07:51 pm |
|
26th Post |
|
subwoofer Member
|
Here it is! Pallet as received this afternoon  Engine unwrapped  Box of goodies Will rebuild the carbs first, shouldn't take too many hours, then I'll install the engine. But first of all, I have to pull the old one. Maybe next weekend, have to change the gearbox on my Vanagon first...
|
|||||||||||||
| ||||||||||||||
| Posted: 11-06-2009 04:05 pm |
|
27th Post |
|
mnunes22 Member
|
Looks great! How did the shipping work out? Was it delivered to your door? What was the cost of shipping? I have seen several items at Lotus Bits that caught my eye, but hesitate at the shipping hassels to California. Looking forward to your post when you fire up the engine. Bill
|
||||||||||||||
| |||||||||||||||
| Posted: 11-09-2009 12:24 pm |
|
28th Post |
|
jcdean Member
|
Regarding shipping to the states, it is pricey. I would love to find a way to have items from Lotus Bits dropped off at the door. But, unless I am buying a very large anount of items the shipping becomes a very large part of the total cost. Back on thread, it looks great and wishing you great luck on the install.
|
|||||||||||||
| ||||||||||||||
| Posted: 11-09-2009 12:30 pm |
|
29th Post |
|
subwoofer Member
|
Thanks! Shipping was absolutely not free of charge, but I guess the cost to the States would be a whole lot more. I hope it will be worth it. Does anyone know how to safely relax the tension on the cambelt on engines with the automatic tensioner? My new engine has one, but it is naturally not covered in the service manual, I think they first appeared in '77. I really don't want to have parts flying in every direction after loosening the wrong bolt.
|
||||||||||||||
| |||||||||||||||
| Posted: 01-23-2010 09:13 pm |
|
30th Post |
|
subwoofer Member
|
Managed to get a few hours in the garage today. On the new engine: - Old water pump is off. - Dell'Ortos taken off, carb exteriors cleaned. On the car: - Air box and air filter out. - Disconnected (and plugged, just in case...) fuel line. - Cooling system drained. - Radiator taken out - Alternator taken out There was some brownish sludge in the bottom of the radiator and in the hoses, so I will clean everything out with dishwasher detergent before connecting things back up. -- Joachim
|
|||||||||||||
| ||||||||||||||
| Posted: 01-26-2010 08:04 pm |
|
31st Post |
|
subwoofer Member
|
Picture time: Sludge from bottom of radiator. Coolant was supposed to be clear blue. Time for some engine work...  Stripdown in progress. Oil cooler, hoses and bonnet off next.
|
||||||||||||||
| |||||||||||||||
| Posted: 03-21-2010 10:24 pm |
|
32nd Post |
|
subwoofer Member
|
Finally got some work done today. Checked valved clearances, and cleaned up and mounted Jensen-Healey valve covers on the new engine. Looking better already -- Joachim
|
|||||||||||||
| ||||||||||||||
| Posted: 03-22-2010 10:37 pm |
|
33rd Post |
|
subwoofer Member
|
And another successful evening. - Oil seals on both cams changed - New water pump installed - Front oil seal on crank changed - New timing belt and tensioner - General clean up as I go Finally getting somewhere! -- Joachim
|
||||||||||||||
| |||||||||||||||
| Posted: 03-23-2010 12:10 am |
|
34th Post |
|
pbahr Member
|
Joachim, I'm taking a close look at your new engine and note that it seems to have the old standard square cambelt sprocket grooves. In my experience, with all that you have put in that car, I would definetly change to the newer Lotus "half moon" cam belt and sprockets. You will never have to worry about the belt jumping a notch nor breakage. Yes, it will cost you a bunch of Kroner, but it is cheap insurance. The other cheap (relatively) insurance would be to add an Accusump (3qt if you will be putting the car on the track........) Pete
|
|||||||||||||
| ||||||||||||||
| Posted: 03-24-2010 09:58 pm |
|
35th Post |
|
subwoofer Member
|
pbahrI'm taking a close look at your new engine and note that it seems to have the old standard square cambelt sprocket grooves. You are absolutely right, it will be running with square teeth for now. I consider this engine a temporary measure, I am planning to rebuild the other one with a few upgrades. Accusump is probably a good idea, though! Tonight brought some real progress. Oil cooler is out and filled with diesel for the second time. The oil in the cooler was STICKY, in fact not quite unlike molassis (sp?). After draining it once, the diesel would hardly go in. Left it for an hour in front of a heater fan, and by then the diesel had started doing its thing, what came out then was roughly like 5W-30 oil at the same temperature. Leaving it overnight, then it should be nice and clean after blowing it out with shop air. I think I will be able to get the old engine out on Friday. All that's missing now is to jack the car, loosen up the exhaust and lift the bugger out. -- Joachim Last edited on 03-24-2010 10:15 pm by subwoofer |
||||||||||||||
| |||||||||||||||
| Posted: 03-26-2010 11:01 pm |
|
36th Post |
|
subwoofer Member
|
"The lift" is underway, but the exhaust has beaten me for tonight. After a few lift attempts, I think I finally found all the bell housing bolts, so the engine is free from the gearbox, but still not free from the exhaust. It's messy work, since the old engine was quite busy "marking territory". I think I'll have to bust more knuckles detaching the exhaust manifold from the head tomorrow. It seems clear that the manifold won't let go of the rest of the exhaust system anytime soon, so I won't waste hours trying to separate the two. Just hoping the manifold comes off easily, access is a b%@ch. I'll prop some wood under the left motor mount, hopefully that will enable me to get all the nuts off.
|
|||||||||||||
| ||||||||||||||
| Posted: 03-27-2010 01:08 am |
|
37th Post |
|
pbahr Member
|
Joachim, Yes, access to the manifold bolts is much easier if you jack up the front of the engine...... YELODOG
|
||||||||||||||
| |||||||||||||||
| Posted: 03-27-2010 02:20 pm |
|
38th Post |
|
subwoofer Member
|
THE ENGINE IS OUT! Tying down right side of engine to tilt it while lifting to gain access to exhaust studs  Engine on its way out   Oily mess   Bell housing before and after quick cleanup It is obvious that the major leak has been the oil seal behind the flywheel, but surprisingly, the clutch looks clean! I'm also happy I have a new lower steering column bush and new U-joints. The bush has about 3mm play in it and the joints were not the best, no wonder the steering was a bit on the sloppy side. -- Joachim
|
|||||||||||||
| ||||||||||||||
| Posted: 03-27-2010 11:27 pm |
|
39th Post |
|
subwoofer Member
|
And here is the reason for the oil leak: The flywheel has been rubbing on the oil seal, so the is no seal - only oil... -- Joachim
|
||||||||||||||
| |||||||||||||||
| Posted: 04-16-2010 10:00 pm |
|
40th Post |
|
subwoofer Member
|
The project is progressing. Old lower steering column bush, not much left 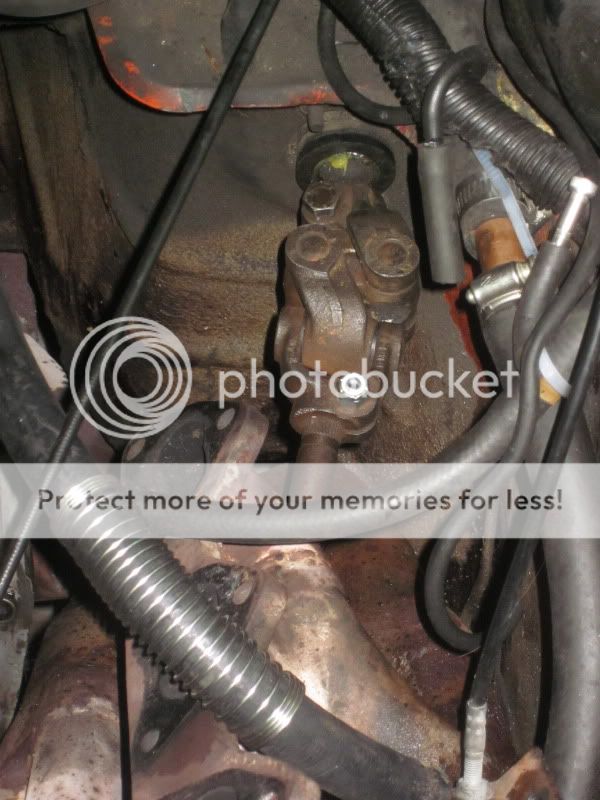 New bush fitted, along with a second hand U-joint  Modified oil pan and one rebuilt carb fitted I think the modified sump turned out nice, the welder did some great work. He normally works with equipment for offshore oil rigs, and it shows.
|
|||||||||||||
| ||||||||||||||
| Posted: 04-26-2010 09:30 pm |
|
41st Post |
|
subwoofer Member
|
Shameless plug time: Pete Bahr (username pbahr) makes some good stuff. I just installed his clutch lever boot kit, if it weren't for the oily mess on everything, it would have been a 5 minute job to install. Perfect fit!  Clutch lever boot installed The ventilator fan was broken, so I ordered one from David Booth. Only shame was that the fan must have been the very first item installed into the empty body shell, since I had to tear everything apart to get to it. Upside is that I found quite a few snags hidden under the dash, now all the hoses go to the right places, and I think all the instrument lights should work again. 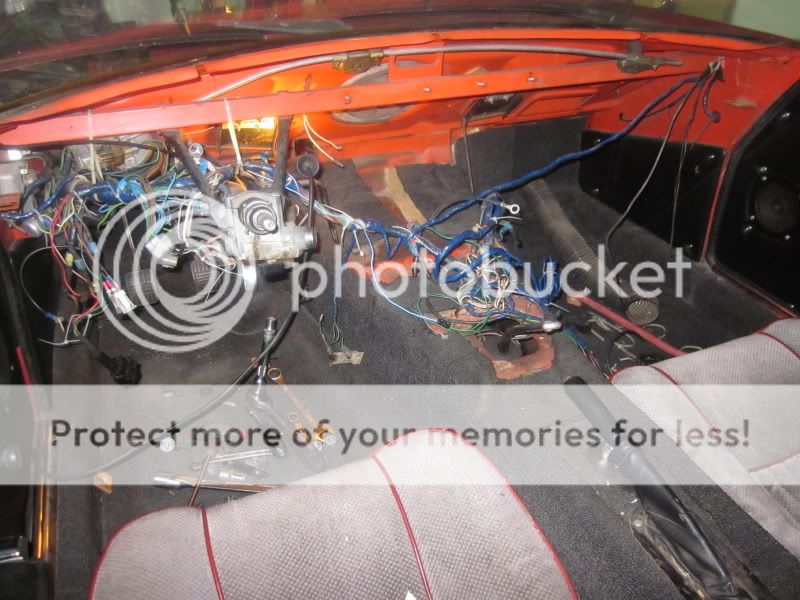 Teardown to get to heater fan -- Joachim Last edited on 04-27-2010 06:07 am by subwoofer |
||||||||||||||
| |||||||||||||||
| Posted: 05-02-2010 06:34 pm |
|
42nd Post |
|
subwoofer Member
|
Engine back in the car today! Spent close to two hours just getting the exhaust manifold back on and all the nuts tightened. Could the designer of said manifold please stand up? <loads shotgun> Used a slightly modified VW clutch alignment tool (~5$, had one in my toolbox) to align the clutch. Pilot bearing size seemed the same, so I just rolled electrical tape around the spline section until it was a snug fit in the JH clutch splines. Got it true on the first attempt, no sweat. 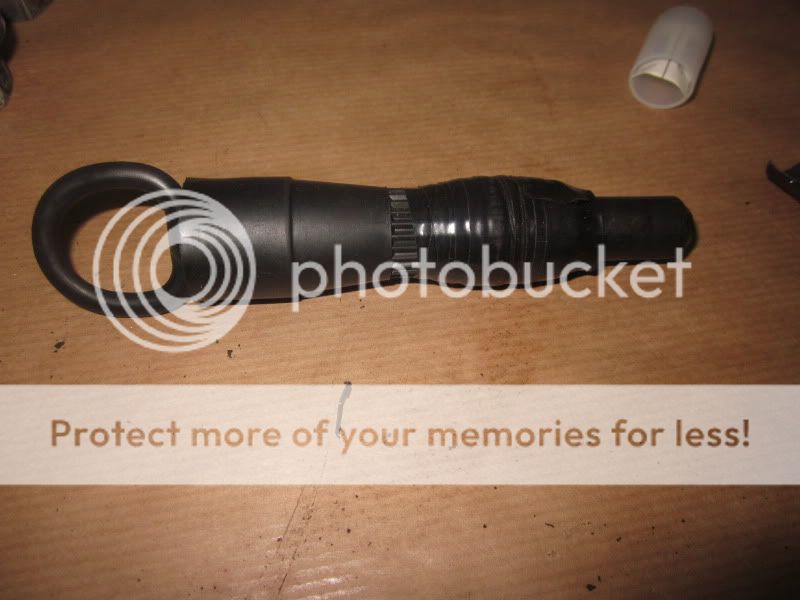 "Modified" VW clutch alignment tool Anyway, I couldn't resist having a go at the weld ridges inside the manifold before bolting things together. I only ground the welds down to the pipe surface, yet the area increase was rather dramatic. If it really matters for performance? I have no idea. It felt good doing it.   Before and after shots I think the Eclat sump may just have cleared the crossmember in unmodified state, but after modifying it, there were no problems at all.  Sump to crossmember clearance -- Joachim
|
|||||||||||||
| ||||||||||||||
| Posted: 05-07-2010 09:42 pm |
|
43rd Post |
|
subwoofer Member
|
She runs! Had a quick run to check for cooling and (lack of) leaks, so far so good. I'll balance the carbs tomorrow and see if I can get the idle mixture about right. At the moment, she hesitates and jerks a bit off idle, but once on cam: WOW! Dell'Ortos and Strombergs simply don't compare. Throttle response on cam is incredible! -- Joachim
|
||||||||||||||
| |||||||||||||||
| Posted: 05-08-2010 07:34 pm |
|
44th Post |
|
subwoofer Member
|
Showstopper! F&%#, f%&#, f"&%, f¤%#ety f#¤%... Massive oil leak in somewhere at the rear of the engine. lost around a liter of oil in not so long time. The engine side of the flywheel is wet, the bellhousing is full of oil. The clutch isn't slipping when I drive it in and out of the garage, but that may not mean much. Did I do something wrong when I changed the rear oil seal, or could there be some other problem? I am wishing I had left that end of the engine alone... I am figuring that dropping the gearbox will be the faster course of action to inspect and fix this, rather than pulling the engine again, just fitting the exhaust manifold took close to two hours and a lot of sweat. What do people here think? -- Joachim
|
|||||||||||||
| ||||||||||||||
| Posted: 05-09-2010 01:27 am |
|
45th Post |
|
pbahr Member
|
You can pull the bellhousing off and get to the rear of the engine - problem is that you will have to jury rig a support for the rear of the engine or it will just hang on the front engine mounts. Just putting a block under the pan won't work, cause you will need to remove the pan to look for the problem. Don't forget to remove the tailpipe from the header.......... YELODOG
|
||||||||||||||
| |||||||||||||||
| Posted: 05-09-2010 06:47 am |
|
46th Post |
|
subwoofer Member
|
The tailpipe to header connection is really the problem, since separating the two is impossible without an angle grinder. I guess I'll hook up the engine hoist to prevent it from tipping to the rear, then remove the bellhousing. Problem will be to get to the bolts at the top of the bellhousing, that area is a bit cramped... -- Joachim
|
|||||||||||||
| ||||||||||||||
| Posted: 05-25-2010 10:16 pm |
|
47th Post |
|
subwoofer Member
|
Problem found: Rear oil seal. There is no doubt, thankfully the clutch survived. I have a new one ready to install, this time I will not take off the rear cover to install the seal if I can avoid it. Tomorrow... -- Joachim
|
||||||||||||||
| |||||||||||||||
| Posted: 05-29-2010 09:51 pm |
|
48th Post |
|
subwoofer Member
|
She runs - again! Did some heavy lifting today, the gearbox came in in only 3 hours. It was a lot easier getting it out... At least I have eliminated all leaks! Now for today's pictures. A few of them are a bit oldish, but still valid. 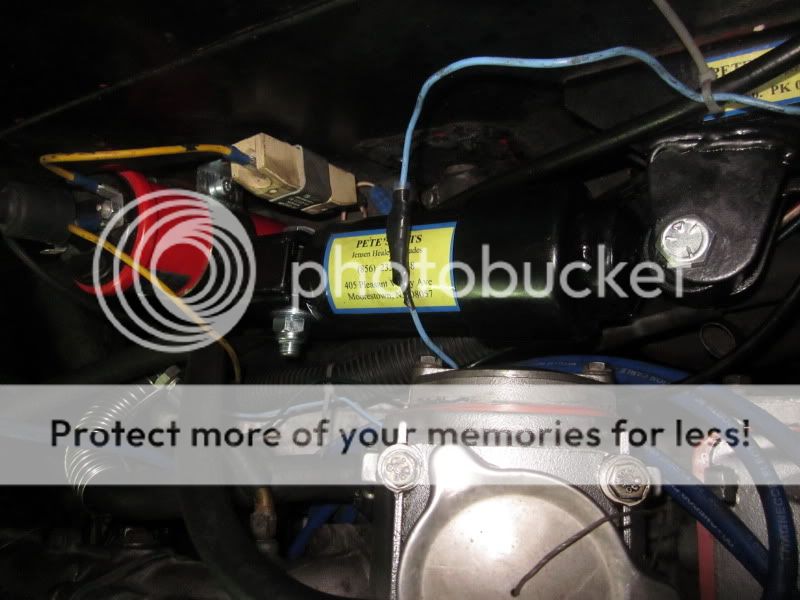 Pete's kits' engine damper, please don't mind messy wiring  Syncing carbs was a breeze with the CarbTune tool  Gearbox cleaned up with Marine Clean and a jet washer, done in 15 minutes  The culprit  Yours truly on a test drive this afternooon  Two of my main expenditures...  Country road in spring, less than 10 miles from home A few minor tweaks are in order, but we are definitely getting there! -- Joachim
|
|||||||||||||
| ||||||||||||||
| Posted: 06-06-2010 09:56 pm |
|
49th Post |
|
subwoofer Member
|
Ms. Jensen is running fairly well, so time to tackle a few other long standing issues. The hood was stripped off a year ago, so time to get the new one on. I have been a bit reluctant to start this operation, brand new territory for me. Had to make a bracket for the velcro strips, one was missing  Step one, glue hood to frame rail  Fabric tucked under the rail, starting to look better. A bit dusty, though -- Joachim
|
||||||||||||||
| |||||||||||||||
| Posted: 06-09-2010 09:41 pm |
|
50th Post |
|
subwoofer Member
|
Nicked the sewing machine from my wife last night, it was time to renew the velcro bands that holds the hood in place. New pieces to the left, old to the right I hadn't touched a sewing machine in 20 years or so, but it's a bit like riding a bicycle, it comes back really fast. I also (re)installed the mechanical fan today, running with no fan while waiting to get around to ordering an electric fan turned out to be a bad idea. It would overheat in no time in residential areas, and the misfires that followed were no fun. I'll still get an electric fan, but for now the mechanical one will do. -- Joachim
|
|||||||||||||
| ||||||||||||||
| Posted: 07-26-2010 07:49 pm |
|
51st Post |
|
Boz Member
|
What a fabulous job you're doing!!!
|
||||||||||||||
| |||||||||||||||
| Posted: 03-04-2011 09:07 pm |
|
52nd Post |
|
subwoofer Member
|
Short update: Haven't done much on the car lately, but tonight I finally got around to setting the ignition after installing a Pertronix IgnitorII unit. Only a few drops of oil under the car after 3 months of standing still, not bad at all. Fired right up, and the timing seemed a lot more stable than with points. Once the roads dry up in a months time it is time to see if the caliper I got from Martin Shirley is better than the one I had. The left caliper kept sticking, I had it apart three times, and it would be fine for three stops, then start sticking again, I really hope the new caliper is better. It was installed and ready the second weekend of November, exactly in time to watch the snow fall... Next up: Complete rewire of the whole car, getting a new universal loom from England. BTW: Thanks, Boz. I don't know if it is that great, but at least both I and the car are getting better! -- Joachim
|
|||||||||||||
| ||||||||||||||
| Posted: 03-16-2011 07:18 pm |
|
53rd Post |
|
subwoofer Member
|
Spring is coming closer, and the garage isn't as cold as it has been for the last months - time to get some minor details fixed, but first a little peek at outdoor conditions: Yup, that is 4" of compact ice in my drive! Picture taken three days ago.  New door seals, both sides  Universal washer bottle installed instead of the knackered old one  Stainless boot trim finally installed -- Joachim
|
||||||||||||||
| |||||||||||||||
| Posted: 03-30-2011 08:25 pm |
|
54th Post |
|
subwoofer Member
|
Not too much happening, except trying to change springs and dampers on the Mondeo... The new wiring loom should arrive in less than two weeks, until then I'll just fix a few small things here and there. Took her out for a spin today, the roads are finally clear and I had to check if the brake caliper I got from Martin Shirley was better than the old one, and that the Pertronix worked properly. I am happy to say that she runs better than ever, and finally the brakes are pulling straight! Nice to ride in an open car again, but a bit chilly on my hands since I forgot to bring gloves - it was around 5C/40F so it is finally getting warmer!  Sun setting at 7:20PM while out for a spin -- Joachim
|
|||||||||||||
| ||||||||||||||
| Posted: 05-01-2011 09:02 pm |
|
55th Post |
|
subwoofer Member
|
The Norwegian Sportscars Meet is next weekend, this year I'm sure I'll make it! She runs well, and I'm not going to do anything electrical or mechanical this week. So, to pass time I figured it would be time to tackle the shoddy paint job. I bought a rotary polishing machine last year and didn't have too much luck since I was using Turtle Wax cr*p. Saturday I went and got myself a 3M kit (fine rubbing, polish and sealer) and tonight I went at it, armed with loads of self confidence and instructions from Youtube. I only did the boot lid, that took me a little over an hour. It didn't look all that bad to begin with, you think?  Roughly same angle after rub, polish and sealer  The big reveal! Look at the difference between the untreated and the polished paint! This was fun, I'll do the rest of the car over the rest of the week. Today's lesson: paint can be restored, even by inexperienced people like me! -- Joachim
|
||||||||||||||
| |||||||||||||||
| Posted: 05-01-2011 10:27 pm |
|
56th Post |
|
pbahr Member
|
Fantastic ! ! ! ! YELODOG
|
|||||||||||||
| ||||||||||||||
| Posted: 05-02-2011 01:29 am |
|
57th Post |
|
chiromaster Member
|
IMPRESSIVE!
|
||||||||||||||
| |||||||||||||||
| Posted: 05-02-2011 06:58 pm |
|
58th Post |
|
subwoofer Member
|
Thanks guys! I'm just about ready to do today's stint, it is really exciting to see how good it becomes. I've got to watch out before the detailing bug gets me! -- Joachim
|
|||||||||||||
| ||||||||||||||
| Posted: 05-02-2011 09:35 pm |
|
59th Post |
|
subwoofer Member
|
Just finished the bonnet, looking good so far. For those interested in trying for themselves, this instructional video is easy to follow. The only thing he doesn't really mention is that you should have the power cord over your shoulder while working so it doesn't rub on the side of the car. http://www.youtube.com/watch?v=vMB8BxsUi6E&feature=related -- Joachim
|
||||||||||||||
| |||||||||||||||
| Posted: 05-09-2011 06:40 pm |
|
60th Post |
|
subwoofer Member
|
I actually made it this year! This year, two Jensen-Healeys, a C-V8, an Interceptor convertible, an Interceptor Coupé, three-four Interceptors and an FF made up the Jensen contingency. On the way hope I found a few tunnels with very little traffic so I could open the taps properly and get a proper soundtrack!  After coming back yesterday, nice and shiny The day wasn't entirely uneventful though. When I was going to drive the car back into the garage, the starter had packed in. Could be a problem caused by the Prince of Darkness, but I haven't had time to investigate. -- Joachim
|
|||||||||||||
| ||||||||||||||
| Posted: 05-10-2011 01:01 am |
|
61st Post |
|
pbahr Member
|
Looks absolutly fantastic ! ! ! !
|
||||||||||||||
| |||||||||||||||
| Posted: 05-10-2011 07:54 pm |
|
62nd Post |
|
Dakota123 Member
|
Beautiful car. Nice job you've done with it. Mike
|
|||||||||||||
| ||||||||||||||
| Posted: 06-28-2011 08:54 pm |
|
63rd Post |
|
subwoofer Member
|
Latest development, this arrived: Full new wiring loom from Premier Wiring Systems. Looks good, all Lucas colours, all necessary hardware included,the price was right, but service was a little slow. I won't install it till the season is over, but it should take care of any remaining electrical issues. -- Joachim
|
||||||||||||||
| |||||||||||||||
| Posted: 07-01-2011 03:31 am |
|
64th Post |
|
Mason Jones Member 
|
Nice! I'm looking forward to seeing how installation of the new wiring harness works out. I may have missed it...are you installing a modern fuse box as well?
|
|||||||||||||
| ||||||||||||||
| Posted: 07-01-2011 03:37 am |
|
65th Post |
|
pbahr Member
|
Well, I HOPE SO ! ! ! !
|
||||||||||||||
| |||||||||||||||
| Posted: 07-01-2011 04:30 am |
|
66th Post |
|
subwoofer Member
|
:-) The new loom has 9 fused circuits, all of them are the modern blade type fuses. It also has a new relay holder for the flasher/hazard relay, it really looks quite complete. -- Joachim
|
|||||||||||||
| ||||||||||||||
| Posted: 07-01-2011 05:11 am |
|
67th Post |
|
Mason Jones Member
|
I can hear the ghost of Mr. Lucas saying, "More than 3 fuses is a waste!" Seriously, it's inspiring to see yours (and other JH projects) this far along! Mason
|
||||||||||||||
| |||||||||||||||
| Posted: 04-26-2013 07:07 pm |
|
68th Post |
|
subwoofer Member
|
It has been quiet from me for quite a while, Megasquirting the family barge has been the priority for a while. The new loom is still on the shelf, did not get around to installing it this winter - which was very cold and very long, btw. I did, however, manage to get the new oil cooler in place. Mocal sandwich plate with thermostat and a fresh oil cooler bought from a local supplier, hoses built at the local industrial hose shop.  New parts on garage floor  New sandwich installed  New cooler installed, no modifications to mounting points necessary The hose shop did not want to put angled connectors on both ends of the hose, thus the 45 degree adaptors you see in picture #2. Next up are probably a set of Revolution 5-spoke wheels and a brake upgrade, both can be done without decommissioning the car for more than a week. Summer is short around here... -- Joachim
|
|||||||||||||
| ||||||||||||||
| Posted: 05-05-2013 08:50 pm |
|
69th Post |
|
subwoofer Member
|
Seconds from disaster! One of the fittings on the oil cooler sandwich plate had loosened itself. It held up when I pulled out of the garage, and since it was the first drive for the season I headed for the closest service station while keeping an eye on the oil pressure gauge. I still had good oil pressure when I arrived, but I made sure to look under the car for leaks. And boy, did I find one! A service station no longer has any tools, those days are long gone, so I had to call the Mrs for a tow home. Fairly eventless, only snapped the tow rope twice... >:-> And BTW: I ordered the full disc brake conversion kit from HiSpec today, looking forward to getting some real brakes on it! -- Joachim Last edited on 05-05-2013 08:51 pm by subwoofer |
||||||||||||||
| |||||||||||||||
| Posted: 08-24-2013 07:06 pm |
|
70th Post |
|
subwoofer Member
|
Not too much driving this summer, been way too busy on other arenas. But, I do get to fix the occasional something. The fire extinguisher had been lying in the passenger footwell for way too long, it had better been fastened properly. So armed with a pair of hose clamps, it was time to deal with it.  Mounting bracket attached to roll bar with hose clamps  All done The brake conversion is ready to be installed, I just have to get a new set of wheels first. 285mm ventilated and grooved discs will not fit under the stock wheels... -- Joachim
|
|||||||||||||
| ||||||||||||||
| Posted: 10-09-2013 08:07 pm |
|
71st Post |
|
subwoofer Member
|
... and here they come! Picked the new rims up today, so I just had to try them on to see what they will look like once properly on the car. Looks a bit odd at full droop and with no tyre, but WOW! - what an improvement! Since Gordon (who had brake kit #1 made at HiSpec, I believe I have kit #2) had clearance issues on the rears, I just had to make sure I had made the correct calculations. No clearance issues here!  -- Joachim
|
||||||||||||||
| |||||||||||||||
| Posted: 10-11-2013 08:21 pm |
|
72nd Post |
|
subwoofer Member
|
And the wheels are on the car! Brakes will go on after the season ends, still a few weeks left, I hope, but winter is approaching quickly! -- Joachim
|
|||||||||||||
| ||||||||||||||
| Posted: 10-11-2013 09:47 pm |
|
73rd Post |
|
Dakota123 Member
|
Looks terrific! A lot of progress you've made.
|
||||||||||||||
| |||||||||||||||
| Posted: 10-13-2013 04:26 pm |
|
74th Post |
|
subwoofer Member
|
Thanks! Had to have her out for some photos today.   -- Joachim
|
|||||||||||||
| ||||||||||||||
| Posted: 11-17-2013 01:41 am |
|
75th Post |
|
pjg55 Member
|
Looks fabulous !! Great watching your progress and sharing.
|
||||||||||||||
| |||||||||||||||
| Posted: 06-17-2014 10:30 am |
|
76th Post |
|
subwoofer Member
|
MoT today, no points on her! It's time for a brake refreshment, I now have 2 years to get the paperwork in order before the next MoT. Worst case scenario, I will have to put the old brakes back on for the next one. Oh well, no need to worry about that yet. -- Joachim
|
|||||||||||||
| ||||||||||||||
| Posted: 06-18-2014 10:16 am |
|
77th Post |
|
subwoofer Member
|
For those curious as to why I didn't swap the brakes over before the MoT; There was a risk that I would have to put the stock wheel back on to make it pass. If that were to happen and I already had the new brakes on, the stock wheels wouldn't fit and I would have three times the work on my hands. -- Joachim
|
||||||||||||||
| |||||||||||||||
| Posted: 06-18-2014 12:14 pm |
|
78th Post |
|
Brett Gibson JH5 20497 Member
|
Joachim, what we do for a vehicle inspection here in New York State is a joke compared to what you go thru... Brett
|
|||||||||||||
| ||||||||||||||
| Posted: 06-18-2014 04:58 pm |
|
79th Post |
|
subwoofer Member
|
For those who wonder, here is a link to the Norwegian MoT inspection guidelines: http://www.vegvesen.no/_attachment/563937/binary/910948?fast_title=Revidert+kontrollveiledning+gjeldende+fra+31+12+2013.pdf Not all of it is relevant to passenger cars, thankfully...
|
||||||||||||||
| |||||||||||||||
| Posted: 06-18-2014 07:56 pm |
|
80th Post |
|
gmgiltd Member
|
In France the equivalent is the 'control technique' - first one after four years and every two years thereafter. It does not apply to bikes so you can ride on baldy tyres with no shock absorbers - but you are still restricted to a maximum of one hundred horsepower. I believe the timing is the same as Norway. In the UK first MOT test is after three years and every year after that for cars and bikes - no power limit. MOT testing is linked to DVLA (Drive Vehicle Licensing Authority) as is insurance and road tax. There are traffic cameras with automatic number plate recognition all linked to DVLA. If you are recorded on the road without valid insurance, MOT or road tax the court summons will be sent to your home address.
|
|||||||||||||
| ||||||||||||||
| Posted: 06-19-2014 11:42 pm |
|
81st Post |
|
Jensen Healey Super Moderator 
|
Do they also have speed cameras in France? I'll be driving there this summer. Kurt
|
||||||||||||||
| |||||||||||||||
| Posted: 06-20-2014 06:42 am |
|
82nd Post |
|
gmgiltd Member
|
Certainly do but we are getting off topic on Joachim's great job
|
|||||||||||||
| ||||||||||||||
| Posted: 06-20-2014 06:54 am |
|
83rd Post |
|
answerman Member
|
Yeah, I feel for you guys. In Wisconsin we don't even have inspections. The state never even needs to see the car, you can just go down to the DMV and register it and you're legal.
|
||||||||||||||
| |||||||||||||||
| Posted: 06-26-2014 08:25 pm |
|
84th Post |
|
subwoofer Member
|
Finally got a few hours to work on the car - home alone for a few days. Yiiihaw! Right front as it used to be  Dust shield off, bracket installed  Size difference  Wheel back on for test fit :-) I just discovered that I didn't take any pictures with the new brakes on and no wheel, will fix that tomorrow. I will have to run new hard lines to the brake distributor since the threads on the HiSpec braided lines and the hard line didn't match. No biggie - I have done that sort of thing before, just have to get the correct fittings. Also, I had to improvise a slight bit to mount the discs, the mounting flange is thinner than the stock disc, hence the bolts were too long. I play jazz music - improvising is part of the game... :-) -- Joachim
|
|||||||||||||
| ||||||||||||||
| Posted: 06-28-2014 08:01 am |
|
85th Post |
|
subwoofer Member
|
As promised: Got the front brakes all buttoned up last night, had a quick road test before bedtime. I AM IMPRESSED! The difference in stopping power was immense right off the bat! I will let the brakes settle a little bit before punishing them hard, but this was really confidence inspiring. -- Joachim
|
||||||||||||||
| |||||||||||||||
| Posted: 06-28-2014 08:16 am |
|
86th Post |
|
gmgiltd Member
|
Hi Joachim, Glad about that. On the rears you will need to make up a spacer to replace the original back plate as well as longer studs because of the difference in thickness between the drum and disc face. The original Jensen wheel nuts grip further down the thickness of the wheel than the taper type. Gordon
|
|||||||||||||
| ||||||||||||||
| Posted: 06-28-2014 11:10 am |
|
87th Post |
|
subwoofer Member
|
Thanks for the tip, Gordon! What length bolts did you get? -- Joachim
|
||||||||||||||
| |||||||||||||||
| Posted: 06-28-2014 12:39 pm |
|
88th Post |
|
gmgiltd Member
|
Hi Joachim, Got the studs from HiSpec listed on the invoice as 'wheel stud 7/16" +13mm. You may also need the following which I got from Merlin motorsport SKT-M8-25 Socket cap screws and K-Nut-M8 for the half shaft retainer. You will also need a 3 way brake union as you will not be using the double fitting on the wheel cylinder. I made brackets out of 62mm exhaust clamps to mount the hard pipe/flexi away from the spring base and used a short flexi to the rear calipers - hard piped from the 3 way union. Gordon
|
|||||||||||||
| ||||||||||||||
| Posted: 06-28-2014 02:14 pm |
|
89th Post |
|
subwoofer Member
|
Will have to check package contents, they may be in there... Good thing I just got myself a 20 ton hydraulic press, makes installing stuff like this child's play. M8 bolts and nuts are plentiful in bags and boxes in my garage. Taking your tip on the exhaust clamps, may go that way as well, but have been seriously considering running hard lines all the way from the T-piece. -- Joachim
|
||||||||||||||
| |||||||||||||||
| Posted: 06-28-2014 06:54 pm |
|
90th Post |
|
subwoofer Member
|
No lug bolts in the kit I received, will have to get some. My local parts pusher has 7/16"x43mm bolts from Grayston in stock, will order tomorrow. -- Joachim Last edited on 06-28-2014 06:55 pm by subwoofer |
|||||||||||||
| ||||||||||||||
| Posted: 06-28-2014 07:06 pm |
|
91st Post |
|
gmgiltd Member
|
Just watch out how far the knurled bit sticks out beyond the half shaft flange - you may have to counterbore the discs to get them to sit flush if they protrude. Gordon
|
||||||||||||||
| |||||||||||||||
| Posted: 09-07-2014 11:21 am |
|
92nd Post |
|
subwoofer Member
|
Swapped starters today. My patience with the old Lucas starter was finally worn through when I, due to a slight brain fart, managed to get myself in a situation where I was stuck in stop-and-go traffic with a car running too rich at idle. So naturally it stalled and the Ghost of Lucas reared its ugly head. Starter jammed, pop the bonnet, wait for things to cool down. Needless to say, this was NOT on a dual carriageway... So I bought a brand new 1.2HP starter from http://www.britishstarters.com, after the usual squabble with customs (they never seem to be able to spell my name while checking for authorization to process items through customs), I was finally able to pick it up at the local post office.  The old starter before removal  The old and the new  New starter installed Of course, I was almost able to install the new starter without completely removing the air box, but alas, off it had to come. So the whole operation took 1 hour instead of 30 minutes as originally intended. -- Joachim
|
|||||||||||||
| ||||||||||||||
| Posted: 05-01-2015 03:28 pm |
|
93rd Post |
|
subwoofer Member
|
Time to grab the bull by the horns and get something done again. Been way too busy playing music, driving the offspring around, working on plans for renovating the house, the list of excuses just goes on... Time for rear brakes! After a lot of swearing and head scratching, I came up with this contraption for pulling the halfshafts out:  I could then get rid of the old backing plate and put the halfshaft back in:  Then I realized what Gordon (gmgiltd) was on about when talking about when he said he had to make up a 3mm spacer. The bearing retainer plate can't be secured without distorting it without the backing plate. The backing plate is 2.5mm thick but with a paper gasket. I found the front plate from an old amplifier and started cutting:  While I was at it, I found that it was time to open the rear end and change the old. Oh boy, that smelled! The oil was dark brown and thick, so a change was about time:  More to come, now I have a family to feed... -- Joachim Last edited on 05-01-2015 03:31 pm by subwoofer |
||||||||||||||
| |||||||||||||||
| Posted: 05-01-2015 06:54 pm |
|
94th Post |
|
Screenplay Member
|
Joachim, I've been a JHPS member for nearly two years now and have seen your posts from time to time but until today had not seen the entirety of your work going back five years. Great job on the car and the blog; the photos are of great quality and help immensely. Keep up the good work. Clinton
|
|||||||||||||
| ||||||||||||||
| Posted: 05-01-2015 10:03 pm |
|
95th Post |
|
subwoofer Member
|
Thanks for the encouragement, Clinton! You know what they say, pictures or it never happened... And with respect to quality, almost all of them are taken with an iPhone, no fancy equipment. I'm getting there with the rear end now:  Working only with basic hand tools, drilling out the rough shape of the large hole  Some elbow grease later, the finished article  Caliper mount point in place, halfshaft installed again -- Joachim
|
||||||||||||||
| |||||||||||||||
| Posted: 05-03-2015 12:32 pm |
|
96th Post |
|
subwoofer Member
|
Some more work done. Adjusted the holes in the brackets by about 2mm  One side mocked up, just have to change the lug bolts before I set things up permanently  Gunk! This is what came out of the diff... No need to tell who forgot to follow up on the lug bolts? But now they are ordered. The originals are 35mm, the new ones as 43mm, that should add more than enough turns for each nut. With the current bolts I have 5 turns from contact to tight, with the new ones I should have about 12. -- Joachim
|
|||||||||||||
| ||||||||||||||
| Posted: 05-04-2015 10:55 am |
|
97th Post |
|
subwoofer Member
|
Ran out of things to do on the brakes before I have the halfshafts back in permanently, so next in line was to get the seats out for some cleaning and treasure hunting underneath. I never did this when I got the car. The driver side seat had done half the job on its own already, both bolts on the left runner had worked themselves out. Passenger side is a bit more difficult, I think I am able to reach the front two bolts - just, then I will have to employ the slide hammer again to move the seat forward. It is rather stuck, and I am unable to see why.  Nothing exciting found, just a lot of dirt -- Joachim
|
||||||||||||||
| |||||||||||||||
| Posted: 05-13-2015 05:23 am |
|
98th Post |
|
subwoofer Member
|
Project stalled for a few days while waiting on parts (not that I haven't been busy on other arenas). I want to get the brakes done before moving on, but HiSpec had sent me pads for the wrong calipers - something I didn't catch until trying to fit them Friday night. I have managed to find the correct pads locally, hopefully I'll be able to bleed the brakes tonight. -- Joachim
|
|||||||||||||
| ||||||||||||||
| Posted: 05-19-2015 06:23 am |
|
99th Post |
|
subwoofer Member
|
Nothing ever comes easy... Turns out the hub on the Revolution wheels is larger in diameter than the hub of the discs, so some clearancing was in order. The wheels are turning smoothly now. Getting the right pads weren't easy either, turns out the pads listed for the Ultralite calipers are too deep for this application, so I had to read through a lot of pages of brake pad catalogue to find something that fit. Now I just have to get the handbrake up and running, but that will not hinder me from testdriving her tonight. Weather permitting, of course. -- Joachim
|
||||||||||||||
| |||||||||||||||
| Posted: 05-19-2015 06:54 pm |
|
100th Post |
|
subwoofer Member
|
Back from the test drive, successful-ish! Still have some rubbing between caliper and rim on the right rear, but that's just a five minute job to fix. The hub moves about a bit when driving, the bearings are not what they once were, I think. More annoying is that it seems to load up at warm idle, then suddenly quits. Getting her running again after that is to say the least difficult. I will have to figure out a way to stealth mount a set of injectors in the airbox. The clutch - or rather the throwout bearing - is on its last knees. -- Joachim
|
|||||||||||||
| ||||||||||||||
| Posted: 07-31-2015 04:22 pm |
|
101st Post |
|
subwoofer Member
|
My prayers may have been answered! https://www.facebook.com/classicfordmag/posts/927284433971729 https://www.youtube.com/watch?v=9WD8_4xhgOg&list=UUJfLna8jgGWD2466yARk8DA Northampton Motorsport has created the DCOi carb throttle body, making it appear that a set of DCOEs are installed, completely hiding the TPS and injectors inside. Somewhat pricy though, ~£750 each... -- Joachim
|
||||||||||||||
| |||||||||||||||
| Posted: 04-24-2016 05:27 pm |
|
102nd Post |
|
subwoofer Member
|
Getting back on track... The handbrake has been out of commission since converted the rear brakes, and I wasn't able to route the cables like HiSpec had intended, no matter what I did I ran into trouble with the rear springs. So I had to get creative, great thanks to Gordon for inspiration. I was able to repurpose the original JH parts without modifying them, that way it is a straight forward job to convert back to the original brakes in case the MOT goes sour (because of the lack of paperwork on the mods).  Had to make an M8 bolt with some M6 threads on it  ... to be able to mount M6 threaded rod in an M8 clevis  Made an adapter to add to the end of the original handbrake wire, return spring clearly visible  And the other side Seems to be working, but I still need to tighten it slightly, I think. The handbrake will never be one for handbrake turns anyway, small pads makes it a parking mechanism only. Shakedown trip was almost uneventful - once I got out on the road. The capillary tube for the oil pressure gauge had dislodged itself, backing out of the garage I lost about 1/3 of a litre of oil. Good thing I saw the stripe of oil as I backed out! -- Joachim
|
|||||||||||||
| ||||||||||||||
| Posted: 05-21-2016 10:20 am |
|
103rd Post |
|
subwoofer Member
|
I may finally have cured the f¤%&ing misfire problem, and while I was at it I replaced the battery with a fresh 72Ah silver/calsium battery. Naturally, no current standard battery size is a correct fit and the closest I found to the one already installed wouldn't sit right either. No surprises there, then... I had to raise the battery platform about 1/2" to get a good foundation for the new battery. Thought long and hard on it, then remembered that plastic cutting boards are cheap and easily available. Enter MacGyver mode:   The new battery is a bit taller than the old one, so I was a bit worried the connections might hit the bonnet, so I did a clearance check with the cardboard box the rotor came in. No problems at all, the box wasn't crushed at all.  It only took 3 years to figure out the cause of the misfire, the fix was £15 delivered at my doorstep. -- Joachim
|
||||||||||||||
| |||||||||||||||
| Posted: 05-21-2016 01:18 pm |
|
104th Post |
|
Brett Gibson JH5 20497 Member
|
Joachim, just replaced my battery and here in the US the 56 frame works well in a JH. Thanks for the tip on the riveted rotor, I had one as a spare but will now toss. Brett
|
|||||||||||||
| ||||||||||||||
| Posted: 05-21-2016 06:28 pm |
|
105th Post |
|
gmgiltd Member
|
I seem to remember that the first few rotors in my car also had a sprung counterweight which was the rev limiter - I haven't seen them for some time. The effect was quite dramatic and certainly discouraged venturing too close to the redline. CTI is a major improvement. Gordon
|
||||||||||||||
| |||||||||||||||
| Posted: 05-21-2016 06:28 pm |
|
106th Post |
|
gmgiltd Member
|
Last edited on 05-21-2016 06:30 pm by gmgiltd |
|||||||||||||
| ||||||||||||||
| Posted: 06-16-2016 11:20 am |
|
107th Post |
|
subwoofer Member
|
MOT done, good for another two years. :-) Need to reset the idle mix and air bleeds, everything is way out of wack after messing about trying to figure out the misfire. I also put in too much toe-in to try to cure a slight left-or-right-depending-on-the-crown-of-the-road problem, so will have to take some back out. Other than that, no complaints from the inspector, neither about the new brakes or the Revolution wheels. Pheew... -- Joachim
|
||||||||||||||
| |||||||||||||||
| Posted: 07-23-2016 08:37 pm |
|
108th Post |
|
Tom Thomson Member
|
Joachim The project looks great! You mentioned doing a bit of work on the brakes and that reminded me of the time my daughter-in-law came back (in 16036) with great clouds of smoke billowing from the rear wheel wells. Turns out that the flex line was swelled internally (outside looked good) so that pedal pressure would force fluid thru but the return springs would not, thus keeping the shoes applied. Replacing the line fixed the problem. Tom Thomson
|
|||||||||||||
| ||||||||||||||
| Posted: 04-24-2019 06:18 am |
|
109th Post |
|
mgreaves Member
|
Joachim, that is inspirational work. I'm interested in shoehorning a 1988 Esprit 920 engine into my Jensen-Healey. I know the oil pan is too wide for the cross member, however, I understand you modified your sump, do you have any idea if a 920 sump can be modified to fit without changing the chassis of the car? Cheers Michael
|
||||||||||||||
| |||||||||||||||
| Posted: 04-24-2019 07:13 am |
|
110th Post |
|
mgreaves Member
|
Update that is a 910 engine not a 920..
|
|||||||||||||
| ||||||||||||||
| Posted: 04-25-2019 05:51 am |
|
111th Post |
|
Max_dvdt Member
|
We are in the process of fitting a 910 block+sump Old engine is out, new engine is being built. before he gets to assembling the whole thing I'm going to get just the block and sump and so some trial fitting. Will let you know but it might be summer before this happens. Our plan is to mod the subframe, not the sump
|
||||||||||||||
| |||||||||||||||
| Posted: 08-20-2019 08:07 pm |
|
112th Post |
|
redracer Member
|
Subwoofer; can you please tell us where you got the "separate" upper steering knuckle and lower matching splined shaft? I saw one years ago(think it may have been off some Jaguar?) but after repairing it sent it back to the owner. thanks, bruce madden(Red Racer) and Greg Fletcher
|
|||||||||||||
| ||||||||||||||
| Posted: 09-20-2019 04:38 pm |
|
113th Post |
|
subwoofer Member
|
redracer: Sorry for sluggish reply, have been way too busy on other fronts to follow up on forum posts. It's been way too long, but most likely it was from David Booth in the UK, unless it was from Martin Robey. -- Joachim
|
||||||||||||||
| |||||||||||||||
| Posted: 09-20-2019 04:40 pm |
|
114th Post |
|
subwoofer Member
|
mgreaves: I wish I knew, Esprit2 is more likely to know the internals of the 910 sump. But anything can be modified into anything, it is just a question of how good you are with the TIG torch and the grinder. -- Joachim
|
|||||||||||||
| ||||||||||||||
| Posted: 09-20-2019 04:42 pm |
|
115th Post |
|
subwoofer Member
|
Been working a bit on the front suspension again, pictures will be forthcoming once I figure out a good place to host them. Photobucket is useless these days. -- Joachim
|
||||||||||||||
| |||||||||||||||
| Posted: 09-20-2019 05:42 pm |
|
116th Post |
|
redracer Member
|
thanks for finally getting back; that item is really needed and I have contacted both Robey & Rejens(but not Booth, who was at the 2000 Easy coast nationals) with no luck?? Somebody(assume in the U.K.) made these and I can't believe there is nobody who knows anyone from whatever factory made them. Please see if you can delve into this a little more, as I said there is a VERY REAL necessity and my cost of rebuilding all 3 pins is over $300. btw, I am at the East Coast National right now in St. Louis, and there is quite an impressive group(40+ cars, mostly J-Hs) keeping the marque alive and well! take care, bruce
|
|||||||||||||
| ||||||||||||||
| Posted: 09-20-2019 09:51 pm |
|
117th Post |
|
Esprit2 Member
|
mgreaves wrote:I'm interested in shoehorning a 1988 Esprit 920 engine into my Jensen-Healey. I know the oil pan is too wide for the cross member, however, I understand you modified your sump, do you have any idea if a 920 sump can be modified to fit without changing the chassis of the car?Michael, The Lotus 920 is just a 2.0 version of the 2.2L 910 Turbo. Whatever fit problem there might be putting one into a J-H will also apply to the other. The cylinder blocks are dimensionally the same for the 907 and 910/ 920. The 'wide' block's greater width is all in the bolt-on Main Bearing Panel (MBP), and the larger, wide-mouth sump matches the perimeter of the MBP. How would you have to modify the sump? If you can do it entirely below the MBP, without modifying the MBP, then there's nothing inside the sump that would be diffiuclt to modify it to fit. There is a windage tray that bolts in, but it doesn't involve any hinged panels. See tha attached JPEG Attachment: 907 Oil Pan, J-H 907 vs 910 Turbo - 91kb.jpg (Downloaded 107 times)
|
||||||||||||||
| |||||||||||||||
| Posted: 09-20-2019 10:39 pm |
|
118th Post |
|
Esprit2 Member
|
Here's the Sump & Baffle's illustration from the 1988 Esprit Parts Manual. Regards, Tim Engel Attachment: 910 Sump & Baffle - Illust 40.03A - 96kb.jpg (Downloaded 107 times)
|
|||||||||||||
| ||||||||||||||
| Posted: 09-20-2019 10:50 pm |
|
119th Post |
|
Esprit2 Member
|
I tried to post a similar illustration of the Cylinder Block & Main Bearing Panel... But JHPS won't accept it. I re-sized it down to 89kb, and still no luck. If you think it would be helpful to you, PM your email address to me, and I'll forward the full size file... 1734kb. Regards, Tim Engel Last edited on 09-20-2019 11:04 pm by Esprit2 |
||||||||||||||
| |||||||||||||||
| Posted: 09-20-2019 11:00 pm |
|
120th Post |
|
Esprit2 Member
|
Last edited on 09-20-2019 11:01 pm by Esprit2 |
|||||||||||||
| ||||||||||||||
| Posted: 09-21-2019 05:51 pm |
|
121st Post |
|
subwoofer Member
|
From Tim Engel (Esprit2):    --Joachim Last edited on 09-22-2019 09:12 am by subwoofer |
||||||||||||||
| |||||||||||||||
| Posted: 09-22-2019 09:13 am |
|
122nd Post |
|
subwoofer Member
|
Finally worked out the kinks of the photo posting, will go back and fix all the old ones soon. -- Joachim
|
|||||||||||||
| ||||||||||||||
| Posted: 09-23-2019 03:10 am |
|
123rd Post |
|
Esprit2 Member
|
Joachim, Thanks for the help with posting the photos. One more favor? Could you delete my one blank post, #120 on the previous page. Thanks. Everyone, Note that Joachim posted the higher resolution versions of the JPEGs that I forwarded to him. Not the <102kb versions I posted on the previous page. If you're interested in the images, then download the higher-Res versions Joachhim uploaded... above. Regards, Tim Engel Last edited on 09-23-2019 02:38 pm by Esprit2 |
||||||||||||||
| |||||||||||||||
| Posted: 09-23-2019 08:08 pm |
|
124th Post |
|
Esprit2 Member
|
Michael, When Lotus first stroked the 907 to 2.2 Litres, it picked up a roughness that hadn't been present with the short-stroke 2.0. That's not unusual... large displacement 4-cylinders to tend to shake a bit. Lotus tried a number of things to minimize the roughness/ vibration. Then, for what remaind after all they could do in the engine, they took two more steps. 1) The 4-seat models used a flex-plate instead of a flywheel. The same basic thing that's commonly used with automatic transmissions. The thin plate has enough flex in it to absorb much of the vibration that made it to the back end of the crank. The Esprits continued with conventional flywheels. 2) Lotus found that bolting the bottom of the clutch housing to the back/ bottom of the sump 'rigidized' the combined lump, significantly reducing vibration. If you do go forward with installing a 910-based engine, it's stock sump will have two horizontal drilled-n-tapped holes in the rear face, but no J-H clutch housing will have matching bolt holes. However, if you also upgrade to the Toyota W58 5-spd, and use the Lotus Excel's mating clutch housing, it will have the mating bolt holes required to make it all work. Do you need this. No. There are a bunch of Jensen-Healeys with 2.2 Litre converted 907s, and you don't generally hear the owners complaining. But, "IF" you would appreciate a smoother running engine, then one small step in that direction is to use an Excel clutch housing with your W58 5-Spd. Then, to shim the gap to zero, Lotus has two shim washers. One is a solid 0.020" thick washer (A911E1430F), and the other is a laminated brass (A082F6358F) with which you can peal off plies as required to achieve the correct shim thickness. If you're going to 2.2 for low end torque and civilized traffic manners, then go all the way and use the Excel's crank (it's not cross-drilled) and flex-plate. If you're going for maximum performance, then use the Esprit's, or Excel SE's cross-drilled crank, and regular flywheel. Then balance everything that moves on an obcessive-compulsive scale. Regards, Tim Engel Attachment: 00000008e - Bell Hsg & Sump Bolted Together - 97kb.jpg (Downloaded 135 times) Last edited on 09-23-2019 08:12 pm by Esprit2 |
|||||||||||||
| ||||||||||||||
| Posted: 09-23-2019 08:56 pm |
|
125th Post |
|
Esprit2 Member
|
mgreaves wrote:Update that is a 910 engine not a 920..andMax_dvdt wrote: We are in the process of fitting a 910 block+sumpGentlemen, If you have a 910 already, then it's a good start. The 910's compression is 'turbo' low, so you'll need new pistons, but everything else is there, including a cross-drilled crank. If you don't have an engine yet, then consider starting with a 912, preferrably a 912HC (high compression). That way it will come with useable pistons (LC = 9.44:1, and HC = 10.9:1). If you're dumping the 'turbo' anyway, and building a naturally aspirated engine, then the rest of the 910 - 912 differences aren't great enough to worry about for a street engine. The late 910S is the ultimate 9XX 4-cylinder. It does have larger intake ports with improved shapes, and the intake valves are 1mm larger in OD. All the other/ earlier 910s have the same valve diameters as all the lesser, naturally aspirated 9XX engines. All Turbo exhaust valves have sodium filled stems, which are larger in diameter, and require the otherwise same basic heads to be bored larger to accept the larger valve guides for the fatter stems. But sodium filled valve stems are not an advantage for a naturally aspirated engine, since they're not needed to deal with excessive heat; and the more slender, non-sodium filled stems are less distruptive and flow better. A 912 would have the same wide Main Bearing Panel as the 910 (the only 'wider' part of the block ass'y) and matching larger sump. Block-ass'y strength is very similar. Depending upon what your goals are for the build, a 910 and 912LC would come with two 107 cams, while the 912HC has one 104 cam on the intake, and a 107 on the exhaust. No matter what the rest of your build goals are, buy a new set of steel, long-skirt tappets. The original chilled cast iron tappets tend to fatigue with age (iron does that), and they're all old by now. Also, it's not a good idea to run aggressive cams on the old cast iron tappets, regardless of their age. Aggressive cams put more side thrust loads on the tappets, and longer-skirts help keep the tappets from cockng/ binding in their bores. Garry Kemp and JAE (and probably others) have aftermarket long-skirt steel tappets that are both better, and cost less than the Lotus cast iron tappets. They also have steel tappets with different crown thicknesses in order to compensate for re-ground cams. Regards, Tim Engel PS... just to be clear: 910 = 2.2 Turbo. 920 = 2.0 Turbo. Last edited on 09-27-2019 09:23 pm by Esprit2 |
||||||||||||||
| |||||||||||||||
| Posted: 08-18-2020 07:26 am |
|
126th Post |
|
subwoofer Member
|
Small update from the land of no updates. Miss Jensen has been a hangar queen for some time, but MoT is now done. Have run a few laps around red tape after my brake upgrade caused an MoT failure last year - thanks to updated MoT guidelines. I have had to put the old brakes back on to have her registered under SVA rules instead of as a historic vehicle. Changes to regulations a few years back opened the door for modifications to SVA class vehicles, but because of idiotic bureaucratic red tape I had to rebuild to stock, have the car approved, then reapply the mods and have her approved again. Sigh. But it's almost there now, and it will not cause issues again. A Megasquirt 3 and a set of Jenvey Heritage throttle bodies is a likely upgrade in a year or two. https://store.jenvey.co.uk/heritage/heritage-twin-tbody-40-48mm-pair-tdp40-48 -- Joachim
|
|||||||||||||
| ||||||||||||||
| Posted: 08-18-2020 07:28 am |
|
127th Post |
|
subwoofer Member
|
And driving with the stock brakes? There is no comparison to the HiSpec upgrade. Wooden is a kind description of the stock system, can't wait to have the proper brakes back on her. -- Joachim
|
||||||||||||||
| |||||||||||||||
| Posted: 08-21-2020 02:17 am |
|
128th Post |
|
gmgiltd Member
|
I am very glad that cars over 40 years old no longer require MOT tests in the UK. Statistically cars over 40 years old were more likely to lead easy low mileage lives and have more attention lavished on them and the failure rate was very low.
|
|||||||||||||
| ||||||||||||||
| Posted: 08-21-2020 04:52 pm |
|
129th Post |
|
noomg Member
|
gmgiltd, I'm glad to hear there's a little common sense being used in the UK. Unfortunately in California they still like harassing classic car owners. I find the topic of old cars an interesting one. What's classic and what's just an old car? This applies not just to J/Hs or only Brit cars but all cars over say 20 years old. That's about where old cars hit a fork in the road. One way leads to just a driver, the other to classic car. A driver is just that, transportation, it has no other value to the owner. As long as it's cheap and easy to maintain it stays on the road. At some point, say around 20 years, it becomes cheaper to buy a newer driver at which point our original driver usually winds up in a junkyard. A classic on the other hand is loved by it's owner, who may be the original owner but usually not. It requires a commitment to keep a classic on the road, a commitment a driver owner is not willing to make. This is why there are so few old cars on the road after a number of years, unless you love it, it's just not practical to keep on the road. That's why the ones you see on the road are well maintained and safe. So it would be nice if Big Brother would get off our butts!
|
||||||||||||||
| |||||||||||||||
| Posted: 08-21-2020 07:26 pm |
|
130th Post |
|
subwoofer Member
|
One of the perks I had to give up by reclassing as a normal vehicle (rather than "preservation worthy" as is the literal translation) is that I will have to MoT her every two years going forward, rather than every five. But mods will be easy to get approved, I think the brakes will be good for 250-300bhp since she is so light. The system seems rigged in favour of the people selling new cars, for a more modern car it does not take much to fail an MoT and the manufacturers seem to be doing their best to make sure any repairs are uneconomical. On a more positive note, the refurbed steering rack really transformed the feel of the car. A lot more stable and much less the feeling of a boat with waves coming in from the rear quarters. Took a long time to get it back from Robey since they didn't have any LHD racks in stock and it turned out the condition was so deteriorated that they had to sacrifice another rack for parts. Oh well... -- Joachim
|
|||||||||||||
| ||||||||||||||
| Current time is 04:53 pm | |
| > Jensen Healey & Jensen GT Tech > Projects > 18711 "Miss Jensen" | Top |