| ||||
| ||||
| Moderated by: Greg Fletcher | Page:   |
|
|||||||||||||
| 16173 will be entering project status... | Rating: 
|
| Author | Post |
|---|
| Posted: 05-08-2014 05:49 pm |
|
81st Post |
|
answerman Member
|
Almost ready to go! Got the bumpers painted last night, and reinstalled all of the interior trim panels, handles, etc. (along with the left front stoneguard which I forgot to install when I did the others for some reason). Tonight: put the bumpers back together and mount them, bolt the top back on, and she's roadworthy other than all the stainless trim and JH badges, etc. Also going to fabricate and install my custom hood prop tonight (came up with an interesting approach using something that will fit under the hood but still allow lots of headroom for working on the engine). About $6 worth of raw materials and an hour or so to make it. I'll have pictures after it's installed.
|
||||||||||||||
| |||||||||||||||
| Posted: 05-12-2014 10:53 pm |
|
82nd Post |
|
answerman Member
|
Roadworthy! Even took her to the office today since my Expedition is off getting the air conditioning fixed. On Wednesday, she goes to the exhaust shop to get her Delta performance exhaust system installed. Looking forward to hearing her growl instead of whatever the cheapy and rusted muffler she has now sounds like. Otherwise, all assembled with just a few minor points to resolve yet: - still need to reinstall the fuel sender float - still need to replace the trunk/boot carpeting (the old stinks of gas) - still need to work on getting the doors properly aligned - still need to make my custom hood prop Otherwise she is good to go! The last step yesterday was to run a half can of Seafoam through the engine oil and then change her oil and install a new oil filter. Now if it would just stop raining...
|
|||||||||||||
| ||||||||||||||
| Posted: 05-13-2014 12:53 pm |
|
83rd Post |
|
Brett Gibson JH5 20497 Member
|
Cant wait to see it at the WI show.
|
||||||||||||||
| |||||||||||||||
| Posted: 05-15-2014 06:18 pm |
|
84th Post |
|
answerman Member
|
New Delta exhaust system is installed and she sounds FABULOUS! Went pretty uneventfully except that they had to weld one of the leaky front connections on the Y pipe (I still have the stock headers). Told them to go ahead since if I ever decide to do anything with it from that point forward, I'll probably go with a replacement header anyway. Then, the fun began. Had a little time last night, so I thought I would knock a couple more things off of my "to do" list. If you remember, when I got my fuel tank back from the radiator shop, the fuel sender float was taped to the top (apparently they must have knocked it off as part of the reconditioning process and didn't bother to put it back in). So I decided to pull the fuel sender out of the tank so I could put the float back on and see if it made the fuel gauge work right. The good news: her fuel gauge works now. The bad news: along the way I had a bit of an ummm... mishap. So, I pulled the gas tank out, took about 10 minutes. Getting pretty good at it (for future reference, I think I could pull the sender out without pulling the tank). Anyway, got the tank out, took it to the driveway. Undid the locking ring, pulled the sender out, pulled the sealing gasket out, snapped the float into the sender, put the gasket back in, put the sender back in, and put the ring on and tightened it up. Whole process took about 5 minutes. Then, put the tank back in. Grabbed a 5 gallon gas can and went to the gas station across the street to get a couple gallons of gas (since I had to drain the tank before I did any of this, and I didn't want to put that gas back in because the tub I drained it into wasn't exactly clean). Got the gas, came back, put it in her tank... started her up... watched the gauge rise a little...YAY! Then, I figured I would take her across the street to put more gas in. Did so, filled her up, and when I got done... (here's where it gets fun) as I was hanging up the hose, I got a nagging feeling... "I probably should have checked for leaks before I filled her all the way up..." So I looked under, and gas is streaming from under the trunk at a fair rate. Opened up the trunk and it's basically filling up... eek! So... best I could come up with was to rush her back home (it's just across the street), pull her into the driveway, go grab a couple of containers, and get underneath and pull the drain plug. Drained out what I estimated to be at least half, to get the level below the sender, and then put the plug back in. Now I'm wearing more than a little of the gas, but at least it's not leaking any more. Since the crisis was mostly averted at that point, I mopped out the trunk, hung the gassy towels outside to dry, went inside, showered, and had supper. Afterwards, I went back out. By this time, things had dried out pretty well, so I pulled her back in the garage, got a flashlight, inspected, and as I suspected (and actually hoped), only 2 of the locking ring tabs were engaged. The third had... missed for lack of a better word. The whole ring was in at kind of an angle, so it wasn't compressing the fitting against the gasket all the way around. I could see it wasn't straight just looking at it. How I missed this the first time, I don't know. So, popped it back off, straightened it out and spun it back on being much more careful this time to make sure it was engaged properly. Whew. Crisis averted, though I think I lost about 2 gallons of gas during all of this. The remaining fuel that was drained out went into two gas cans, which means I probably won't have to buy gas for the lawn tractor for quite a while. I think it's all good now, I didn't fill it back up to find out yet. I want it to all dry up first. At least I hadn't installed the new trunk carpeting yet. Moral of the story: after working on a gas tank, check for leaks before reinstalling the tank, and definitely BEFORE you fill it up.
|
|||||||||||||
| ||||||||||||||
| Posted: 05-21-2014 06:30 pm |
|
85th Post |
|
answerman Member
|
Further update: All is well. Gas tank is no longer leaking, and she is deemed roadworthy. Trunk carpet is in, hood prop is fabricated and installed (though I still need to pull it out to paint it... pics forthcoming when that's done), drivers door is aligned (passenger side is still giving me fits), and I've put about 100 miles on her over the past week just because, well, that's why I worked so hard on her, to enjoy driving her! Now that the new exhaust is in, on the to-do list is to fix a leaking exhaust manifold issue (you can hear it much better now that the rest of the exhaust is good). After reading through the forum posts on that job, I may just see if I can live with it for now and deal with it next winter, because I don't know if I have enough vino to cover the job. Otherwise, at this point, all I have left is to try colorsanding and buffing her new paint to see if I can knock some of the orange peel down. I am probably going to have to reshoot the hood and the taillight surround at some point since I didn't do a good enough job of prepping (I didn't block at all) and some of the grinder marks are still apparent through the paint. Lesson learned... block sand EVERYTHING and have lots of light on the subject. Ready for the Jensen East meet next week!
|
||||||||||||||
| |||||||||||||||
| Posted: 05-21-2014 09:57 pm |
|
86th Post |
|
Jensen Healey Super Moderator 
|
Your build is truly inspiring! Have fun at Jensen East! Kurt
|
|||||||||||||
| ||||||||||||||
| Posted: 06-16-2014 09:11 pm |
|
87th Post |
|
answerman Member
|
I've been quiet here, but not elsewhere: instead of working on Ms. Jenavieve, I finally get to reap some of the rewards in driving her and showing her off. Had a fabulous time at Jensen East (really surprised no one's posted pics here) and this past weekend took part in our second British Car Field Day in Sussex, WI. Once again, I was the only Jensen there (honest, I recruited people at Jensen East) but it was still fun, even though she got classed as a big Healey again.  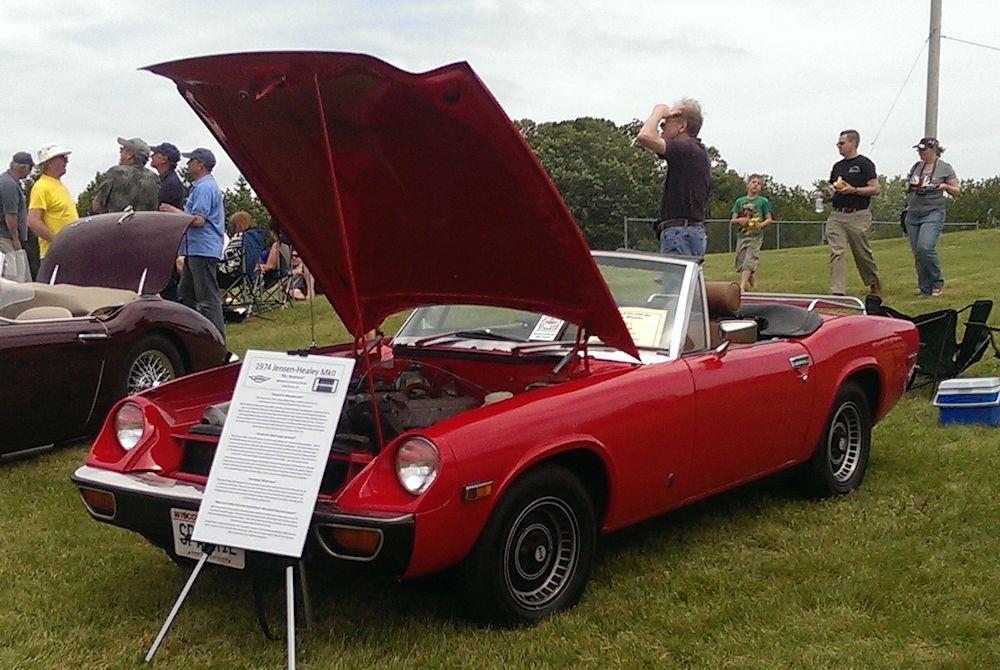 From the front... lots of people stopped to (1) read the sign, and (2) ask why she had a muffler under her hood. I told people it was a spare in case the rear one fell off :-)  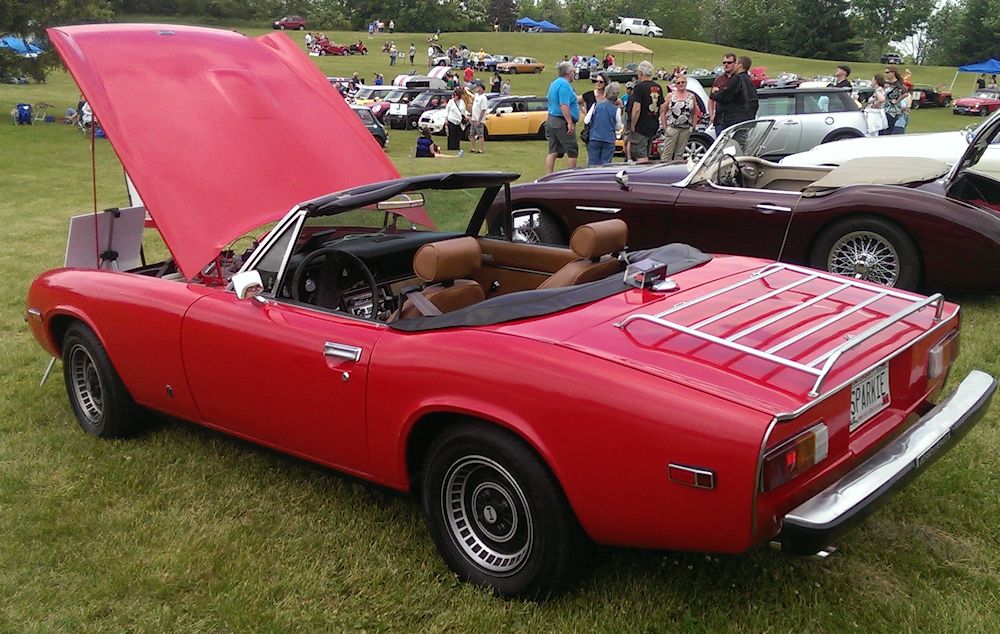 From the rear, obviously. Spent 6 hours the day before scrubbing down the orange peel with 1000/1500/2000 grit wet sandpaper, followed by a couple of grades of Meguiar's cutting polish and finished with caranuba wax. Did all but the hood (that has its own set of issues and I didn't want to bite off more than I could chew that day). Came out nice, in a way it's almost a bit more authentic finish since I lost just a little bit of gloss overall. Had a few people ask if it was her original paint.  And the view of all her cousins. Austin-Healey 100s and 3000s. Obviously they got all the votes in the class. It was fun just being there though. Last edited on 06-16-2014 09:22 pm by answerman |
||||||||||||||
| |||||||||||||||
| Posted: 08-30-2014 11:37 pm |
|
88th Post |
|
answerman Member
|
Since I haven't "had to" work on Ms. Jenavieve this summer, there hasn't been much to report here. However, I remembered that a while back I promised to detail the custom bonnet prop I created for her. While I'm not tall, I do like to have as much headroom as possible when working on her. The factory prop (which was lying in her boot when I got her, which was probably a good place for it) doesn't allow a lot of headroom. One of the previous owners had removed it and installed what looked suspiciously like a prop from a 1970s Ford Pinto... just a rod which was attached with a cotter pin, stored atop the radiator, and could rotate up to a vertical position to set into a hole drilled in the underside of the bonnet. While this solved the bent bonnet problem from the original prop, it still didn't allow much more headroom, basically because the rod could only be "so" long to store across the radiator. So, I had a brainstorm, and my son (the master welder) and I created a much improved prop. All it took was a length of round stock, and a short piece of tube stock, along with a couple of washers. The pictures aren't the greatest, but hopefully you get the idea... 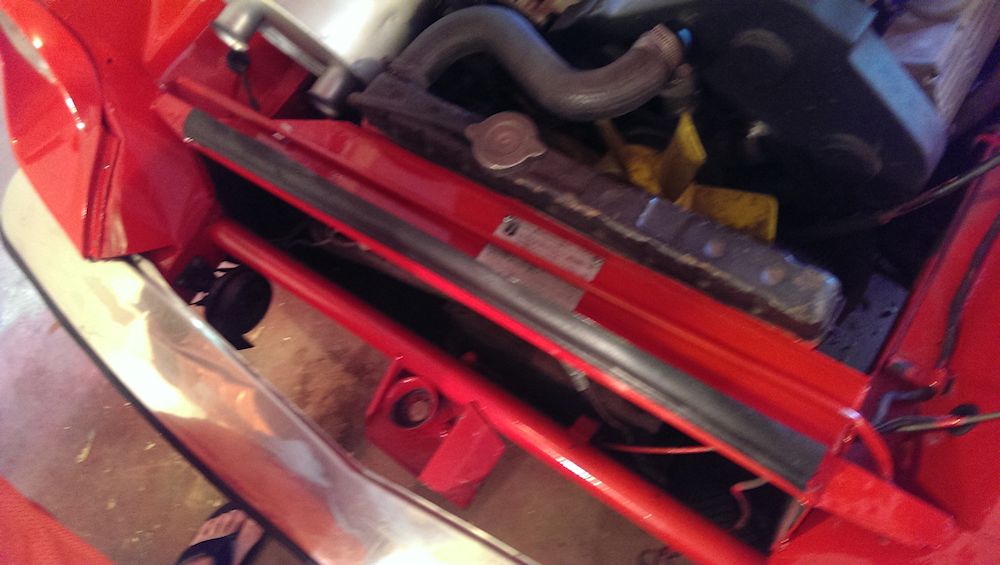 First order of business was to custom cut and bend a new rod, similar to the "Pinto" one she came with. You can see it in the pic, lying across the data plate, with a couple of bends near the end on the right so that it can "hinge". There is a washer welded about an inch from the end to act as a stop, with the remainder inserted through a hole in the sheet metal near the headlight and then held in place with another washer and a cotter pin. The left end, you will note, has something else... 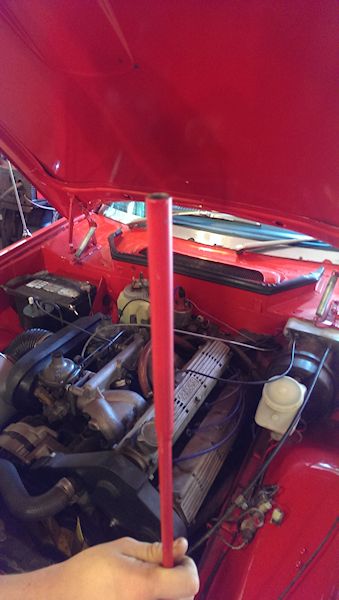 With the prop in the upright position, you can see that we welded a short piece of tube stock to the end of the rod. For quick "under the bonnet" jobs, this is all we need as the end of the tube can just be inserted into one of the recesses in the underside of the bonnet. However, for more room... 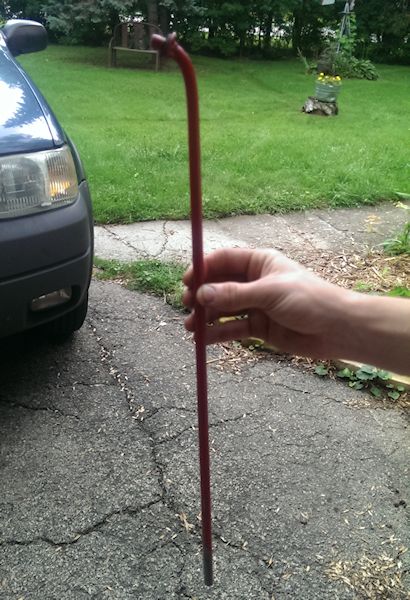 ... we need an extension. This is another piece of the same rod stock, with a bend in the end and another washer welded to it... 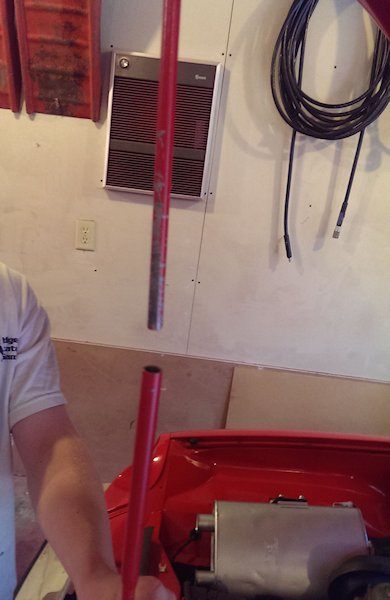 ... which inserts into the tube at the end of the prop...  and into a strategically drilled hole on the front edge of the bonnet. This makes working on Ms. J's engine much more pleasant. Lots of headroom, and it's not in the way. While it's a small chore to use (for now the extension sits in the boot... looking for a couple of clips to clip it under the bonnet) it's quite functional and easy to work around. And again, I don't "have" to use the extension if I just need to do something quick. Now I can put my 4 foot level away... which was my "temporary" prop while I was working on the restore. No more broom handles, either! Last edited on 08-30-2014 11:53 pm by answerman |
|||||||||||||
| ||||||||||||||
| Posted: 08-31-2014 01:16 pm |
|
89th Post |
|
Jensenman Member
|
The car looks great! I did the GT hood prop thing on mine when I got it, the bonnet was in good shape but I had horrors of some oaf (likely me) not knowing about the stock prop rod operation. I need to extend mine to keep it from banging my ugly head.
|
||||||||||||||
| |||||||||||||||
| Posted: 10-22-2014 07:32 pm |
|
90th Post |
|
answerman Member
|
Well, Ms. Jenavieve is off the road for the winter. Last week I walked out in the garage and thought "ok, I am not going to realistically drive her any more this year... why am I putting it off?" I do have some work to do on her before spring, but I figure I'll probably wait till March or so to get started since it's not the sort of thing where I need her in the garage for months (new exhaust manifold, and I want to sand her down some and respray to fix a few issues with the paint job I did last spring). Plus now I can finally put my Expedition in the garage, just in time to not have to scrape ice and snow off the windows in the morning. Of course this simple little task didn't go without a few little glitches. And these are not serious, just amusing. Had to share. So, last Thursday afternoon I decided "it's time". Hadn't driven her in a couple weeks, so when I started her up I was dismayed, but not terribly surprised, to find that I had no brake pressure. I obviously have a leak somewhere, but I have never found it. Anyway, with the pedal to the floor she does stop, so I figured "I'll deal with it next spring". The storage facility is only about a block away from the house, so I wasn't too concerned. Drove her over to the storage facility, which is one of those "self-storage" places with lots of buildings (I rented a 10x30 stall) and a security fence... you punch in a keycode to open the fence gate to get in, and then you just drive up to the gate from the inside to open it to depart. This becomes important later in the story. Being a LBC, of course she isn't the neatest car in the world... a few drips here and there from various fluid reservoirs in the car. I had this bright idea to spread out a sheet of painter's plastic under her to catch said drips. So, I pulled up to the storage stall, opened the overhead door, and drove in partway. Got out, got my roll of painter's plastic, and unrolled about 20 feet of it and spread it out. The stuff is not much thicker than Saran Wrap, so it was an adventure to get it to lay down. Having done all this, I got back in Ms. J, started her up... and as I slowly started to move forward the thought crossed my mind "I wonder if maybe it wasn't such a good idea to drive..." and at that moment there was a loud FOOMP and the plastic was gone. Just disappeared. Already knowing what I was going to find, I shut her down, got out, and opened the bonnet, and of course found 20 feet of painters plastic wrapped around the fan and belt. Just like a big vacuum cleaner, that engine is... (at this point I crossed myself and thanked the heavens for still having my cam belt cover installed, apparently I am like one of 12 people in the world who still has it). I don't even want to think about how much of a mess that would have been if the plastic had gotten into there. So, I made a couple of feeble attempts to pull the plastic out, realized that quite a bit was between the fan belt and pulley, and basically said "heck with it, I'll deal with it next spring". So, I pushed her back out a bit, put another piece of plastic down, and this time PUSHED her onto it. Which is what I should have done in the first place. I took the pieces that I had pulled out and wadded them up and shoved them into the steering wheel to remind me not to try to start her up again until I get the fan cleaned up. Called it good enough, dragged her cover over her, walked out of the stall, closed it, locked it, and started the short walk home. Got to the security gate... and realized the flaw in my plan. If you remember, you need a key code to get in, and then you drive up to the gate to actuate a sensor to get back out. Well, that works very well IF YOU ARE DRIVING A CAR... Shook my head, got out my cell phone, and called my son to come over and spring me from the outside. Sheesh. What a day. Anyway, figured some of you could use a chuckle... and it's all part of Ms. J's story, so it's now recorded here for posterity.
|
|||||||||||||
| ||||||||||||||
| Posted: 02-23-2015 07:20 am |
|
91st Post |
|
answerman Member
|
And Ms. Jenavieve is back home in the garage where she belongs. Decided that 4 months without her was long enough, and I'm kind of champing at the bit to start preparing her for spring. So, my wife, son, and I went over to the storage unit this weekend and brought her back home. Couldn't get her started over there, and with no light, no heat (it's been hovering around 5 degrees Fahrenheit here the past week or so) and only the tools I bring from home, we figured it was easier to just tow her back home with a rope and my Expedition (the storage unit is only a block from home). That was a little giggly because as noted below, her brakes are at about 1% functional... if you stomp all the way to the floor, she slows but panic stops are not an option, so I was praying the whole way home that Mrs. Answerman wasn't going to hit the Expedition brakes hard. Made it just fine though, at about 3 MPH. Now that she's home, the task list (notice I'm skipping #1, read further for why) for the next 6 weeks: 2. Fix her brakes. As detailed in another thread, she has a mysterious syndrome where her brake fluid just disappears on occasion... no puddles on the ground, but it's going somewhere, and the consensus is that her master cylinder is leaking into the booster. So... did some ordering this week. New master cylinder arrived today, and I lucked into a "slightly used" booster on eBay that was apparently purchased as a temporary fix by the seller from the club store several years ago. He then had his original rebuilt, and decided to sell this one (it looks like the one Greg used to sell, the kinda gold colored one). The master cylinder looks easy enough, but the booster looks more complex. We'll find out... it should be arriving this week. 3. Order and install her new exhaust header. Yes, I am going to tackle this thankless looking job. I'll be ordering the header from the club store, along with the copper nuts and gaskets, and also new motor mounts since I'm in there and I am sure the current ones are trash. I have what I believe to be the stock header and it's got some serious leak issue (and basically looks ugly, looks like a PO had done some welding on it). I'm giving myself a month to do the PB Blaster/wrench/swear/rinse and repeat process. Hopefully that will be enough. 4. Sand, block, and respray her bonnet. When I did the bare metal strip and respray last spring, I gouged up the hood pretty well and it's visible through the paint. Going to take my time and get it right this time. And that should be it other than the missing number, which I got halfway through tonight: 1. Finish unwrapping about 20 feet of painter's plastic from around the fan and water pump pulley. Eesh. That was a mess (as explained in the previous post). We loosened up the alternator and pulled the belt at the storage unit, and got about 80% of it off, but the rest waited till we got home. At this point it's about 98% removed, but there's still some very tightly wrapped around the flange and shaft on the water pump. It'll clean up with whatever I have to use to cut/scrape/burn it out. It's all worth it, though... so glad to have her back home, and ready to get her ready for spring!
|
||||||||||||||
| |||||||||||||||
| Posted: 03-02-2015 12:10 am |
|
92nd Post |
|
Tom Bradley Member
|
I am getting my car ready for repainting now and have had the same sort of issue with the bonnet. It seems to be the most finicky piece to get looking right. Actually, your experiences have been very helpful for me in getting mine ready. I have been much more careful about the prep work than I would have been otherwise. Even so, I have had to do more work after my first pass of blocking, priming and sanding. There were many more dings and such than I had noticed before. Fortunately, it is rainy here, so I am not missing driving it as much as I would have otherwise. Thank you for posting. Tom
|
|||||||||||||
| ||||||||||||||
| Posted: 03-09-2015 07:06 am |
|
93rd Post |
|
answerman Member
|
The last two weekends were productive (should have been just one weekend but I ran into a snag). Regardless, Ms. Jenavieve is now once again roadworthy, took her for her first drive of the year today. Not a terribly long drive since it only hit 49 degrees F today, which is really nice for early March in Wisconsin but not warm enough to be driving a convertible around :-) Finished up the removal of the painters plastic last weekend. It was actually fused around the water pump shaft. Ended up taking my Dremel tool with a little router bit on it to kind of drill into it and break through enough to peel it off, it was melted into what basically looked like a hard plastic washer. Anyway, that's done and her fan is all cleaned up and put back on, alternator and belt are reinstalled, and ran her a little bit to be sure there weren't any other gotchas. All good there. Then, I tackled the master cylinder/booster replacement. This didn't go quite like I planned since for whatever reason (as detailed in another post) the booster rod and clevis were not the right length, needing to be at least a half inch longer. I actually pulled the pedal box, took off the old booster, cleaned up the pedal box since I had it out, and then reinstalled it with the new booster. It went in but I noticed that the pedal was somewhat "sunk" to the floor, and the shortness of the rod wasn't even letting the pedal come back far enough to contact the brake light switch. So, this weekend, I took it all apart again, determined that there was no way to adjust the length of the rod and clevis, and decided to just put the old booster back in since it appeared to be working fine before removal. I did have to dump about a pint of brake fluid out of it, so I'm hoping that the internals aren't too damaged, but it seems to be working fine after reinstalling everything and mounting the new TR6 master cylinder. Brakes are nice and responsive again, and this should have solved my disappearing brake fluid issue. We had our annual meeting of the local British car club today, so I brought the replacement booster along and the guy we call our "resident MacGyver" took it from me... he thinks he will be able to retrofit a longer clevis on it so that I can drill the pin point in the proper place. No hurry on it as long as the old one is working... chances are I'll just stick it on the shelf and look at it again next winter. On to the exhaust manifold... just have to force myself to make the commitment to order it and actually go through the pain of replacing the old one. Still a little on the fence, but I think I will end up doing it over the next couple of weeks.
|
||||||||||||||
| |||||||||||||||
| Posted: 03-30-2015 04:16 am |
|
94th Post |
|
answerman Member
|
I seem to remember myself saying that I had the whole month of March to tackle the replacement of the old exhaust manifold. Ummm... March kind of went by without me noticing. Well, most of it anyway. Regardless, on Friday I did go ahead and order (1) Delta 4 into 1 header, (1) gasket set, (1) set of new manifold nute, (12) new exhaust studs, and (2) front motor mounts. Once I get confirmation from Greg that the parts will be shipping and arrive here on or before next Friday, next weekend is set aside for the R and R of the manifold. Figuring that (again once I know the parts are on the way) I can spend an hour or two a day this week preparing... lots of PB Blaster, and a sharp new Sawzall blade or two. I'm pretty sure I have duplicates of all the wrenches needed, so if I have to modify one or two on the fly, I don't have to wreck my "good ones". If it all goes well, maybe I'll have the old header out before the weekend and ready to install the new one. I figured I'd replace the motor mounts at the same time since I have to remove the old ones anyway (or at least undo them) and it seemed to make sense. Wish me luck. I'm assuming I'm going to need it.
|
|||||||||||||
| ||||||||||||||
| Posted: 03-30-2015 02:46 pm |
|
95th Post |
|
Jensen Healey Super Moderator
|
I think the 4 into 1 exits lower, under the sway bar. You may have additional re-configuring to do. Good Luck
|
||||||||||||||
| |||||||||||||||
| Posted: 04-02-2015 07:06 am |
|
96th Post |
|
answerman Member
|
See, when you obsess about things they never turn out as badly as you expect. Ms. Jenavieve's old exhaust manifold is lying on the garage floor in 4 pieces, and the whole removal process took less than 4 hours. I experimentally took a box end wrench to the bottom left nut on cylinder #1, and was shocked to find out that it easily turned. No extra help required, no PB Blaster, nothing. I kept turning it and the stud backed right out of the block (with the nut attached). Easy as pie. Encouraged, I tried the rest. Some interesting contortion involved, but I was able to remove all 12 studs with nothing more than a combination wrench and a socket with a long extension. And I didn't even jack up the engine, did most of it either through the wheel opening or from underneath (other than two of the top nuts which were just plain easier to get at from above). All nuts came out with the studs attached. None broken (which was my greatest fear). Some were a little slow, having to continually flip the wrench and go about 1/16 of a turn at a time, but they all came out just fine. Then, after a dinner break, I went back under with a Sawzall. Started by cutting both of the pipes right at the Y-pipe (which is still attached to the exhaust system, but since that was just clamped last year when I had the rest of the exhaust system replaced with the Delta performance exhaust) I don't anticipate much trouble there. After cutting those two, I went back through the wheel well and cut #1 and #4 up as close to the bends as I could, pulled those off, and then cut #2 the same way. Then, I cut #3 very close to the mounting plate (found my leak, it was breaking off of the mounting plate). I was almost able to break it off by hand... ended up shifting what was left of the manifold around so that I could cut #3 off right at the mounting plate. After all that, jiggered the mounting plate around (which had a few inches left of #1, #2, and #4 attached) until I was able to pull it out from underneath. Didn't even remove the steering shaft (though it probably would have made that last part easier). I figured since the header was going to be coming out in pieces, I'd wait to remove the shaft until after the header wasn't in the way any more. Tomorrow, I'll remove the shaft, unclamp and remove what's left of the Y-pipe, jack up the engine and remove the mounts, and with any luck I may get the new motor mounts and 4 into 1 header installed tomorrow night. I'm sure something will come up to complicate things, but at this point I have to say that this is going MUCH better than I anticipated.
|
|||||||||||||
| ||||||||||||||
| Posted: 04-06-2015 08:54 pm |
|
97th Post |
|
answerman Member
|
Wow, what a weekend (actually I started on Wednesday). Oddly enough, the removal of the old header and install of the new was probably the easiest part of everything I had to do, comparatively. My earlier concern about the header not mating up to the engine block correctly turned out to just be a little misalignment of the studs, and a little work with a file in the header mounting holes solved that. Got the gaskets in and the header bolted up nice and tight. I was able to do all of it from under the car without the engine jacked up, though in retrospect I can see where that might have made some of it easier. Anyway, the next step was to get the steering shaft back in. That was a battle, though not for the reasons other people have found. For the life of me, I could NOT get the upper knuckle to slide back onto the steering column shaft. It wasn't an issue of not being enough room, it just wouldn't go on. So I took the shaft back out, spread the coupling on the joint as much as I could in the vise with a hammer and chisel... still no go. In fact, I think I made it worse... it was slightly out of round. After fighting with it for too long, I finally just gave up, assumed the Lotus position, and removed the steering column so I could get both pieces on the bench and see what I was doing. After cleaning 41 years of grease, dirt, and whatever else out of both surfaces, and taking a needle file and sharpening up the splines, I got them to slide together nice and easy. Whew. So, the column went back in, and under the car I went again, and this time the shaft went right on. Again, whew. From there it wasn't too much of an issue to slide the coupling all the way to the firewall which gave me plenty of room to slide the lower end of the shaft back into the steering gear coupling (after cleaning that out as best I could with a toothbrush). This whole steering shaft issue was 4 hours I hadn't planned on, but such is life with a LBC I guess. At this point, I went back under and looked at how the exhaust (remember, I had a Delta performance exhaust installed last spring with the old header in place) was going to go back together. Well, that is another can of worms. Besides the fact that I have about an 8 inch gap between the back of the header and the front of the resonator pipe (still not sure why, they must have shortened that front pipe when they installed the exhaust to the old Y-pipe) there are alignment issues which are going to have to be addressed. I'll come back to that. So, time to install the new motor mounts. That actually wasn't too horrible. The left one came apart during removal, and the right one, while in one piece, looks about like you'd expect after being sprayed with oil mist for 41 years. Went to the hardware store and bought a handful of 1/2" fender washers, each about 1/16" thick, slotted them in the vise with a die grinder, and proceeded to install the new motor mounts, which went right in except that I had to jack the engine WAY up to get the shafts to clear the holes enough to slide them into place. But I got them in, and started the process of figuring out how many shims I needed to get clearance between the steering shaft and the header. Oddly enough, I don't see that the lower knuckle is an issue with clearance as others have brought up. It's not even close to hitting the header. The issue I ran into was up higher, about a third of the way up the shaft, where the shaft passes through the header pipes. It was a very fine line between hitting the pipe either to the left or to the right of the steering shaft, but after a lot of trial and error I settled on 9 washers as being the optimal number of motor mount shims... about a half inch. Decided I was happy with that, tightened the mounts down, tightened the pinch bolts on the steering shaft couplings, and we're all good there (though I am probably going to have to realign the steering wheel, I just kind of guessed and I'm sure it's not straight). Won't be able to verify that till the road test. An aside at this point... if you remember, the DPO on Ms. J had installed the upper cam cover upside down (putting the oil filler at the front instead of the rear). Not sure why, but this now has to be addressed. Since I raised the engine with the shims, it appears that the oil filler cap is now going to contact the bonnet when it's closed. Can't have that. So, I just placed another order with Greg at the JHPS store (if I was planning ahead I would have done this last week when I ordered the header) for a new set of cam cover gaskets and the associated hardware. I'll pull the covers off and put the top one on the way it's supposed to be on, with the Jensen-Healey lettering right side up and the oil filler at the rear. While I have them off, I'll see if I can clean and polish them up a little. Anyway... back under the car. I think I am going to have to take her back to the muffler shop to have them address the exhaust. The issue is that the header is terminating a little farther to the left than the old one did, and as a result the Delta performance exhaust system isn't lined up right. I kind of pulled it over to the header and put an intermediate pipe in, but it's not straight and the resonator is pressed up tight against the bottom of the car (not into the transmission tunnel), in addition to falling off the hanger in front of the axle. I took some measurements and determined that I need an intermediate pipe between the header tip and the resonator end that has about a 2" offset in it. It can be made to work, but it's just another speed bump in this task. I'm probably going to just take it to the muffler shop and tell them to just do whatever they need to to make the exhaust all go together properly. I do have to say that I did start her up, with the exhaust kind of cobbled together as I described above, and she definitely sounds different (a good different, I think). Can't wait to hear how she sounds once it's all properly together... all pipe from the engine back to the exhaust tips will be either new or less than a year old. The light at the end of the tunnel is pretty bright, all things considered. At least the temperature's not likely to get out of the 40s here in Wisconsin for at least the next week, so I'm not in a huge hurry, but I would just like to get this done, you know? Last edited on 04-07-2015 06:00 pm by answerman |
||||||||||||||
| |||||||||||||||
| Posted: 05-04-2015 05:44 pm |
|
98th Post |
|
answerman Member
|
Hey guys... it's been a while since I posted any updates. Ms. Jenavieve is pretty much past the "project" stage now I suppose, though there is always more to do on these little cars, right? Anyway, let's see if I can get caught up. As I outlined previously, I got the new Delta 4 into 1 header installed, and then took her over to the local muffler shop to have them do some magic. Because of the way things lined up, they ended up having to custom bend an offset pipe to mate up from the end of the header to the front of the resonator, along with a flex pipe. Not quite original, but her exhaust is now pretty much brand new from the engine all the way to the exhaust tips (or less than a year old, anyway). And I have to say she sounds absolutely fabulous. It's a nice change to have all the exhaust noise coming out of the exhaust tips and none from under the bonnet. I also did install the new cam cover gaskets from the JHPS store, and cleaned up the cam covers while they were off. They are almost shiny now. Reinstalled with the "Jensen Healey" logo right side up and the oil filler at the back of the engine, instead of the front. Nothing too exciting in this process, went very smoothly. Then, I decided to go ahead with something I've been thinking about since last fall... a couple of weeks ago I made a phone call, drove over to look, and came back with a nice hardtop for her. The guy who had it had originally approached me at a show last fall and asked if I was interested, and I told him that I would think about it. Finally got back to him, he still had it (and was about to put it on eBay) so after a bit of haggling (with me in the drivers seat on the transaction since I was the guy in his driveway with cash and no need to ship this crazy oversize thing) we agreed on a fair price. And the top, while not original (it's an aftermarket from Custom Hardtops in California) is almost like new. He bought it new with the can back in 1974, it stayed in the garage most of the time, and for whatever reason when he sold the car, the buyer didn't want the top. Good for me, though. Actually drove her around for a week or so with the top on before I took it off for the summer. While I was still in "getting ready for spring" mode, I also finally joined the ranks of "official JH owners" with the rite of passage of installing a new timing belt and tensioner bearings. The old belt, from the records I got when I bought her, was changed about 9000 miles ago... but also about 12 years ago, so I figured I'd put it off long enough. The approach I used (got the idea from a friend who's a Lotus afficianado) was to set the engine at TDC with the 110 marks lined up, then take a bottle of WhiteOut and mark each gear (both cams, crank, and ignition) with a mark on one slot, and mark the old belt with a corresponding mark on the tooth in that slot. Once I had done that, it was a simple matter to remove the belt, line it up with the new one, mark the corresponding teeth on the new belt (counting the teeth between the marks to be sure) and then pop the new belt on in the appropriate location. Worked just fine, the whole process took maybe 3 hours from start to finish... I was in no hurry and I am sure it would go faster the next time since I now know exactly what has to be removed to get at it. For posterity, here's the order I did things (I used Greg's guide as a, well, guide, but there was more to be done than he had outlined: 1. Disconnect battery and coil wires, just because. 2. Remove top half of belt guard (I have the two piece guard) 3. Attempt to remove bottom half of guard. Grumble because it won't come out at this point, too much stuff in the way. 4. Loosen alternator, remove belt. Remove fan and pulley. Skin knuckles a bunch because of proximity to radiator. 5. Look down and realize that the lower guard still isn't going to come off. 6. Remove crank pulley. This went way better than I had expected... put a 19mm socket on my ratchet, put a pipe on the handle, and had Mrs. Answerman stand on the brake pedal (since I've never had a functioning hand brake) while I first hit my knuckle with a rubber mallet (ouch!) and then the pipe a few times to break it loose. Moved engine BACK to TDC since of course it moved during this process. 7. Now I can remove the lower belt guard. Did so. 8. Got my bottle of WhiteOut and marked one tooth/slot combination on each of the 4 gears. 9. Loosened tensioner and pulled belt off the gears. Loosened upper radiator hose clamp at top of engine, pulled hose off the fitting, and snuck the belt through there. Old belt is off! 10. Removed tensioner (that actually came out fairly easily). 11. Took tensioner to bench, followed Greg's process at http://www.jensenhealey.com/tech/bearing/bearing.html to disassemble tensioner and replace the bearings. The old ones seemed fine, but since I went this far I didn't see a compelling reason to NOT replace them. 12. Put newly assembled tensioner in place, loosely. 13. Take new belt, count teeth and make new WhiteOut marks corresponding with marks on old belt. 14. Put new belt on. Take belt off, put on again because I was one tooth off on the crank gear. Triple check all marks and deem it good. 15. Tighten tensioner till the belt tension seemed about like it was on the old one (was able to twist it about 45 degrees between the oil pump/distributor gear and the intake gear). 16. Think about it for a while and decide that I am going to be one of the 12 JH owners that still has the belt guard in place. Put the lower section back on. 17. Reinstall crank pulley and fan/pulley. 18. Reinstall alternator belt and tighten. 19. Reinstall top half of belt guard. 20. Reconnect coil wire and battery cables. 21. Say a little prayer, get in, and turn key. Starts right up and seems to run as well as she ever did. Whew. It really wasn't that bad of a process, though with all my careful planning I must have been "off" by a tooth on the distributor gear, because after a day of trying her out I found that she wasn't quite right. She ran just fine, but was hard to start (especially when hot) and didn't want to idle (again when hot, which led to a few frustrating restarts at traffic lights). So, off to purchase a timing light (which I've somehow gotten this far in life without) and checked her timing. Obviously there were no corresponding marks, but I would guess that her ignition timing was at about 15 degrees ATDC. Yes, that is AFTER TDC, not before. Well, that would explain things. Loosened up her distributor and gave it a little twist and after a few stops and starts got it set to about 15 degrees BTDC (with the vacuum hose attached because, well, I forgot to detach and plug it). Amazing difference in how she runs now, for the first time in forever she actually idles right (though a bit fast, can't get her idle down below about 1200 RPM) and is much smoother on takeoffs. Now it's time to shine her up and drive, because, well, that's why I have her, right?
|
|||||||||||||
| ||||||||||||||
| Posted: 05-05-2015 07:33 am |
|
99th Post |
|
Tim Murphy Member 
|
Hi. Good outline of changing timing belt. One thing I was told to do that I would like to add. Before starting engine, turn the engine one revolution by hand (using socket wrench on crank nut) to make sure then is no contact between pistons/valves. It is a good way to check that nothing has been set wrong or left loose. Take care Last edited on 05-05-2015 07:34 am by Tim Murphy |
||||||||||||||
| |||||||||||||||
| Posted: 05-14-2015 07:18 pm |
|
100th Post |
|
answerman Member
|
Decided it was time for a completely unnecessary upgrade, just because I've wanted to do this for some time. Placed 3 orders with 3 different vendors: 1. Madera Concepts for the full dash wood kit, including the gauge panel surround, because it looks sooo nice. 2. APT Instruments for replacement trim rings for all the gauges. Stock was black, but the new ones will be chrome. I've seen pictures and the chrome rings just make the gauges "pop" in the woodwork. 3. Delta Motorsports for 6 new 5W gauge bulbs, so I can actually see the gauges at night. Figured since I had to pull the gauges to install the trim rings anyway... Also ordered from Delta a new windshield washer nozzle (I wrecked the old one when I stripped her bonnet down, and I've been driving around with a hole in the bonnet ever sinze) and a new shift boot to replace the 41 year old rather ripped up one she has now. Appearance is everything (plus I already had the other stuff coming so the shipping was covered). Pictures when it's all done... Madera figures about 3 weeks for the woodwork.
|
|||||||||||||
| ||||||||||||||
| Current time is 07:03 am | Page: |
| > Jensen Healey & Jensen GT Tech > Projects > 16173 will be entering project status... | Top |