| ||||
| ||||
| Moderated by: Greg Fletcher | Page:   |
|
|||||||||||||
| 16173 will be entering project status... | Rating: 
|
| Author | Post |
|---|
| Posted: 12-11-2012 04:51 pm |
|
21st Post |
|
Art DeKneef Member
|
Having a heated garage to work in is nice when it's cold. Being from the Chicago area I know how cold it can get there. Having a place to paint is a bonus. Trying to paint in the garage is a pain without the added issues of ventilation and overspray to deal with. What color and type of paint are you planning? My current quick project, which hasn't been as quick as I hoped, is a copper/bronze single stage. Need to spray the engine compartment and hood. The other full restoration car will be base coat/clear coat. When I have done brake work I usually do everything so I know what I have. It may take a little longer and cost a little more, but the thought of everything being checked and fixed is worth it. A new switch sounds to be the answer. The tach will involve a little more work. If an adjustment of the carb's choke assembly doesn't solve the issue then I would think taking it apart and checking would be the next step. I'm rebuilding a set right now and after taking them apart I can see why the car didn't run all that well. They were pretty dirty on the inside. Not that hard just time consuming with all the parts for rebuilding.
|
||||||||||||||
| |||||||||||||||
| Posted: 03-01-2013 07:02 pm |
|
22nd Post |
|
answerman Member
|
Well, here's an update. My winter didn't go quite like I expected it to. Crazy cold, too cold for the heat in the garage to compensate, and as a result not much has gotten done. I'm rethinking the whole repaint idea for now, since once it gets nice out I'll be wanting to drive her (other than cracking and bubbling in a couple spots, she looks pretty good from 20 feet away) so I suspect that the body work/paint may wait till after I've finished the mechanicals such as brakes and timing belt. And a set of tires... the sidewalls are pretty cracked on her current set and for what I can get a cheap set of 185SR70/13s for, I'll invest in a temporary set so that I don't have to worry about a blowout.
|
|||||||||||||
| ||||||||||||||
| Posted: 03-25-2013 03:33 am |
|
23rd Post |
|
answerman Member
|
Another victory. Ms. Jenavieve's headlight switch hasn't worked right since I got her. Same problem as outlined by others on the forum. Contacts were pretty burned up inside and the switch would basically fly apart if you looked at it wrong. Intermittent headlights aren't a good option. Anyway, was at True Value Hardware this afternoon, of all places, and they had a black rocker switch exactly the same size and style as the factory headlight switch. It's only a single throw, but since I can't imagine when I would want to have just the parking lights on, I spliced the blue and red wires together so that they all come on when the switch is on. I also bypassed the dash light dimmer, since it has never worked right either. Even at full bright the dash lights aren't exactly what I would call blinding. $10 and an hour's work. Not too shabby for lights that actually work when you flip the switch. One more thing crossed off the rapidly expanding to do list.
|
||||||||||||||
| |||||||||||||||
| Posted: 03-26-2013 08:06 pm |
|
24th Post |
|
answerman Member
|
Baby needs a new pair of shoes! Well, actually two pairs. My Kumho P185/70R13s are in, and will be installed tomorrow. Also ordered the Retrosound Model One radio, which should be here by the end of the week. Between brake hoses and the radio swap, I know what I'm doing this weekend. Spring is in the air and I want to be ready! On that subject, just in case anyone sees this before the weekend... is there a trick to getting to the radio? Can it come out the back of the console, or does the console need to be removed? I didn't see any obvious screws holding it in place other than the two that hold the fresh air vent controls.
|
|||||||||||||
| ||||||||||||||
| Posted: 03-27-2013 12:02 am |
|
25th Post |
|
Art DeKneef Member
|
You need to remove the center console. Then you will see a couple of screws holding down the radio console to the trans tunnel. Then you look at where the top of the radio console attaches to the dash. On each side there is a small bolt or screw that needs removing also. After removing them you should be able to move the console around and then get the radio out easier.
|
||||||||||||||
| |||||||||||||||
| Posted: 03-27-2013 05:04 pm |
|
26th Post |
|
answerman Member
|
Thanks Art. That's what I suspected. Actually, I need to pull the choke cable out too (the whole cable and housing is trying to move now, pretty sticky in there) so I would like to pull the radio console anyway. Noticed it this morning when I drove her over for her new tires... if I pull the choke knob she chokes right up, but pushing it back in just moves the whole cable so the choke doesn't open back up. Drove over idling at 40mph... lol
|
|||||||||||||
| ||||||||||||||
| Posted: 03-27-2013 11:21 pm |
|
27th Post |
|
Art DeKneef Member
|
The choke cable is a pain to work with. As I mentioned early, did you check the actual choke on the carb? When you disconnect the cable at the carb choke see if the choke assembly moves freely. If not, then it needs cleaning. And you might need a new choke cable if it sticks real bad. But you'll know for sure when you have the cable out. It should slide smoothly.
|
||||||||||||||
| |||||||||||||||
| Posted: 03-28-2013 03:50 pm |
|
28th Post |
|
answerman Member
|
Actually it wasn't that bad. Went to O'Reilly and bought a universal choke kit for $10, pitched everything except the cable housing, and cut it to the proper length. Then I disconnected the cable at the choke (which moves fine by the way), pulled the cable out of the housing, removed the old cable housing all the way back to the dash, and replaced it with the new one. Pushed the old cable back through the housing (after greasing it up good), hooked it back up, and good as new. The problem turned out to be that the housing was pulled off the mounting behind the dash... it was just sliding around with nothing to stop it from moving. The worst part was getting the old mounting point off behind the dash... because I got impatient and didn't wait till this weekend when I was going to have the radio console off anyway, I had to assume the Lotus position and sneak an open end wrench up through to loosen the locknut from the back. Got it though after scraping my knuckles up pretty well. The new mounting is a lot smaller, but still fit fine in the dash opening, though I was ready to put a couple of washers in if needed.
|
|||||||||||||
| ||||||||||||||
| Posted: 04-01-2013 09:01 pm |
|
29th Post |
|
answerman Member
|
Quite the productive weekend. Started off Saturday afternoon *finally* getting around to installing the brake hoses I ordered from Greg last fall, along with the pads for the right caliper (the left side was replaced when I rebuilt the caliper last fall). Like everything else, it all ended up being more involved than I had hoped. First, when I removed the right wheel I immediately saw that something didn't look right. The pads were shifted slightly from their correct position and the top edge was actually riding "off the edge" of the rotor. Looking into it, the lower retaining pin was completely missing! Fortunately, I kept all the extra parts from the Spitfire replacement caliper I bought last fall for the left side (if you remember it didn't fit right but I ended up disassembling it and using the seals and pistons to rebuild the existing caliper) and was able to find a retaining pin there. However, I didn't have the little clips to hold the pins in place... more on that below. While I had the caliper off I decided I might as well clean it up a bit, so I basically did a rebuild of the existing parts. Popped the pistons out using compressed air, pulled the seals, shined up the inside of the cylinders and the pistons with emery cloth, and put it back together. The seals all looked pretty good, which was fortunate since I didn't have replacements handy. The only thing missing at this point were the clips to hold the retaining pins in place ("retainers for retainers?"). The ones I remember from the left side were what I would call "hitch pins" for lack of a better name, kind of shaped like a capital R, with a straight part that fit through the hole in the retaining pin and then curved around to clip against the outside edge. Not sure if these were original, but that was what came with the replacement caliper last fall. Long story short... none of my favorite hardware stores stock such a thing in such a tiny size. What to do? I finally ended up just using a standard (albeit tiny) split cotter pin cut down to about a half inch long, and then carefully bent back around the sides of the retaining pin. It worked fine, but I will be cursing myself when it's time to change the pads again since these are really going to be a bugger to remove again. With the caliper successfully rebuilt and reinstalled, time for the new brake hoses. I only did the front, didn't do the rear one. I'll probably be cursing myself for not ordering all three. Anyway, that went pretty uneventfully. By this time it was pretty late, so I knocked off and picked up Sunday morning after church. With all this done, all that was left was to bleed the system. So, armed with a quart of DOT4 fluid, off we went with Mrs. Answerman on the brake pedal and me on the bleeder valves. After almost a quart of fluid and an hour of getting the three bleed points at least close, we couldn't seem to get all the air out of the system. So, I did a little online research, headed over to Harbor Freight Tools, and came back with a pneumatic bleeder kit (http://www.harborfreight.com/brake-fluid-bleeder-92924.html). Oh wow. I am never going to bleed brakes without this little gem again... best $25 I have spent to date. Took another quart of fluid, but we finally got them bled out properly and the pedal is nice and firm. The rest of the day was preparation for the new Retrosound Model One radio that should be arriving tomorrow. Pulled the door trim panels off, and removed the incredibly crappy speakers that the PO had mounted in the doors... 3 1/2 inch speakers that didn't even fill the opening. No wonder they sounded so rotten. Then, tackled the radio console. Now, this didn't quite go as I expected (actually easier if you can believe that). What ended up happening is that after removing the shifter/e-brake console, I removed the two screws holding the lower edge of the radio console down, and then removed the two screws that hold the vent handles under the dash in place. As Art suggested, there appear to still be screws holding the top edge of the radio console to the dash, but I could not find them for the life of me. Just for fun, I started pulling on the bottom edge of the console and the whole thing wiggled pretty well, but wasn't going to come out. So I pushed it back into position... and the "woodgrain" trim plate popped loose. Ooh! So, I disconnected the choke cable to give me a few inches of give, popped the fan switch off, pulled the bulb assemblies from the 3 warning lights at the bottom, and was able to remove just the panel. Maybe this was the way it was supposed to come out, and I just misunderstood, but regardless I now had access to the front of the radio. The radio was mounted to a plate that was held to the face of the console metal with 4 screws. Took them out and the radio came right out the front of the console. Easy as pie. Again, this may not be the original setup. I will get a couple of pictures of it all before I put it back together. Today's project is to run over to Best Buy and pick up some new speakers to be mounted tonight. I have picked out a pair of JVC 4" coax speakers that look like they will fit into the door space. And, I am going to build a box for the 6 1/2" Alpine rear speakers I will be picking up at the same time. A box that is 34" wide by 7" high by 4" deep should fit nicely in the rear well under the rolled up soft top, covered with cheap automotive carpet. When it's all said and done, I think it will be more a more than acceptable speaker setup for the space available... not audiophile quality, but more than good enough for me. Bonus find of the day was a pair of cabinet doors (one of the neighbors must be remodeling their kitchen) made of 3/4" plywood, 36" high by about 12" wide. Perfect material to make my speaker box, and the price was right.
|
||||||||||||||
| |||||||||||||||
| Posted: 04-02-2013 05:20 am |
|
30th Post |
|
answerman Member
|
Quick update... picked up the speakers tonight and decided to put them in so that part was done when the radio got here. I have to say I'm confused about the door speaker mounting. They are definitely designed for 4" speakers, since 5 1/4 would overhang the beveled area they mount in, but the 4" speakers I got didn't quite fill the opening. I thought about it for a while and decided to try a little field modification, especially since I didn't care for the way they would have mounted anyway. What I ended up doing was going to the hardware store and picking up a roll of 1/2" sponge rubber window insulation, and circling the back of the door trim cutout for the speaker, so I would have a nice seal between the door trim and the door metal. Then, I put the door trim panel back on and mounted the speaker to the trim panel, drilling holes into the beveled area. That worked out pretty well, though I lost the stock speaker grilles in the process since they wouldn't fit over the speakers anyway. I ended up using the grilles that came with the speakers. Tomorrow: the Retrosound radio arrives, and that goes in along with building and installing the rear speaker box. Once that is all done, the interior will be reassembled and I can actually drive her in comfort (though the weather's not supposed to get out of the 40s for the rest of the week so she'll probably stay in the garage anyway).
|
|||||||||||||
| ||||||||||||||
| Posted: 04-06-2013 06:42 am |
|
31st Post |
|
answerman Member
|
Radio and speaker installation is complete! As previously mentioned, I found a 4" pair of JVC speakers for the doors and a matching pair of JVC 6 1/2" speakers for the rear deck. The doors: 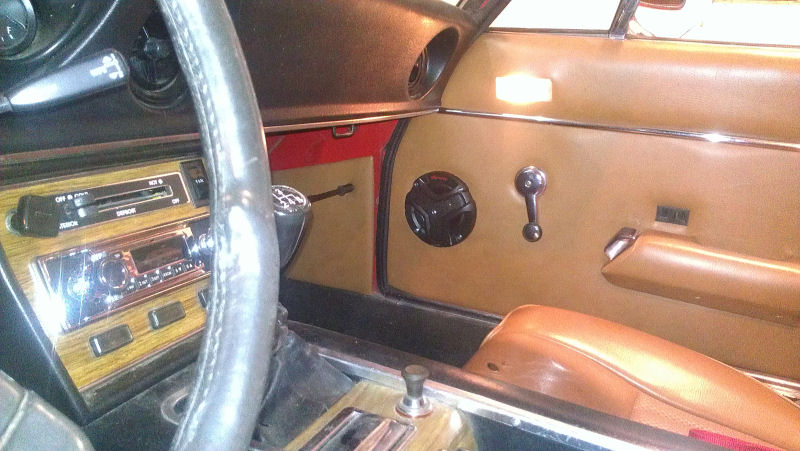 And the rear well: 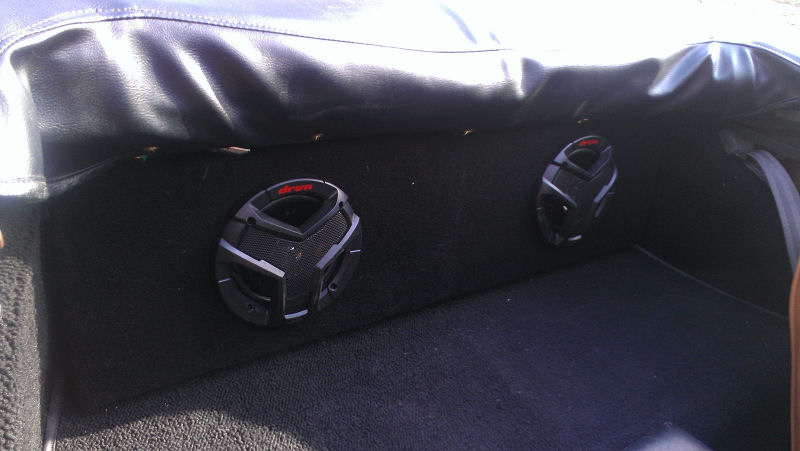 What I ended up doing for the rear was to build a box 33" wide by 7 1/2" high by 5" deep, just enough to fit tight into the rear well under the rolled up top and frame. Covered it with cheap black automotive carpet and it looks like it's part of the car. Other than the grilles being very modern looking, it doesn't look too bad if I say so myself. The Retrosound Model One radio installed: 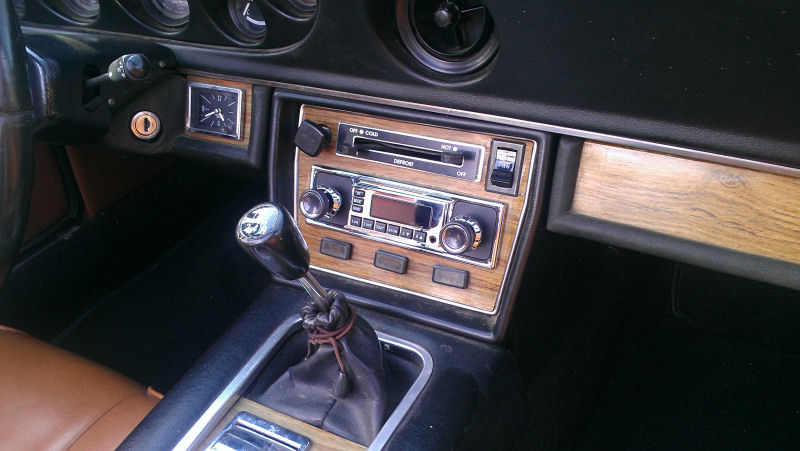 Oh, and the radio is chrome... for some reason I can't get a picture of it without it looking reddish brown. Reflecting off the interior, I suppose. *EDIT* I was able to get a couple of pics in the sun yesterday and the radio and rear speakers pics are updated now. Plus I figured out how to embed pics within the post :-) Anyway, it looks very appropriate in the 1974 dashboard. Last edited on 04-08-2013 11:37 pm by answerman |
||||||||||||||
| |||||||||||||||
| Posted: 04-26-2013 08:13 pm |
|
32nd Post |
|
answerman Member
|
Since Joachim updated his project, I guess I should update mine. Decided last night to start hitting Ms. Jenavieve with the grinder. The right side appears to be the worst (from the outside anyway) so that's where I started...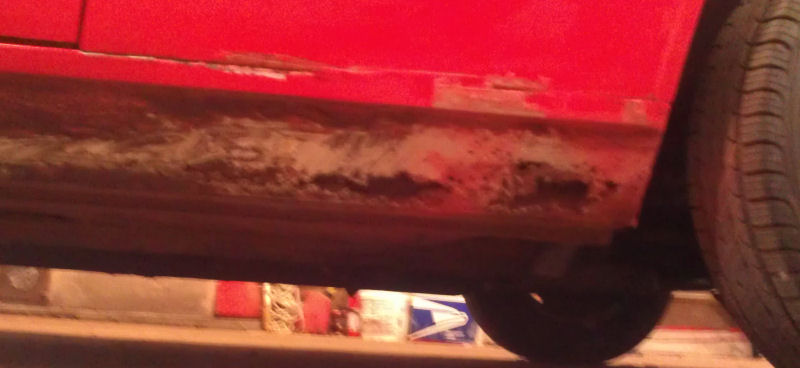 So, the rocker is pretty much Swiss Cheese as I suspected. This looks to be a nice straight flat piece, guess I'll just cut it out the entire length right under the groove where the red paint ends, and weld in a new piece of metal. 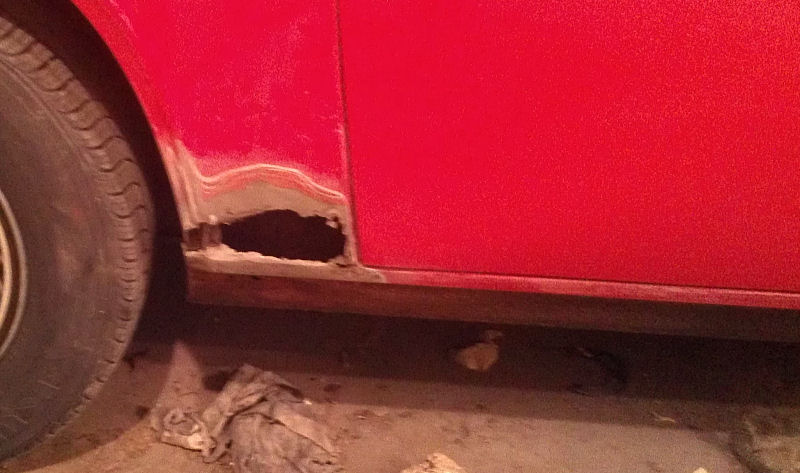 This will be a bit more of a challenge. I could see that one of the POs had done some Bondo work here. Started chipping away and pulled out all the old school bodywork: about an inch thick of Bondo backed with some wadded up newspaper and rags. Not to mention that when I reached through the hole, the rocker has a nice fill of what appears to be very high quality topsoil, nice and moist. I'll clean that out when I cut the rocker as per the previous picture. Fun stuff. Obviously I'll need to weld some new metal in, but shaping it is going to be interesting. Thinking about doing it as a two piece job, welding a small piece in for the "flange" or "lip" of the wheel well first to connect the flange to the rocker, and then doing the flat piece and mating it to the first one. Last edited on 04-26-2013 08:22 pm by answerman |
|||||||||||||
| ||||||||||||||
| Posted: 04-27-2013 10:48 pm |
|
33rd Post |
|
Art DeKneef Member
|
Fixing the rocker, or is it rockers, is going to be a pain no matter how you look at it. Once you get the rocker opened up and can get a look inside you'll get a good idea if just welding in the flat piece will work. Based on the picture my initial guess would be no. The bottom of the rocker is probably going to be rusted also. And trying to weld on the rusted area will cause more problems. You might think of calling Delta and see if they have rockers and what the cost would be. You might be able to buy 1 rocker and use it to fix both sides. Of course you could always make your own rocker. It's not that difficult. Just requires a lot of bending and measuring. Spoken from experience. The bottom front of the rear passenger fender is another piece you can make. I made one for one of my cars. It takes time and patience to get it right. Well, that and having the right tools really helps also. But this piece is easier to do than the rocker in my opinion. The wheel lip is the hardest part.
|
||||||||||||||
| |||||||||||||||
| Posted: 04-29-2013 07:55 pm |
|
34th Post |
|
answerman Member
|
Talked to Delta today and they will be getting the rockers back in stock shortly, but the repair piece for the rear fender is no longer available (supplier went out of business or something). I think I'm going to go ahead with my original plan of patching the rocker as best I can for now, making a new patch panel for the fender/wheel well (maybe glass and a little Bondo), and doing what I need to to make it presentable for the summer. Then, next winter I can address a permanent solution, probably just replacing both rockers with new ones from Delta as part of the complete stripdown and repaint. For now, I just want to get her on the road and not be embarrassed... the driving season in Wisconsin (which STILL hasn't started) is way too short.
|
|||||||||||||
| ||||||||||||||
| Posted: 05-04-2013 04:50 am |
|
35th Post |
|
answerman Member
|
Don't shoot me... I know I committed a car restoration faux pas. It's only temporary. I just need it to hold up for the summer and then we'll do it right next winter. Armed with Bondo Glass, Bondo Body Patch, glazing putty, high build primer, and about 9 different grades of sandpaper from 40 to 1200 grit, I've spent the past few days patching up what you saw above. It's not perfect, but it'll pass the 10 foot test. I had my body shop friend match up the paint and get me a quart of single stage with the appropriate reducer and activator, and will cross my fingers that it will match and spray it tomorrow. Pictures then unless it comes out completely bodged.
|
||||||||||||||
| |||||||||||||||
| Posted: 05-07-2013 04:45 am |
|
36th Post |
|
answerman Member
|
Well, I wouldn't say completely bodged, but the new paint is definitely darker than the old. Giving it a couple more days to harden up and then I'll hit it with the buffer and see if I can blend it a little better. I think it'll be ok for the summer.... at least pass the 20 foot test anyway.
|
|||||||||||||
| ||||||||||||||
| Posted: 05-14-2013 08:43 pm |
|
37th Post |
|
answerman Member
|
Change of plans (as mentioned in another post). I was checking my eBay account to see if the tach I had ordered had shipped (which it had, and I've received it, and it didn't solve my problem, but that's for another post) and ran across a listing for a 1974 JH parts car. Long story short: it now belongs to me and my son and I will be driving over to Perham, MN to pick it up this weekend.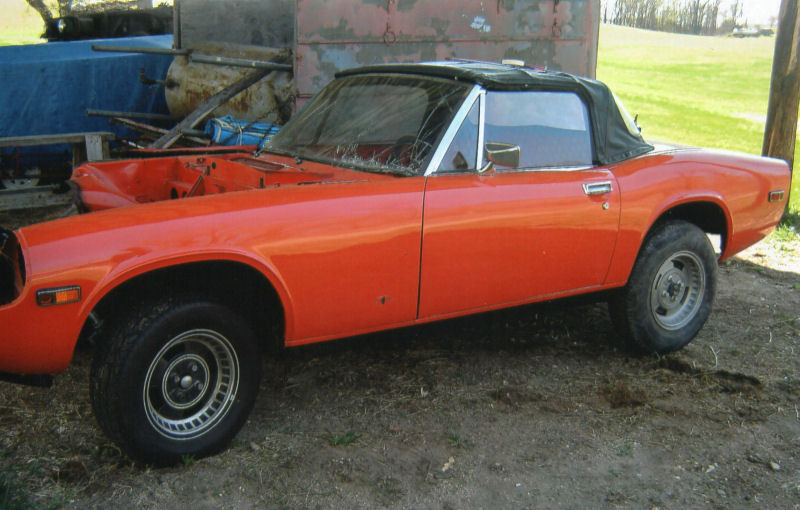 From the good side. And.... 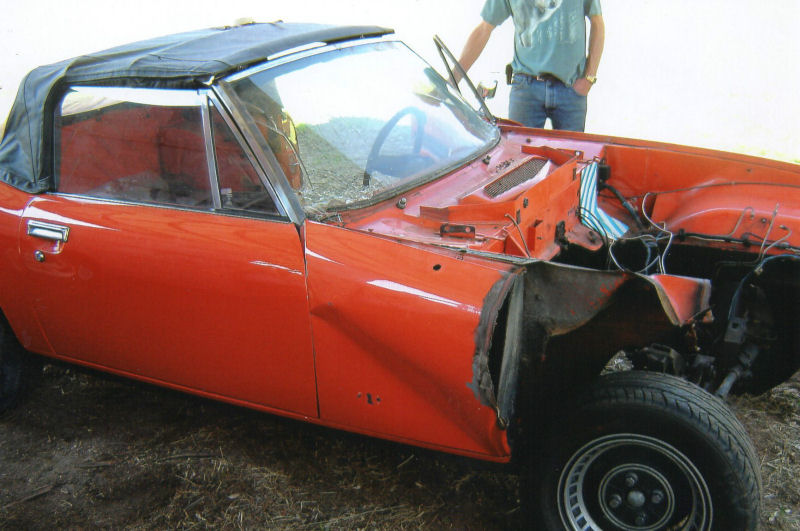 From the not so good side. As a result of this unexpected event, I am going to hold off on any more body work on Ms. Jenavieve for the summer, and then re-address it next fall/winter when I can do it right with the donor car. I haven't actually seen this in person yet, but according to the owner it's in pretty good rust-free condition (other than the obvious damaged/missing parts). This solves my problem of needing rockers and lower fender repair patches, plus I can use the floorboards and maybe a few other bits. The pictures aren't quite correct as he's since removed all of the exterior lights and trim. And obviously the engine, transmission, interior, dash, etc. are gone as well. Still lots of good parts there, though. The plan is to disassemble this as much as I can this summer and dispose of what I don't need, either by finding people who can use the parts or just storing them "just in case" and sending what's left to the recycle bin. Last edited on 05-14-2013 08:52 pm by answerman |
||||||||||||||
| |||||||||||||||
| Posted: 05-21-2013 06:02 am |
|
38th Post |
|
answerman Member
|
Well. JH 19370, or what is left of her, is now in my possession. Nice drive across Wisconsin and Minnesota to pick her up this past weekend. Looking like an excellent investment, the more I delve into her. She belonged to Ernie West (who as I understand is a JHPS member but isn't active on the forum) and we had a really nice chat about JHs in general and ours specifically. Many of the parts from 19370 moved over to his other JH, which was apparently featured in the JHPS newsletter tech talk some time back (before my time apparently). Anyway, got her home and been playing the past couple of days. Like I said above, he stripped pretty much anything that could be unbolted and removed. However, the items I was looking for are all there (along with a couple of nice surprises). The three fenders that weren't damaged in the accident are pretty much perfect, as are the rockers and floor pans. Even the front passenger fender is probably salvageable in the "behind the wheel" area, which is the part I need. Those will all be coming off in the weeks to come. Also (and this made the cost of the car and the transportation much easier to swallow) the soft top, while not perfect, is in perfectly serviceable condition... just needs to be cleaned up. It's a much lighter weight than the aftermarket top that Ms. Jenavieve came with, it's not suffering from any shrinkage (in fact it's a tad loose), and the framework is clean as a whistle. So, the first order of business tonight was to unbolt both top frames and do a bit of regluing at the header rail, and the soft top and frame you see in the picture above is now happily mounted on Ms. Jenavieve. I think it'll be perfectly fine once it's tidied up, and more importantly it actually fits right and I can snap and Velcro the back the way it's supposed to be done. Took all of an hour to swap, and it actually works right.
|
|||||||||||||
| ||||||||||||||
| Posted: 06-14-2013 05:00 am |
|
39th Post |
|
answerman Member
|
Small update, just because I like to talk about my cars :-) Donor car is getting lighter every day. As of tonight, all 3 1/2 fenders, trunklid, and doors are removed and stored safely in my garage attic until I get to stripping them and prepping for the graft onto Ms. Jenavieve. Also removed and stored in the attic are the stainless door trim from both sides, convertible top frame (actually it's the one from Ms. J), heater, fan, windshield frame, steering wheel, wiper motor, and a few odds and ends like door latch striker plates and the convertible top locating hooks from the rear deck. These all fall into the category of "probably won't use them in the restore, but maybe someone else can use them". To remove yet: rockers/sills and floor pans, which will be part of Ms. J's restore. Once those are removed, all that will be left will be to remove the wheels, front rotors, rear drums, steering column, and rear axle/differential (and the rear taillight surround panel if I can figure out a way to remove it without too much trouble) and then what's left can be carted off to the crusher. Unless someone can think of something I missed that would be of value. I'm thinking that I can have the rotors turned and kept as spare pairs, and the wheels sent off to be blasted and refinished for either spares or swapping if I think they are better than the ones Ms. J has now (both sets are stock style). Meanwhile, Ms. J is all shined up and ready to take part in her first show this weekend... the British Car Field Day in Sussex, WI. Over 200 British cars on display, and from what I've seen in last year's pictures she should be the only JH there (though there were a couple of Interceptors last year). Of course this isn't too far from the Mau family abode, so maybe Ron or Jeremy may be there. We'll be driving down with the local British car club... the lone JH in a procession of MGs, Triumphs, Jaguars, Minis, a couple of Lotuses, and even one Rolls that I know of. I'm not expecting any trophies in her current condition, but it'll be fun just to go take part in it. Last edited on 06-14-2013 05:12 am by answerman |
||||||||||||||
| |||||||||||||||
| Posted: 07-09-2013 07:23 pm |
|
40th Post |
|
answerman Member
|
It's been a while, though not a whole lot has happened in the interim. Donor car is gone. Got the sills and rockers removed and stored, along with the rear valance (or whatever it's called, the rear panel that the taillights mount into), the rear axle and suspension, and what was left of the front suspension, and called it good enough. What was left was loaded by myself and my two teenage sons onto my little flatbed trailer and carted off to the local recycling center. At 7 cents a pound, this pile of classic British steel resulted in the recycling center handing me $23.80. Kind of sad... 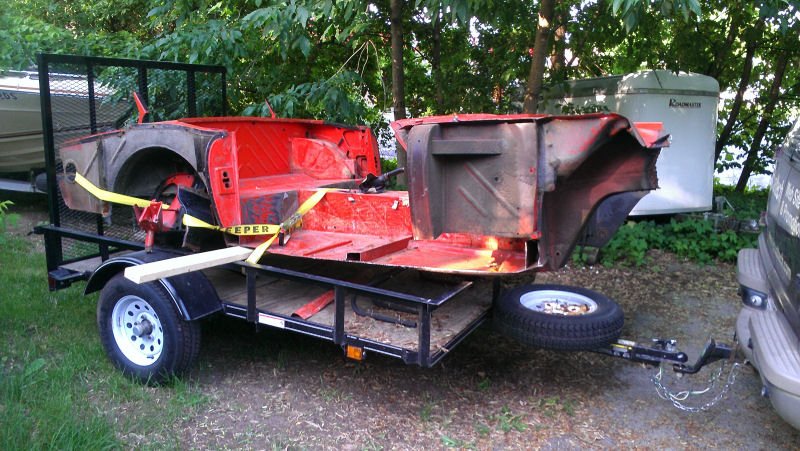 The British Car Field Day was fun. Great weather, over 200 British classics on display. As expected, no trophies for Ms. Jenavieve. Actually, they didn't quite know what to do with her, so they classed her as a big Healey. Take a look at this picture and tell me which car you would vote for... or which one not to vote for. Kind of unfair competition :-) 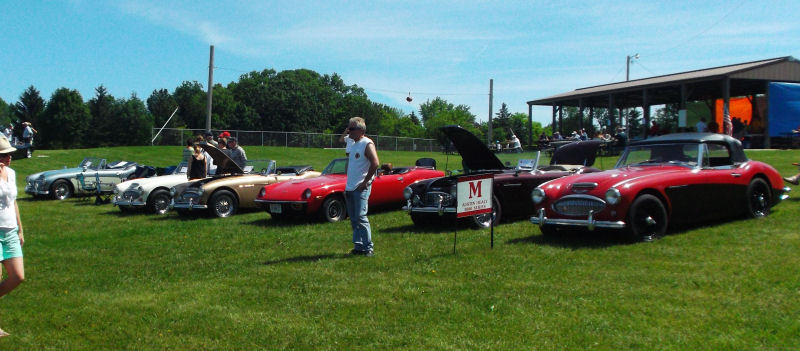 The remainder of the summer will now be odds and ends that will keep her in driving condition (gotta drive when I can in Wisconsin, the season will be over way too soon) and getting the body panels from the donor car prepped for this winter's transplant. Other than that, probably not too much work on her for a while, though I noticed yesterday that there is a bit of fluid leaking from the area of the right rear brake. It's always something... On the plus side, was vacationing with the inlaws this week in NY state and dropped in to visit Brett Gibson. Had a great couple of hours chatting, sharing tips and getting insights, and looking over his JHs. Last edited on 07-09-2013 07:25 pm by answerman |
|||||||||||||
| ||||||||||||||
| Current time is 10:06 pm | Page: |
| > Jensen Healey & Jensen GT Tech > Projects > 16173 will be entering project status... | Top |