| ||||
| ||||
| Moderated by: Greg Fletcher | Page:   |
|
|||||||||||||
| 16173 will be entering project status... | Rating: 
|
| Author | Post |
|---|
| Posted: 07-11-2013 06:37 pm |
|
41st Post |
|
answerman Member
|
Yup, brake problems indeed. Decided to drive Ms. J to work today for the first time in a couple of weeks, and the pedal is going right to the floor. Looks like it's time to hit the club store for a new rear cylinder (unless I get lucky and it's something silly like a loose fitting... haven't gotten down there to look yet). Sigh.
|
||||||||||||||
| |||||||||||||||
| Posted: 07-14-2013 05:02 am |
|
42nd Post |
|
answerman Member
|
Well, good news for a change. It was in fact the rear right brake cylinder spewing fluid at an alarming rate. However, I was doing some work in the garage and happened to glance over at the rear axle assembly that I removed from my parts car (and was too heavy to drag up to the attic) and lo and behold, the cylinders were still mounted! For some reason I had convinced myself that Ernie had pulled them (like he did the front calipers) before selling me the car, but there they were. Pulled the right rear cylinder, took it apart and cleaned it up just to be safe, and swapped it out with Ms. J's faulty one. After a quick power bleed, I can stop again! This parts car is starting to look like the best investment I've made in a long time.
|
|||||||||||||
| ||||||||||||||
| Posted: 07-20-2013 04:43 am |
|
43rd Post |
|
answerman Member
|
Another puddle on the garage floor. Looks to be gas this time *sigh* It's always something. The boot has always smelled like gas... my guess is with the crazy hot weather we've had the past week, things are expanding and opening a tiny leak into a small leak. Guess I'll be pulling the gas tank for repair...
|
||||||||||||||
| |||||||||||||||
| Posted: 09-18-2013 06:52 pm |
|
44th Post |
|
answerman Member
|
Not much has changed in the past couple months, decided that this was the summer to rip the old wood siding off our house and replace it with vinyl, so that's been taking most of my free time. 3 of the 4 sides (the complicated ones) are done, hoping to finish up the last side over the next couple of weekends. The gas leak I mentioned above seems to come and go... I am writing it off to the weird changes in the weather we had all summer. My guess is there's a tiny leak somewhere in the tank that is expanding and contracting with the weather changes. It'll wait till this winter when the body comes off, and then I can assess the tank for repair or replacement. On a side "fun" note (and I suspect several of you have been there) the first "oh you have a convertible!" moment happened this week. My son volunteered me to drive Ms. J in his high school homecoming parade with a homecoming court couple perched on the boot. So, that'll be fun. Any excuse to show her off, right?
|
|||||||||||||
| ||||||||||||||
| Posted: 11-11-2013 07:07 pm |
|
45th Post |
|
answerman Member
|
Well, it's official. Ms. J is off the road for the winter (it's 31 degrees F which works out to -1 C for those of you across the pond, and likely to get colder rather than warmer for the next several months) which means it's time to start the restoration in earnest. First order of business is to start prepping the panels I took off of the parts car I picked up from Ernie West earlier this year. Fortunately, those appear to still have the original paint so hopefully removal down to either bare metal or a good base shouldn't be too much work. I'll be replacing the front left, rear left, and rear right fenders, the boot lid (maybe, haven't decided yet, depends on whether I want to go with or without the luggage rack she currently has mounted), and the rockers. Looking forward to drilling out all those spot welds fastening the rockers to the inner sills. Since I'm not planning on replacing the sills, I just Sawzalled off the whole rocker and sill assembly from the parts car along with a bit of the floor pan, so those spot welds should be friendlier to drill out (I can just put the whole assembly on my workbench and use my drill press) though the ones on Ms. J will be fun. Is there such a thing as a portable horizontal drill press? Once all that's done, then I get to prep the rest of Ms. J. Lots more fun there. At least one badly done Maaco-style paint job to remove from the bonnet, doors, and other parts not mentioned above.
|
||||||||||||||
| |||||||||||||||
| Posted: 01-06-2014 05:56 pm |
|
46th Post |
|
answerman Member
|
New year, and time to get to it. As I just posted on the Jensen East 2014 thread, I have 19 weeks to get Ms. J ready for the event. Nothing like a deadline, right? I got a bit of a wrench thrown into things when I blew out my knee back in November and had to have it scoped, but I think I'm now ready to tackle the project in full. Assuming the weather warms up some (if you haven't seen the national weather reports, it's crazy here... minus 21 degrees F at the time of this writing) my first goal is to get everything unbolted by this coming weekend. Doors, bonnet, boot lid, and fenders removed, and seats and carpet pulled. Garage is heated and insulated, but that kind of temperature is hard to overcome, so we'll see. Then, it's assessment time regarding floors and rockers, once I have the above stuff out of the way. I took a look at the rockers from the parts car this weekend, and while they are pretty clean as far as rust, they are not exactly perfect (lots of little dings). Still debating if I want to go to all the trouble of using them, or just cut out what I need to cut out on Ms. J and weld in patch panels. Won't know until I can see what I am working with. Wish me luck.
|
|||||||||||||
| ||||||||||||||
| Posted: 01-14-2014 03:31 am |
|
47th Post |
|
answerman Member
|
The weekend passed and I actually got a lot done! Over Saturday and Sunday, my assistant (the 18 year old son who is anxious to start welding and is planning on this car being his someday) and I made a huge dent (pun not intended) in the disassembly process. First order of business, after removing the battery, was to remove the doors, bonnet, convertible top, boot lid, front bumper, and gas tank. That all went fairly quickly. Then, since I had way more time to work with than I thought I would, off came the headlight pods, headlights, and the left front fender. Not bad for 6 hours of work. I was pleasantly surprised with the condition of the gas tank (my guess is that my leak isn't coming from the tank, but rather from the fittings and/or hoses) and the boot floor itself. Some surface rust, but it seems mostly solid. Sunday, I went back out and decided to tackle her again. Besides removing things like the hooks that hold the top down at the rear, all the snaps that hold the top in place, the taillights, the vertical stainless trim in the door jamb, and the curved trim pieces at the rear of the car, I also removed the left rear fender. Now, THAT was a job. I experienced my first significant rust along the way, and while I was pleased with the condition of the rocker/sill at the front fender (it's actually quite clean) the condition behind the door is pretty atrocious. I was expecting the worst after seeing the bad Bondo job one of the POs had done, and I wasn't disappointed. In order to remove the rear fender, after removing the myriad of bolts and rivets (and having to melt the lead to get at a couple of the rivets), I ended up having to take a Sawzall to the fender in the little section in front of the wheel where it bolts to the rocker since the bolts were covered with about a half inch of Bondo. Once I did that, I was able to wiggle it off. There's basically nothing left to the top of the rocker in the area where the rear fender and the stoneguard attach. After chipping away all the Bondo, the center of it is basically a big hole. Next step will be to get the stainless trim off of the bottom of the door jamb (where it's basically glued to the rocker) so I can assess just how far it's rusted. I remember removing the stainless trim panel from my parts car and it was a hassle... not sure what they used to glue it down but it's seriously strong stuff. That reminds me... they used the same, or something similar, to seal between the top of the rear fender and the edge of the frame where the weatherstrip for the boot lid is. What is that stuff? Some kind of caulk? I found that heating it up only makes it even harder. Anyway, a good weekend of work. Looking forward to next weekend when the other two fenders come off and I can finally assess just how much work we are going to have to put into fabricating metal patch pieces for the rockers. Last edited on 01-14-2014 08:53 pm by answerman |
||||||||||||||
| |||||||||||||||
| Posted: 01-14-2014 03:40 am |
|
48th Post |
|
answerman Member
|
By the way, an aside... I thought I'd share an organizational idea I came up with during disassembly. I went and got myself a couple of boxes of Ziploc storage bags, both the quart size and gallon size, a Sharpie, and a pack of index cards. Then, as I remove items, I put them in an appropriate size bag along with an index card stating where they came from. So, as an example, I have a bag with a card labeled "Front Left Fender" which has all the fasteners I removed, along with the side marker light. Another one labeled "Stainless Trim" with the screws from the door trim, the curved trim pieces from the rear of the car, and the little retainer clips for said curved trim pieces. Obviously, the larger parts don't need to be bagged since they are quite apparent as to their identity, but the fasteners that go with them aren't... hence the labeled bags. You get the idea. I would hope that this will aid immensely in the reassembly portion instead of having a box filled with all the nuts and bolts that came from various places in the car all mixed together.
|
|||||||||||||
| ||||||||||||||
| Posted: 01-14-2014 06:38 am |
|
49th Post |
|
subwoofer Member
|
Pictures, or it didn't happen! :-) PM me if you can't figure out how to attach pictures. -- Joachim
|
||||||||||||||
| |||||||||||||||
| Posted: 01-14-2014 07:18 am |
|
50th Post |
|
answerman Member
|
Pictures? Oh, I got pictures :-) Tomorrow, I need to get them off my phone.
|
|||||||||||||
| ||||||||||||||
| Posted: 01-14-2014 08:50 pm |
|
51st Post |
|
answerman Member
|
OK, pictures at various stages during the weekend. Here's phase 1, after all the easily removable bits were removed:  And here's where I went farther and took most of the front, and the front fender:  And finally (bad lighting here) the end of the weekend with the rear fender removed.  I'll get some better pictures of the rocker and associate rot a little later, perhaps when I get the other side disassembled. Last edited on 01-14-2014 08:52 pm by answerman |
||||||||||||||
| |||||||||||||||
| Posted: 01-22-2014 07:08 pm |
|
52nd Post |
|
answerman Member
|
Spun Ms. Jenavieve around on her roller skates last weekend to get the fenders off the passenger side. That actually went surprisingly well. Expecting some pretty extensive rust issues at the front of the rear fender/rocker joint, and I wasn't disappointed. The rear fender was basically just Bondo'd to the sill. The "tab" at the bottom of the fender wasn't even there. As promised, closeups of the rocker/sill calamity: 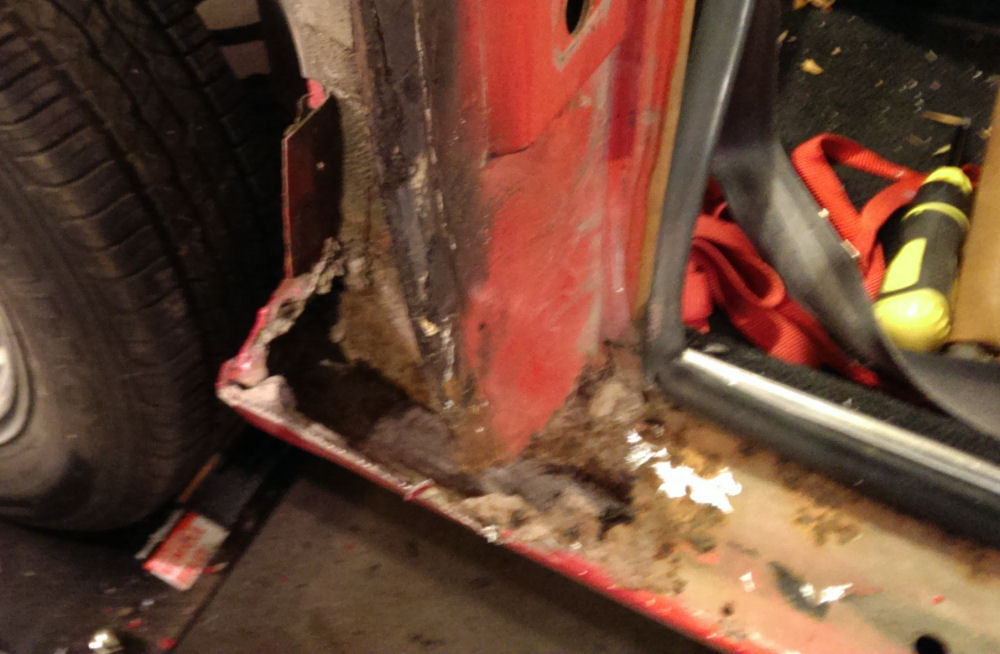 Ummm... the top of the rocker is pretty much gone! Also, the door jamb is pretty much gone in the bottom area.  Another view of the same area. Haven't hit it with the grinder yet, but there's not much to work with there. 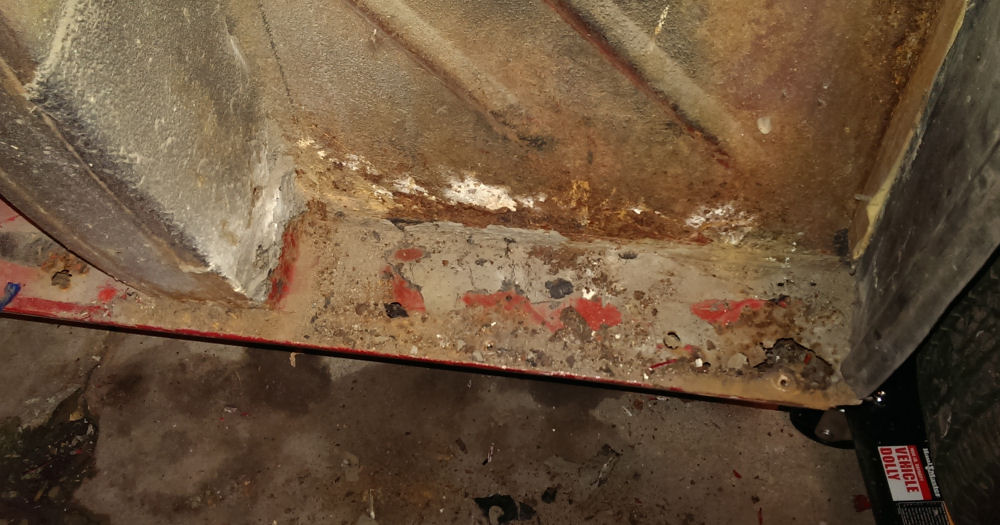 At least the front is mostly in once piece. Obviously, there are likely rust issues on the inside that I can't see at this point, too. Debating whether to just cut out and weld sheet metal as needed, or perhaps chopping up the rockers I took off my parts car to patch in the front and rear bad spots, while leaving the middle (though I know I need to cut out a "window" and weld in new metal in the center under the door). The fewer spot welds I have to drill out, the better. And of course fabricate a patch piece for the bottom of the door jamb. This is getting fun! Last edited on 01-22-2014 07:12 pm by answerman |
|||||||||||||
| ||||||||||||||
| Posted: 01-28-2014 04:33 am |
|
53rd Post |
|
answerman Member
|
Rant time. We were looking at the passenger side rocker/sill from different viewpoints, and decided that since it's in pretty good shape (other than the obvious spot behind the door) the most straightforward route would be to chop the rocker I took from my parts car a few inches into the door opening and weld it in to replace the existing rotten area (basically making the rearmost 12 inches or so new from about the drain hole in the door jamb back to the wheel cutout). After fighting with it for the better part of yesterday and today, it's just not worth it. After drilling out about 30 spot welds, I still don't have the outer panel separated from the rest of the sill on the piece I want to put in. Not to mention that I haven't even started trying to remove the associated parts from the car. The rear corner of the rocker/sill is the wackiest welding job I have ever seen. Counting the outside (visible) panel, the inside stiffener, the end triangular piece that closes it off, and the inner sill, there are 4 (yes 4) layers of metal that are welded together at the rear. Going to take a day to lick my wounds (and wait for it to warm up a bit, supposed to hit -25 degrees F tonight) and then look at it again and see just how hard it would be to fabricate a new piece or pieces to patch what needs to be patched. I'm trying very hard to do this all "right" but I keep losing sight of the fact that most of this repair will not even be visible when the fender is re-mounted. So, the plan at this point is to make a couple of new pieces to fill in the big hole, welding to the inner unibody panel and then wrapping over to meet the rocker at the point where it changes from red to black in the picture above. Then, patching the bad spot behind the front wheel, cutting out most of the visible flat part of the rocker under the door and welding in a new flat piece of metal. At least this is the bad side. The drivers' side is in much better shape... really the only bad spot is behind the door and it's not half as bad as the passenger side. I'll get past this, but just frustrated right now. Last edited on 01-28-2014 04:34 am by answerman |
||||||||||||||
| |||||||||||||||
| Posted: 01-29-2014 01:43 am |
|
54th Post |
|
Art DeKneef Member
|
Oh, I so understand the frustrated part. You're correct with the funky metal layers and removing the rusted metal. But it can be done. First thing I would do is remove all the paint, tar, sealer, etc. from the areas and get down to bare metal to actually see what you are working with. And I would start with the front to hone my skills so to speak before working on that rear section. Those rear pieces aren't that difficult to make with basic hand tools, just time consuming. If you need some pictures of those areas let me know. I have another car under restoration that is apart in those areas if you need some pictures.
|
|||||||||||||
| ||||||||||||||
| Posted: 01-29-2014 07:18 pm |
|
55th Post |
|
answerman Member
|
Thanks Art. I just needed to vent a little because I thought my original plan was going to work better than it did. I didn't expect that it was going to be such a hassle to remove the outer rocker from the assembly from the parts car, and I feel like I wasted an entire weekend. Definitely going with plan B... clean up all the paint and tar and such to see what's salvageable on the car, de-rust as best I can, and cut out the nonsalvageable stuff and weld in new. As long as it's structurally sound, that's all I'm worried about... like I said 98% of this repair won't even be visible when the car is reassembled.
|
||||||||||||||
| |||||||||||||||
| Posted: 02-17-2014 07:59 pm |
|
56th Post |
|
answerman Member
|
Just an update, or lack thereof. The past few weeks have been kind of busy so not a whole lot getting done on Ms. J. When I've had a spare hour or two, I go out to the garage and pick a part to strip the paint off of. Lots of cleanup to do from things like the headlight rings and trim having overspray from the PO's bad paint job. Things get much calmer after this coming weekend, and then I will start having more progress to report. January kind of got away from me, so I need to get my nose back to the grindstone. The Jensen East meet is coming sooner than I would like... gotta be ready! Last edited on 02-17-2014 08:00 pm by answerman |
|||||||||||||
| ||||||||||||||
| Posted: 02-22-2014 07:20 am |
|
57th Post |
|
answerman Member
|
Good news for a change. Took Art's advice and spent some time cleaning up the chunk of rocker/sill that I chopped off my parts car. Got it pretty much down to bare metal, and it became much clearer how everything was welded together. I swear those Jensen welders must have gotten paid by the spot weld... Anyway, once I was able to see what was holding everything together, I was able to drill out the welds I needed to in order to separate the outer rocker from the rest of the sill. Then, I moved on to Ms. Jenavieve and did the same. I figure about an hour of final cleanup this weekend, and then I will be ready to graft the nice new piece of outer rocker into place. That will be a huge load off my mind. Feeling much better about the project now.
|
||||||||||||||
| |||||||||||||||
| Posted: 03-03-2014 04:29 am |
|
58th Post |
|
answerman Member
|
Another mostly productive weekend went by, with only one calamitous discovery (which I was kind of expecting anyway). First, the good. Yesterday, we finished the graft of the "new" section of rocker panel to Ms. Jenavieve. Came out pretty good. Apparently two semesters of welding classes have made an impact on my 18 year old. Ground down the seam and with a little filler you won't even see the seam. Also spent a LOT of time with a sander/grinder this weekend. All paint is removed, down to bare metal, on the rear valance, the rear deck (between the convertible top well and the trunk opening) and both rockers and door jambs. All that's left to do of the "unibody" is to finish paint removal and prep of the trunk interior and the engine compartment. Then, prime and paint. I'm taking a week off from work (it's nice to be self employed) next week to spend several full days working on her. The goal is to have this work all done by the 15th of March. Now, while I was doing all this, I also stepped to the side and started the paint removal of the hood, because I had a nagging feeling that all wasn't well there. Of course, I was right. Armed with a 50 grit sandpaper disc and backing pad on my angle grinder, I went to work. After I got through the Maaco paint job layers down to the original finish, I started running into body filler. Yup, someone creased the hood at some point. They did a pretty good job with the filler, it wasn't even noticeable other than the paint had cracked over it (which was my clue, it was right over the area where the telescoping hood strut would have been if it was still installed). Of course, I didn't discover it until AFTER I hit it with the sanding wheel, so the filler got gouged up pretty bad. I ended up just going down to the bare metal there as well, and can see all the peen marks and such where they bashed it back into shape. No more than 1/8" of filler, but that's enough, and though I'm pretty fair with body filler this looks like a bit of a challenge with all the contours of the hood. I may ring up my body shop friend and see what he'd charge me to do it right. Anyway, still not ahead of schedule, but at least not behind.
|
|||||||||||||
| ||||||||||||||
| Posted: 03-05-2014 12:03 am |
|
59th Post |
|
redracer Member
|
answerman: there is a very nice fix for "the bend" in the hood caused by someone inadvertantly trying to close it without lifting up the release catch first.(I saw this first on Clay Gleason's J-H--he called it "LUCIE", Seattle, WA.) I have fixxed one myself, even though I am not a "body" man. If interested, call 404-261-2552 or SKYPE "RockClimber52" me.
|
||||||||||||||
| |||||||||||||||
| Posted: 03-05-2014 07:15 pm |
|
60th Post |
|
answerman Member
|
Talked to my body shop friend and he thinks he can get the hood properly filled and shaped for about $100. Going to take him up on it, since I'd probably spend half of that just getting the proper supplies and tools, and no guarantee it would be done right. This looks best left to the pros.
|
|||||||||||||
| ||||||||||||||
| Current time is 10:43 pm | Page: |
| > Jensen Healey & Jensen GT Tech > Projects > 16173 will be entering project status... | Top |