| ||||
| ||||
| Moderated by: Greg Fletcher | Page:   |
|
|||||||||||||
| 16173 will be entering project status... | Rating: 
|
| Author | Post |
|---|
| Posted: 03-11-2014 07:33 am |
|
61st Post |
|
answerman Member
|
Well, today was productive, though some unplanned time got added to the project. I thought I was close to priming and painting the "concealed" parts of the unibody (engine compartment, door jambs, etc). All prepped (or so I thought) and masked... bare metal on some, and sanded and scuffed on the rest. So, I spent an hour at the auto paint store, and got a lot of free advice as part of the deal (remember I am hardly a professional at this restoration stuff and the last time I did it was 25 years ago). Long story short... something I didn't even think about. He basically explained the different kinds of paint to me and told me that the 2k urethane primer I was going to use would likely lift the old lacquer finish right off the car. Oh boy. Not what I wanted to hear. The whole reason for the repaint is to get rid of the Maaco bubbles! So, the project has altered slightly now: she will be a true bare metal restoration. Hadn't planned on it all the way through (I'm doing the "visible" panels such as doors, fenders, etc. because I have to remove the horrible Macco paint job) but now it ALL has to come off. Including the parts from the parts car. Not horrible, but time consuming. I got most of the engine compartment done tonight, will finish tomorrow after I get a new drill (burned up my 25 year old Black and Decker tonight) and hope to finish it tomorrow. What seems to be working well is to use a pretty aggressive chemical stripper (Zinsser StripFast), let that sit for a half hour, scrape off most of the old finish (it doesn't seem to have any trouble going through most of the layers) and then hit what's left with a 3M SandBlaster disc on my drill or grinder, depending on the angle I need to hit it at. It's always something... but in retrospect it's probably a good thing since it's forcing the engine compartment to be cleaned really well. I'm doing this with the engine still in the car, using aluminum foil to mask off anything I don't want painted. The Zinsser stripper, in addition to removing the paint, also does a fine job of removing most of the possibly 40 years worth of grease buildup. We'll see how it goes.
|
||||||||||||||
| |||||||||||||||
| Posted: 03-12-2014 03:23 am |
|
62nd Post |
|
Art DeKneef Member
|
What paint/primer exactly were you planning to use? A paint product with hardener will cause problems like that. You could have used a sealer to cover the old paint and then applied your regular paint over that. I'm having a hard time visually with you painting the engine bay with the engine in it though.
|
|||||||||||||
| ||||||||||||||
| Posted: 03-14-2014 05:11 am |
|
63rd Post |
|
answerman Member
|
Yes, it's a 2K PPG urethane primer, and the topcoat will be a PPG single stage urethane paint with activator. Most of the old paint had to come off anyway since it was such a badly done overspray, but I hadn't planned on all of it. Oh well. It's off now, at least on the unibody, and it's probably the right way to do it, right? Primed today, will be topcoating tomorrow (got it up to a nice 82 degrees in my garage). And yes, the engine is still in place. Basically what I did was to Reynolds Wrap anything I didn't want painted. Works better than paper and tape, just mash it around whatever you're masking. The complete engine bay won't be painted, just down to and including the structural channels about halfway down. I think it'll be ok... not going for show quality, just an improvement (a DPO apparently decided it was a good idea to spray part of the engine compartment black at some point and about half of it peeled or just wore off). I'll post before/during/after pics when I'm done. Once all this is done, I can tackle the fenders, doors, and boot/trunk lid, all of which have been removed for some time and will be much easier to work with. The bonnet/hood is already stripped. Last edited on 03-14-2014 07:41 am by answerman |
||||||||||||||
| |||||||||||||||
| Posted: 03-14-2014 03:16 pm |
|
64th Post |
|
Jensen Healey Super Moderator 
|
Just a note on toxicity of 2k paints. http://www.sigmaaldrich.com/analytical-chromatography/air-monitoring/applications/paints-and-coatings/binding-agents.html You need to consider harm to yourself and others.
|
|||||||||||||
| ||||||||||||||
| Posted: 03-15-2014 02:33 am |
|
65th Post |
|
Art DeKneef Member
|
Removing the old paint is the best way to go. You remove all the variables that might arrive from going over old and different paint. That's what I did for my major restoration project. Your garage temp was our outside temp today. And now I can picture what you are doing to the engine bay. Makes sense. Then the fun really starts when you do all the other pieces. Oh yes, I agree with the toxicity of today's paint. The best way to spray is with a fresh air hood and good ventilation. Even with the waterborne base coats, the clear still has ISOs in it.
|
||||||||||||||
| |||||||||||||||
| Posted: 03-15-2014 04:36 am |
|
66th Post |
|
Randallclary@icloud.com Member
|
Has anyone used Kleen Strip Aircraft Paint Remover? It was recommended to me by World Class Restoration out of Riverside, CA. I read posted reviews, not from the JH Forum and they looked pretty good. My 13046 has both the original factory yellow and black when the car was last painted back in the late 90's. I am doing a to bare metal restoration and a 2.2 Stroker Crank upgrade with the 104 and 107 cams with the 45 mm Delloroto Carbs. Called the money pit. Maybe that will be the name of the car.
|
|||||||||||||
| ||||||||||||||
| Posted: 03-15-2014 03:31 pm |
|
67th Post |
|
Brett Gibson JH5 20497 Member
|
Yes I used it, painted it on with a brush placed plastic wrap over the top and let it sit for 5 to 10 minutes then just used a scrapper to peel off one layer after another, the plastic wrap helps to keep the solvent from evaporating to quickly. Good quality product. Brett
|
||||||||||||||
| |||||||||||||||
| Posted: 03-18-2014 08:01 pm |
|
68th Post |
|
answerman Member
|
Pics if anyone's been wondering what I've been doing. I'm calling the unibody done at this point, fenders and bonnet/hood are all stripped and ready to paint (once I repair a little Bondo work I unexpectedly ran across on one of the front fenders). Then, all that's left is trunk/boot lid (should be simple) and doors (will probably be a pain). Against the advice of several here, I did decide to paint her in stages and then reassemble the already painted panels. Planning on being uber careful when remounting everything, and if I scratch things up it's my own damn fault (though I have to say that the urethane finish dries like a rock, not easy to scratch). A couple of "before" shots: 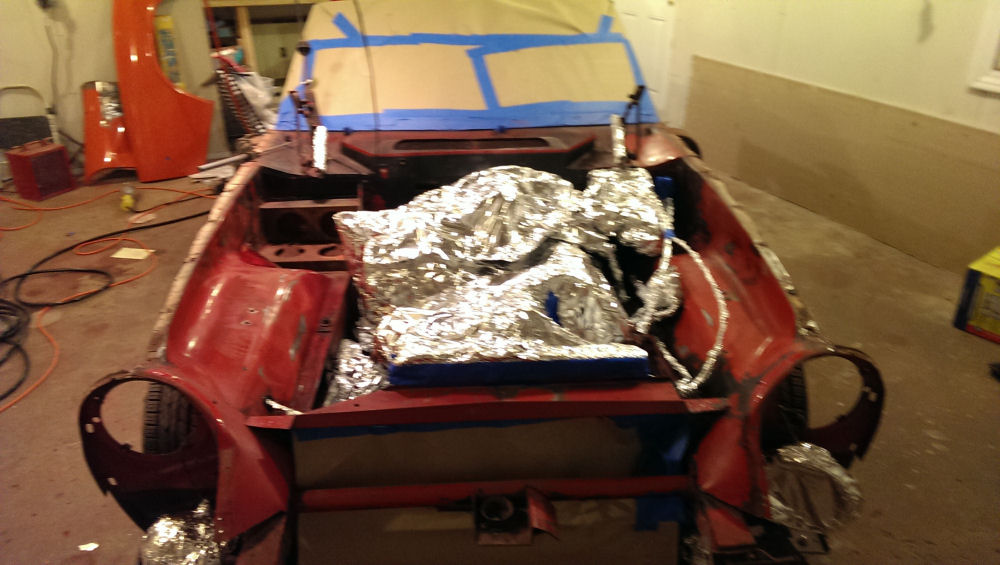 The engine bay, showing the deteriorated condition of the original paint plus what's left of what appears to be a quick black overspray with Krylon. I've got things masked off with Reynolds Wrap, ended up taking it all off to redo after I stripped the paint (more on that below)   The rear valance and taillight surround with most of the old paint removed... And then I proceeded to strip the engine bay. 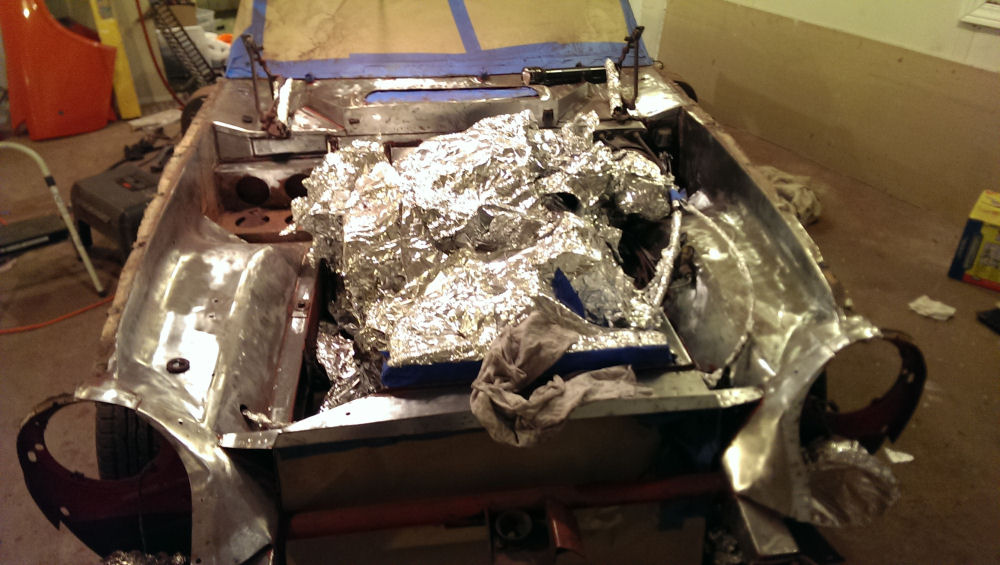 This was an adventure. Stripping wheels on the grinder and drill, and a tiny little flap wheel on my Dremel extension for those hard to reach places. Remasked with foil and ready to spray. And finally, after 3 coats of PPG 2K urethane primer, followed by 4 coats of PPG Cardinal Red single stage urethane... 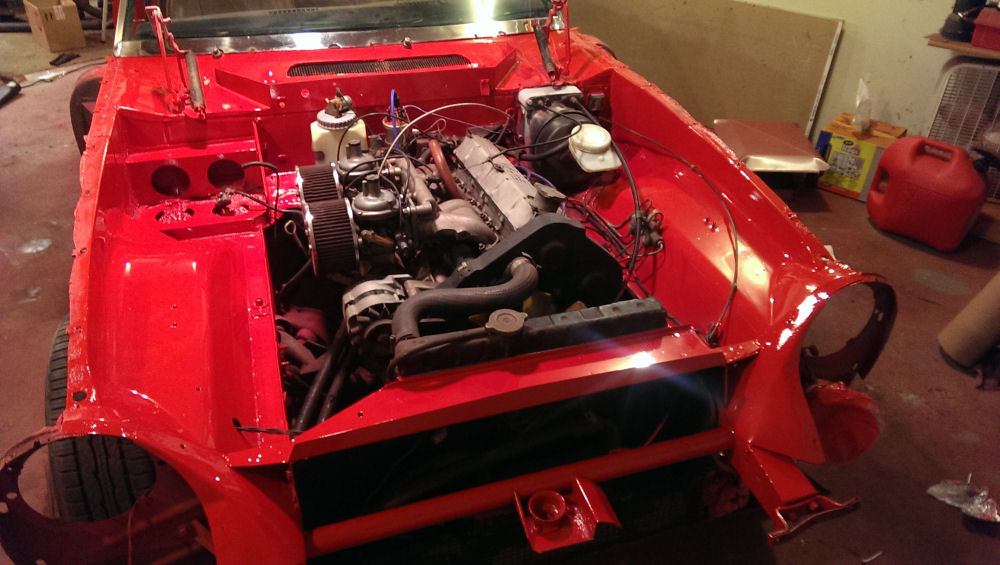 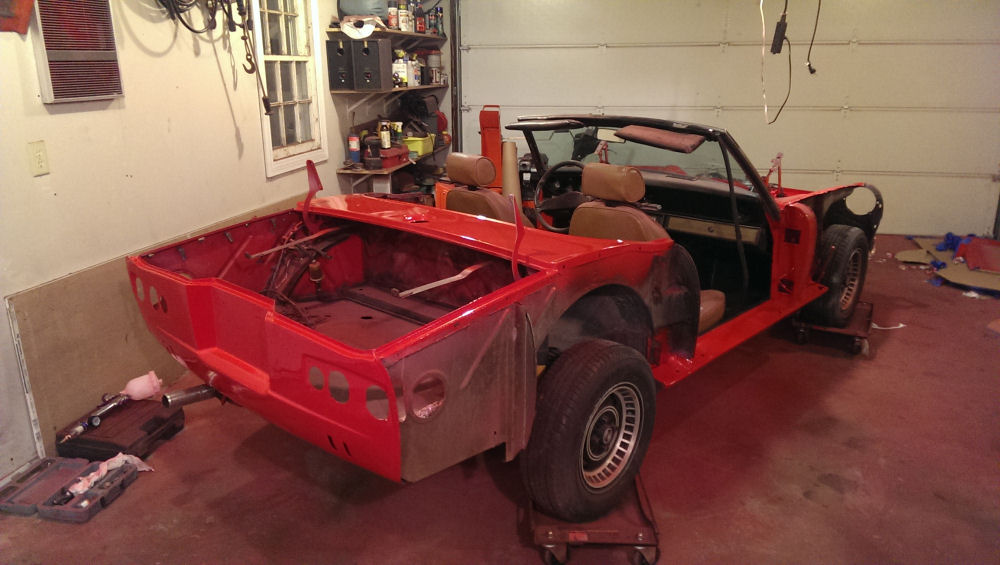 Quite a difference. This was my first time working with this type of paint. I have to say it goes on nicely, easy to work with, and cures to a rock hard finish. Of course, having the garage heated up to 92 degrees for 48 hours aids the process. These bad boys are next up, stripped and mostly ready.  I still need to do the Bondo work on the bonnet/hood and one of the fenders just under the headlight pod cutout. That should be done tonight, and the plan is to get them primed and painted before the weekend if all goes well. Last edited on 03-18-2014 08:05 pm by answerman |
|||||||||||||
| ||||||||||||||
| Posted: 03-24-2014 04:20 am |
|
69th Post |
|
answerman Member
|
A reasonably productive weekend. Friday, decided that since I'm done with the chassis for now until I get the fenders, etc. painted, I decided to take Ms. J over to the 10x20 storage unit I'm renting. This will make the garage much easier to get around in for painting the assorted panels, and I don't have to worry so much about overspray hitting her. As I thought about it, I realized that the only thing keeping her from being "drivable" was that her battery and fuel tank were removed (and in the storage unit with the other bits removed from her). So, went over there (it's only about a block from the house) and grabbed both those bits, brought them back, and charged the battery for about a half hour while my son and I put the fuel tank back in, at least temporarily. Was more than pleased that she started more or less right up (she's never been what I would start an easy starter), so the only thing keeping me from driving her over to the storage unit was the "legality" of it. Was that going to stop me? No, of course not. So, with Mrs. Answerman tailgating me with her 4-ways on, I drove her over in the condition you see above. No doors, fenders, bonnet, or boot lid. Got a few funny looks but it went pretty uneventfully. Then, I spent the rest of the night doing the Bondo work I needed to do on the bonnet, as well as one of the fenders (unearthed a repair when I was stripping her paint off, and of course I wrecked the existing Bondo in that process). That went fine and they are ready to prime and paint. I think I am going to strip and prep the boot lid and the doors beforehand though, so that I can paint everything needing to be painted at once. One thing came up during all of this, which initially was an "oh crap" moment but actually turned out ok, was that it was easy to see where my fuel leak in the boot is (with everything being removed and cleaned up}... it's definitely a leak in the bottom of the tank. Well, at least now I know what it is. So, I called on a local radiator shop on Saturday morning and it turns out they can do a complete recondition on the tank (chemically clean, weld/solder anything needing to be repaired, and then coating the inside) for somewhere between $100 and $150, depending on how much repair needs to be done. Not a bad price considering the alternative of sending Jorge $400 for a tank that may not even go in right. I can live with it. So, the tank will go off to the shop tomorrow and be reconditioned while I'm doing the rest of the painting. About a month ahead of schedule at this point. Getting excited for spring to get here!
|
||||||||||||||
| |||||||||||||||
| Posted: 03-30-2014 05:23 am |
|
70th Post |
|
answerman Member
|
More painting today. Primed and painted the fenders and headlight "sugar scoops", and primed the hood/bonnet and trunk/boot lid. I'll be painting those tomorrow, didn't have enough room in the garage to hang everything properly and while I had the fenders on sawhorses to prime them, it's a heck of a lot easier to paint them if they are hanging. At least that's my experience. So, at this time tomorrow, all that should be left to refinish is the doors, which I haven't even started yet. Those look like they will be a gigglefest to disassemble.
|
|||||||||||||
| ||||||||||||||
| Posted: 03-31-2014 07:15 pm |
|
71st Post |
|
answerman Member
|
As promised, got the lids painted yesterday. Hood/bonnet and trunk/boot lid are a nice shiny red now. Plus, I had to sand and reshoot the headlight surrounds as I had a couple of drips I didn't notice the first time around. Note for successful painting: LOTS of light so you can see what you're doing. The photographic evidence: 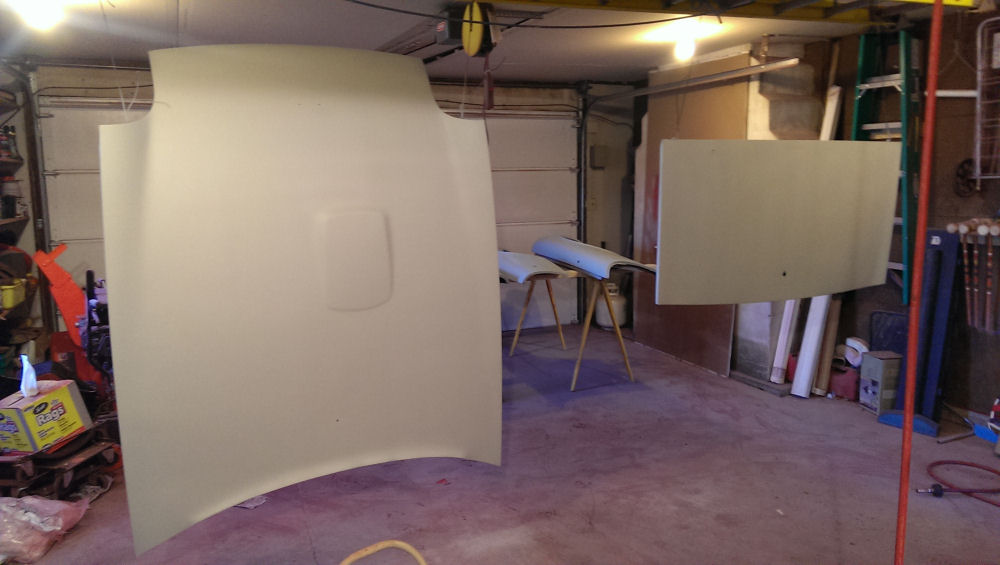 Saturday afternoon, after priming was complete. 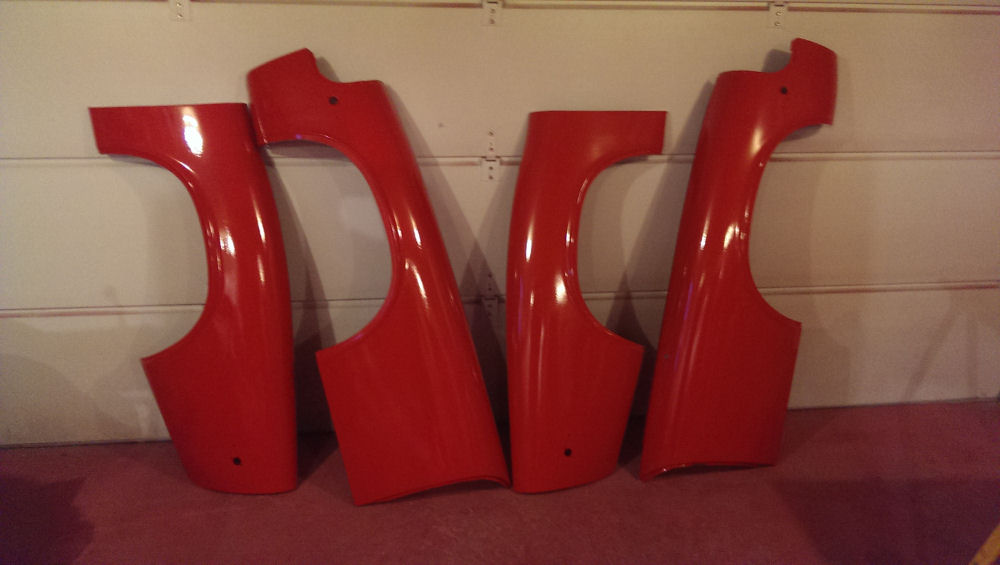 Nice red fenders! 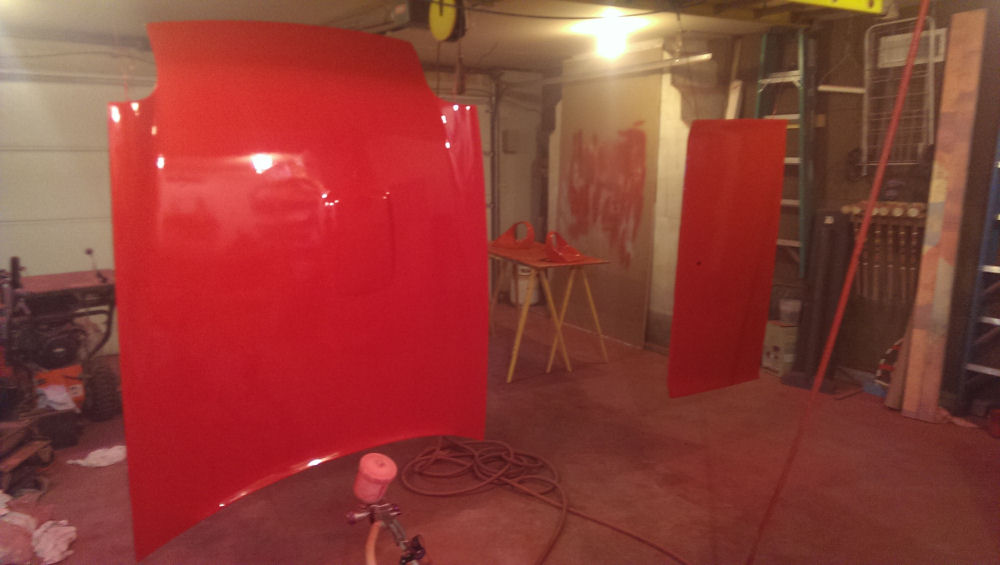 Bonnet and boot to match... 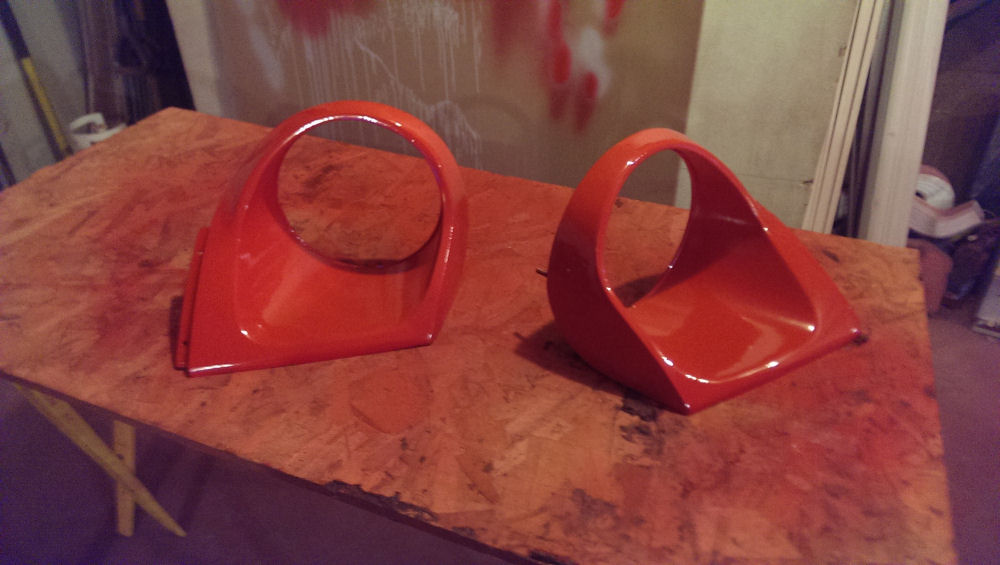 And the sugar scoops, post oopsrepair. Only thing left to strip and repaint are the doors. At this point, if my repaired gas tank is done today or tomorrow, I am thinking it's time to bring Ms. J back home and reassemble what I have disassembled before tackling the doors. I've got the resurfaced rotors and drums from the parts car all ready to swap onto Ms. J, and my club store order arrived last week with new pads, new shoes, a new rear brake hose (I replaced the front last year), and a new filter element for the factory airbox. I plan to do the brakes before anything else since I've got more room to work with with the fenders removed, and after that do the application of the truck bedliner on the rockers. Once that's done, it's time to start the remounting of the fenders and everything else that's been removed... we'll see how good of a job I did of labeling everything I removed. Expecting more that one instance of "ok, where did I remove this from?" and the inevitable "why do I have parts left over?". Last edited on 03-31-2014 07:16 pm by answerman |
||||||||||||||
| |||||||||||||||
| Posted: 04-07-2014 04:53 am |
|
72nd Post |
|
answerman Member
|
Another milestone, got the rotors and drums replaced. New rear brake hose. New pads and shoes. All bled out and the brakes *seem* to be good now (can't exactly take her out to road test her right now but the pedal is nice and firm). I'll be curious to see if I got my pressure differential switch recentered as part of this... my brake warning light has been on for over a year. On to the reassembly of the body!
|
|||||||||||||
| ||||||||||||||
| Posted: 04-09-2014 07:02 pm |
|
73rd Post |
|
answerman Member
|
So, I have this big box of parts removed during the reassembly, and it's time to sort through and find what I need to put her back together, right? Here's where I see how organized I was with my Ziploc bags. First order of business, after a cleanup and respray, was to remove the K&N filters from the Strombergs and reassemble the original airbox and filter assembly. 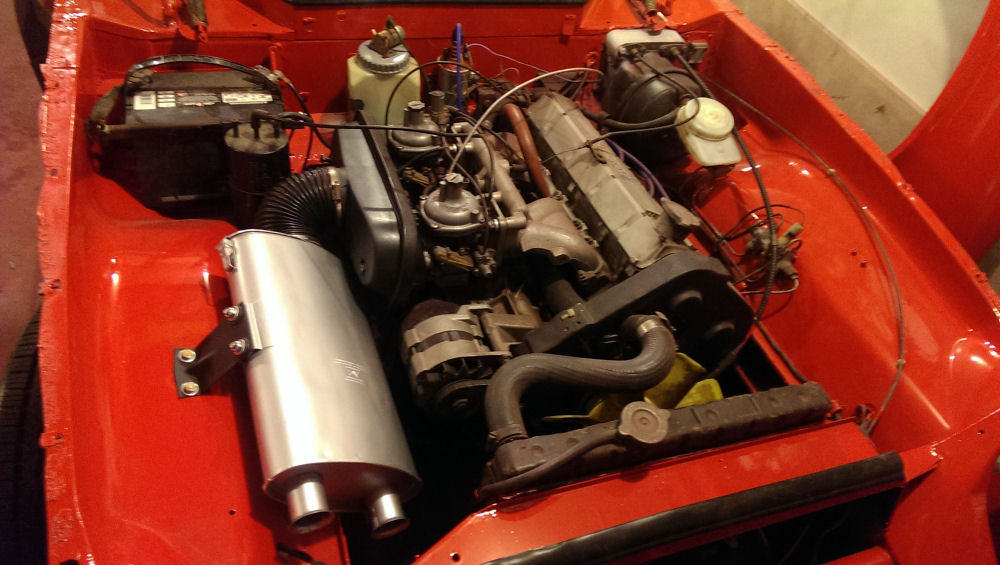 Used a high temp ceramic engine enamel to respray the "muffler". It's a little shinier than it probably should be, but it's somewhat close to the original gray. Now, I've been doing some perusing of the archives here about the way it should all be put together, especially with the crankcase ventilation. What the DPO had done was to remove the factory airbox, install the two K&N pancakes, and just shove a little K&N filter into the hose coming from the crankcase and just leave it stubbed like that. From what I've read here, there doesn't seem to be a whole lot of advantage to reconnecting it, so I am thinking of just leaving that is and plugging the port on the airbox that the hose is supposed to connect to. Unless someone tells me that's a bad idea. Then, I temporarily hung the fenders on the drivers side just to see how she looked:  It makes me feel better to see the fenders in place, you know? On to the re-bolting of the front fenders. Brett wasn't kidding about "getting everything to line up". The front passenger side is mostly on now, though I am thinking that I am going to replace all the fasteners instead of fighting with the old ones. Hoping that tonight I can finish that, get the drivers side fender mounted too, reattach the sugar scoops, and *maybe* see about remounting the hood/bonnet. It all has to be done, and it will do my heart good to see the front end complete. Still haven't heard from the radiator shop, so no idea when I'll have my gas tank back. Getting anxious. Last edited on 04-09-2014 07:03 pm by answerman |
||||||||||||||
| |||||||||||||||
| Posted: 04-09-2014 07:39 pm |
|
74th Post |
|
Tom Bradley Member
|
The only reason I know for connecting the crankcase ventilation to the air box is for pollution control: the blowby gets sent back into the engine to be burned rather than vented to the air. If the rings and valve stems are good, there should be very little. I cannot feel any flow coming out of mine right now, but I still connected it to the air box on general principles. Not that big a deal. I am also looking to get my gas tank repaired/replaced. I was surprised at how low a price you got. The only local radiator shop that would do mine said it would take about $200 and a week to do all the cleaning, derusting, etc. At your price, the shop may be treating it as a "back burner" project. Or maybe they are dong a very thorough job. I was considering getting an aluminum replacement from Jorge, but the price is now asking on ebay just went through the roof, so I guess it will be a repair job. I am enjoying seeing what you are doing. It is still going to be months before I get to the repainting stage, but seeing yours makes me hope that I will be able to get mine back to looking good again too, though i doubt it will be as good as what you are doing.
|
|||||||||||||
| ||||||||||||||
| Posted: 04-09-2014 08:43 pm |
|
75th Post |
|
answerman Member
|
Actually, I just got back from the radiator shop. It's still in the chemical cleaning stage. His line was that they have to do a treatment, let it do its thing, rinse, dry, repeat and that it's a slow process... if they just let the chemicals sit it could blow right through the tank. Plausible, but your theory's crossed my mind too regarding it being a back burner project. I did let them know that I was hoping to have her back together and drivable within the next week and a half to try to light a bit of a fire under them... he then said that it should be done next week. We'll see. And thanks for your kind words... the paint didn't come out quite as nice as I had hoped, a little orange peel. Hoping that I'll be able to sand and buff it out. Regardless, even as is it's a huge improvement over what I started with, and I'm not talented enough to create a concours quality show car. She just needs to not embarrass me as a fun semi-daily driver and last a while with the couple of thousand miles a year she'll probably get.
|
||||||||||||||
| |||||||||||||||
| Posted: 04-21-2014 09:47 pm |
|
76th Post |
|
answerman Member
|
Had a bit of a family emergency, so I've been lax for a week or so. Back at it. From a paint perspective, all that's left is the doors. As predicted: a joy to disassemble. Spent most of Saturday afternoon on them, and after about 2 1/2 hours on the drivers side door, the passenger side only took about a half hour. The big puzzle was how to remove the fixed triangle window and attached window guidetrack. I finally figured out that the easiest way was to remove the back guidetrack first so that the window pane wasn't so tight against the front one. The rivets that hold the bottom of the triangular frame to the rest of the assembly seem to have given up the ghost on the drivers side (nothing really holding them in place) so I'll have to address that before the reassembly. Worst case scenario is that I use the one from my doors from my parts car, but I'm trying really hard to keep those intact for future use by either myself or someone else. Question: did Jensen have elves on the payroll to mount the door handles? Getting them removed wasn't easy to say the least, and I am not looking forward to trying to reassemble them after the paint is done. Is there a special tool or something to loosen/tighten the bolts? Accessing everything through the opening on the interior of the door is painful to say the least. Anyway, hit the doors good with the Zinsser paint stripper on Sunday and scraped off about 2/3 of the existing paint layers. At this point I think I'll move on to the stripping wheel on the grinder to finish them up tonight or tomorrow (waiting for it to stop raining so I can do it outside and not add any more pink dust to the garage). Also, now that I have officially disassembled everything there is to disassemble during this project, I called Delta with my laundry list of "stuff" that is either missing, broken, or basically useless. Mostly rubber pieces to replace the rock hard ones I removed (or broke in the process) such as the interior and exterior window wipes, the door seals, door handle gaskets, etc. and lots of push fixes for badges and trim. My body shop friend took the front bumper stainless panel and is going to sub it out to his English wheel/metalworking expert to work out the dents. He seemed pretty confident that he could get it really close to original, and for the $150 he's going to charge it seems well worth it as I don't think I could replace it for that, even if I could find one in the first place. Oh, and my gas tank should be done in the next couple of days. I *think* I'm still on target.
|
|||||||||||||
| ||||||||||||||
| Posted: 04-28-2014 04:16 am |
|
77th Post |
|
answerman Member
|
OK. I think I'm done with paint, as long as I don't ding things up too much putting the doors back on. Doors are curing in the garage after primer yesterday and paint today. Now the fun begins. Gas tank is *supposed* to be ready tomorrow. Doors are painted. Nothing holding me back from reassembly except, well, me. I am going to wait with the doors until I get my order from Delta, since there are a number of parts (gaskets, window wipes and various push fixes) that I figure will be easier to deal with with the doors still removed from the car. Hoping they arrive in the next couple of days. Oh, and no go on the front bumper stainless. The "expert" figured once he saw it that it would be closer to $400 to $450, and he's not even guaranteeing that it will be perfect. Delta can get a new one from England for $550. If I'm going to spend that much, I'd rather pay the extra for one that I know will be perfect. It'll wait for now, not a huge priority. Next weekend is looking like a distinct possibility for completion... at least the weather will be lousy all week so I won't be looking outside thinking "wish I could take her out and drive her", but those days will be coming soon. I now have (once I get the gas tank back) everything I need to finish, except for the JHPS club store performance exhaust system which I've been waiting to do till last (didn't want to have to worry about getting paint on it). Once she's together and verified running and driving, then the exhaust gets ordered.
|
||||||||||||||
| |||||||||||||||
| Posted: 04-30-2014 06:09 pm |
|
78th Post |
|
answerman Member
|
The things a Jensen-Healey owner gets excited about... Finally got some news from the radiator shop. They did in fact find leaks in my gas tank! Funny that it makes me happy. Anyway, the sealing is happening now and I will be picking it up either tonight or tomorrow. It can wait a few days as I have to reassemble the doors with all the rubber parts and push fixes that arrived from Delta yesterday, and I suspect that is going to take me a while. Still, it's progress.
|
|||||||||||||
| ||||||||||||||
| Posted: 05-01-2014 08:41 pm |
|
79th Post |
|
answerman Member
|
Gas tank cleaned, rust removed, leaks repaired, recoated inside and out, and verified leak free. Finally!
|
||||||||||||||
| |||||||||||||||
| Posted: 05-06-2014 06:24 pm |
|
80th Post |
|
answerman Member
|
OK. As detailed in another post, had a running issue (stuck float in the front Stromberg) which is now resolved. Gas tank is installed and NOT leaking (yay!) though the radiator shop managed to knock the float off the sender, so my fuel gauge isn't working. Fished the float out of the tank and set it aside... I'll deal with that presently. For now, I just want to get her drivable. She's basically together other than the bumpers, the inside trim (no door or window handles) the top, and all the trim. Going to hit her hard this week and hope to be more or less done by the weekend.
|
|||||||||||||
| ||||||||||||||
| Current time is 04:26 pm | Page: |
| > Jensen Healey & Jensen GT Tech > Projects > 16173 will be entering project status... | Top |