Changing ‘74 Jensen
Healey Timing Belt Tensioner Bearings
Something Every J-H
Owner May Want To Know!
By Greg Fletcher

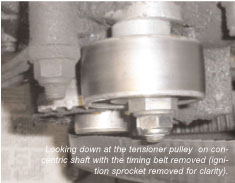
The concentric pulley
tensioner adjuster should have new bearings installed on a regular basis.
My rule of thumb is every other timing belt change. The stock timing belt
must be changed every 18,000 miles to avoid breakage and a really messed up
engine. A broken belt will, of course, bend all your nice valves causing much
trouble and creating great expense.
I’m using the up-rated half-moon timing belt and adjustable pulley gears
(about $300 from Dave Bean Engineering) so I can go more like 40,000 - 50,000
miles between belt changes, a great time saver! I’ve only recently realized
it’s been a good 70,000 miles since I’ve changed the tensioner bearings.
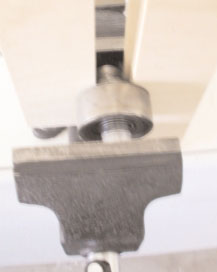
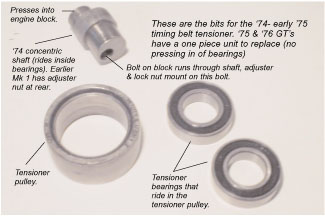
Although I have a ‘73, my current the engine is from a ‘74, otherwise
the adjuster above would look a bit different than the one shown in the
photo above.
You should always plan on a timing belt change with the replacement bearings
since the outer crank fan belt pulley must be removed to pull off the concentric
pulley (and bearings) above it.
The whole process is NBD (No Big Deal) with the only requirements being some
modest tools, timing light, a drift, a good bench vise to press off the old
bearings and press on the new ones and a few hours of your time.
Tools needed
Basic 1/2” drive
socket set, including a 19mm socket for the crankshaft bolt & a 1 3/4”
or 44-45mm round object used a drift.
- 1/2’ drive torque
wrench
- Bench vise
- One set (two) bearings
($20 from Delta Motorsports)- ‘75 & ‘76 use a one-piece pulley
unit ($75 from Delta Motorsports)
- New Nylock locknut
for adjuster
- Timing belt (about
$30)
- 22mm open end wrench
or crescent wrench for tensioner adjuster
- Mark I ‘72 &
‘73 JH’s need the special Jensen rear adjusting tensioner wrench
or convert to ‘74 style adjuster (needs some machining or this)
- Rubber or similar mallet
- Timing light to check
timing
- Anti-seize compound
Top Dead Center
Remove the battery negative cable and the coil lead for safety. Turn the engine
over until the gears line up (you may need to turn two revolutions for the
cam gears to line up) at Top Dead Center (TDC). If in doubt you can remove
the cam bolts & washers to see where the keyways are located. I would
advise anyone to never remove the timing belt without the engine at TDC. If
any gears are moved, it will be difficult to see and even harder to set back
properly.
At TDC, before I get too deep into anything, I always loosen the crankshaft
bolt. Put the car in gear and apply the hand brake. This bolt should be torqued
to 58-60 ft lbs, so a 19mm wrench and a rubber mallet should break it loose
with a few blows. If not, the bolt has been over torqued and you will need
to figure out how to loosen it before you proceed. Often, a liberal application
of a firm mallet will eventually work. On occasion, an impact gun is the only
thing that will remove it (presumably as this is how it got that way to
begin with).
An electric impact gun often works for the home mechanic. At this point you
would need to remove the radiator to gain access to the bolt from the front
(add an additional vino to the rating for that).
With the bolt slightly lose, make sure the engine is still at TDC, or tighten
a bit and readjust.
Use you mallet to tap the fan belt pulley forward and remove so you’ll
have access to the timing belt at the crankshaft.
Use a 22mm open end wrench to loosen the concentric adjuster (pull the wrench
toward you to loosen, away to tighten). The belt should be loose and you can
now pull it forward and off of the gear pulleys.
Do not move the cams in relation to the crankshaft. If doing a valve
adjustment you would rotate the crankshaft back (counter clockwise) about
15 degrees to go down into the liners so the cams could move independently
and not contact the pistons. For changing a timing belt and tensioner bearings
it is sufficient to leave the crank and other pulleys as is.
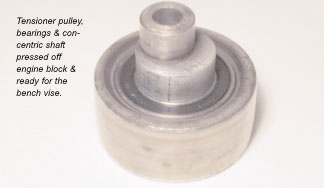
With the outer crank pulley removed we can now remove the tensioner pulley
assemble from the engine. The concentric shaft that the pulley rides on is
a simple press fit into the block, and I just rotated the adjusting nut on
the front clockwise to move it forward. In a few minutes that is off the block
and we can now consider the bearings.
Once removed, I could tell immediately that the bearings were in a bad state.
They were very rough when spun and made most unpleasant noises. I did notice
the old ones were made in Japan and that the new bearings are now made in
the fine country of Rumania. This gave some cause for concern, but they seemed
smooth enough and were definitely a lot better than what I had now.
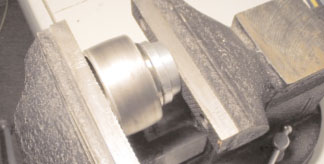
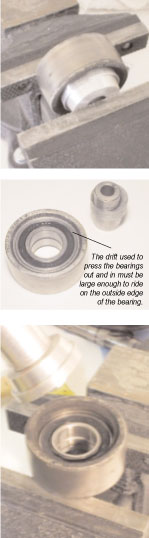
Pressing out the old bearings
The key here is finding the correct size socket(s) or other stout round implement
to act as an impromptu drift. To remove the concentric shaft, a 17mm socket
and two pieces of wood were all that
were needed.
With the shaft removed I could deal with the bearings themselves. This proved
somewhat troublesome, and took a while before I found a drift that was exactly
the right size. When pressing out the old bearings and especially when pressing
new ones in, it’s quite important to have a drift that will ride on the
outside metal edge of the bearing and not crush the bearing sleeve inside.
You’ll need a suitable drift that measures 1 3/4” (44-45mm) in diameter.
I started it in the vise (above), which will only press out about an 1/8”
and I then pounded the rest of the way with my drift on the vise (right)
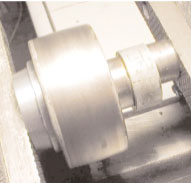
It’s a simple matter to press the new ones in back in. I used the larger
drift to press in the two bearings in the vise and then, with the large drift
to hold the bearing in place on one side, put the concentric shaft in the
vise and tightened it up. The new bearings were all back together in a few minutes.
The tensioner assembly is pressed back on the block (use a dab of anti-seize
here) by turning the adjuster and pushing back and then tightening into place
with the lock nut (always use a new Nylock nut). The new timing belt is put
back on (I removed the upper radiator hose and slide it down and around the
fan for that since I didn’t feel like removing the radiator on this job).
Everything else is replaced the way it came off. The belt should be adjusted
for tension (when cold you should be able to depress the belt about an 1/8
inch between the ignition sprocket and intake cam. This will need an additional
tightening in a few weeks of driving. Throw on a new fan belt, install the
crank pulley and torque the crank bolt to 58-60 lbs with your torque wrench,
reattach the battery and coil lead & adjust the new belt and you should
be ready to go.
Start up the engine and check the timing, adjust as necessary. Be sure to
take a look at the belt in a week or so of regular driving and readjust as
needed. That’s it! New bearings, new timing belt, you’re good for
at least another 18,000 miles on the belt or in my case another 40,000 miles
and
about that long on the tensioner
bearings.