| ||||
| ||||
| Moderated by: Greg Fletcher | Page:   |
|
|||||||||||||
| 16173 will be entering project status... | Rating: 
|
| Author | Post |
|---|
| Posted: 05-22-2015 06:57 am |
|
101st Post |
|
answerman Member
|
Decided to tackle the trim rings and bulbs tonight, since they needed to be done before the woodwork anyway. As usual, the part I figured would be difficult was the easy part, and the part that should have been easy... well, you know... Pulled the steering wheel and cowl off, and undid the screws that hold the top of the cluster in place. Of course, that didn't allow me to remove the cluster. After looking at it under the dash for a bit and contemplating different ways of prying the rusty center pin loose, I decided to take a chance. Reached up behind and undid the speedometer retention nuts, and pushed it out through the cluster. Popped the bulb out and disconnected the cable, allowing me to remove the speedometer completely. Now I had a place to grab the center of the cluster... reached in through the vacant speedometer hole, got a good grip on the center of the cluster, and gave it a yank... and it popped right out. Whew. I wasn't looking forward to fighting with that rusty spike from underneath. Disconnected the oil line and the two harness plugs, and out came the cluster to the kitchen counter (Mrs. Answerman is getting used to seeing JH parts in the kitchen). From there, it was pretty simple to remove the gauges and replace the black trim rings with the chrome ones, cleaning the glass inside and out in the process. Reassembled everything, and the cluster was ready to go back in. At this point, I had spent maybe 45 minutes on the job. Moving along nicely. So, after supper, I went back out and laid the cluster on the steering column stub, reconnected what needed reconnecting, and decided that before I put it all back together I should probably make sure everything was working right. Tried the dash lights and the new bulbs are a HUGE improvement. So far so good! So, I turned the ignition key to "run".... and nothing. No movement on anything. Hmmm. OK, must have a bad connection somewhere, right? So, I checked all the connections... they all seem good. Still nothing when I tried it again. So, just to make sure there wasn't more mischief afoot, I started her up. She started right up, but still nothing on the gauges (other than the oil gauge of course which is purely mechanical). Well, this isn't good... About this time I notice that the radio didn't come on either. A HA! Must be a fuse!!! So, up went the bonnet and sure enough the #2 fuse was blown. I'm guessing that maybe the cluster wiring touched something it shouldn't have when I had it loosely lying there. So, I pulled the blown fuse and put in a new one. Turned the key back to "run" again, and this time the voltmeter moved up and the radio lit up. OK, progress. So, I start her up again. This time, the voltmeter and tachometer behaved as they should have. Feeling a little better about things, but I'm still wondering why the temp and fuel gauges aren't moving. While I am pondering this, checking connections AGAIN, she starts to misfire. This CAN'T be good! So, I shut her off, think about things, check connections under the bonnet (maybe I damaged the coil somehow? Who knows) and then start her up again. Harder to start, and she was not running right at all. After about 10 seconds, despite my efforts to keep her running, she died and I could not get her restarted. By this time I am seriously freaking out, wondering what I could possibly have damaged. I'm already paranoid after changing her timing belt, and I went to the trouble to get her at TDC and check the cam marks just to be sure the belt didn't slip. Fortunately, that's all good. Whew. So, I get back behind where the wheel would be if it wasn't lying on the floor, and I tried to start her again. Still nothing, just turning over but not catching. As I'm doing this, a little bulb goes off in my brain... "you know, I am not hearing that lovely noisy fuel pump clicking away..." OK, now I have something else to troubleshoot! So, up goes the boot lid, and a quick test with my Fluke meter reveals that I am only getting about 2V at the pump. OK... so, after consulting the wiring diagram in the owners manual, I go back under the bonnet and idly wiggle and spin the fuse I replaced in the fusebox. Then, back to the boot, and now I am getting 12V at the pump. Much better. Reconnected the pump wiring, got back behind the missing wheel, and she started right up. Huge sigh of relief. Apparently the fuse wasn't properly seated in the fusebox. I guess I should go in there and clean things up. So, the mystery of the misfire now solved (basically, she ran out of gas) I could go back to pondering the nonfunctioning fuel and temp gauges. After doing more testing with my Fluke, I established that there was no voltage on the "I" side of the voltage stabilizer. That would explain why those gauges aren't working. To confirm, I moved the wires on the stabilizer so that they were basically just a jumper (both wires on the "B" terminal) and the gauges moved right up, though obviously not accurately since they were now getting much more than the 10V that the stabilizer provides. Apparently, whatever caused the fuse to blow also took the stabilizer with it. So, after Googling around a bit (the club store doesn't have them that I could find) I found a replacement solid state voltage stabilizer at Moss Motors (which means I get to look forward to getting all kinds of catalogs and email offers for the MG that I don't own). Since I was ordering one, I ordered two (I like having spares of hard to find items). Good thing I wasn't planning on driving her for the next week... they should arrive before I get back from vacation. The fun continues... and maybe my Madera Concepts woodwork will arrive about that same time...
|
||||||||||||||
| |||||||||||||||
| Posted: 06-09-2015 07:44 pm |
|
102nd Post |
|
answerman Member
|
Well, got my voltage stabilizers from Moss Motors, pulled the dash apart again, and got one installed, and my gauges are now working properly once again (though the speedo is a little jumpy, just ordered a new speedo cable from Greg since I'm pretty sure that's the problem). Good to know how much fuel I have in the tank again. That being resolved, I moved on to installing the Madera Concepts woodwork that arrived on Friday. First order of business, after pulling the gauge pod out once again, was to finally "fix" the trip odometer reset cable. In the process of pulling the gauge pod out multiple times, I managed to break off the little plastic tabs that hold it to the back of the speedo. After trying a few different solutions involving silicone glue, I finally cut a piece out of a PVC electrical switch box, drilled a couple of strategically placed holes, and here's the result. Not pretty, but at least the cable can't come out, and it's not like anyone is going to assume the Lotus position to see it: 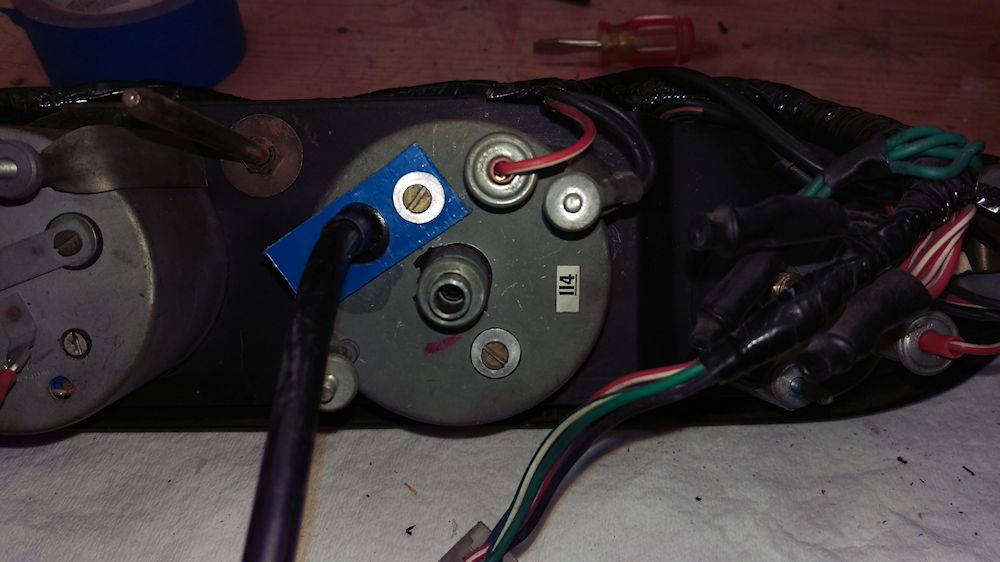 Now that that's fixed, I moved on to getting the woodwork installed. That actually went pretty well, didn't have to do any customizing other than making the hole for the hazard light switch a little thinner (it's not the original switch, and the panel was just too thick for it to mount properly). The one concern, which I spent way too much time trying to fix, is that the gauge pod doesn't sit flush with the opening in the dash (compounded by the fact that there's a Delta dash cap installed by the PO over it). I had the opportunity to look at another JH this weekend at a show, and I noticed his was the same... when the top of the pod is flush, the bottom is actually recessed into the dash about a quarter to half inch. Anyway, after obsessing about it, removing the dash cap (and finding out why it's there, her original dash is pretty cracked), bending the spike around on the gauge pod, and generally trying several different ways to make the pod fit flush, I finally gave up, went to bed, and the next day pulled the pod out and mounted the wood to it and just shoved it in, hoping for the best. It actually came out just fine, and I could have saved myself about 3 hours of work if I would have just done that in the first place. 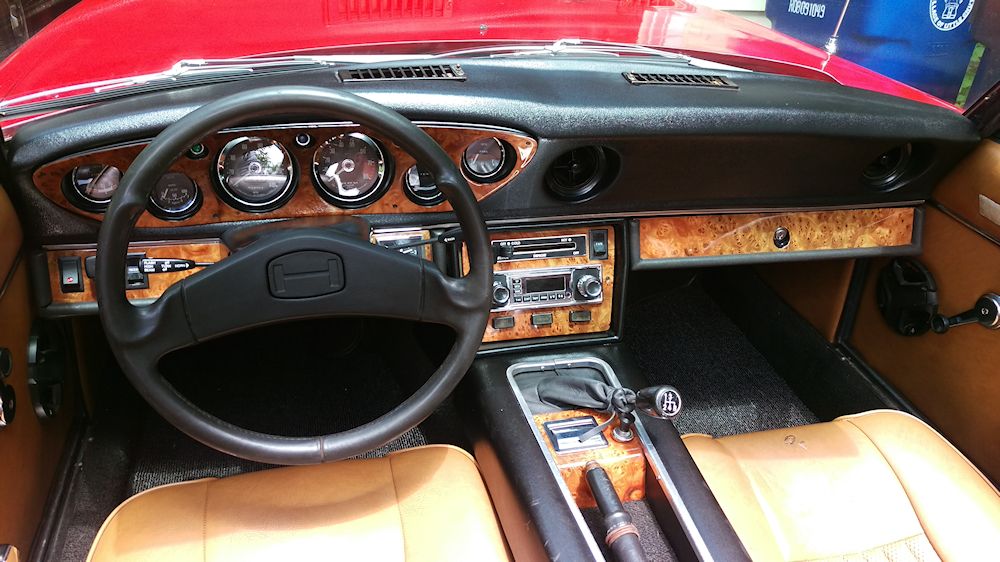 Last edited on 06-09-2015 07:48 pm by answerman |
|||||||||||||
| ||||||||||||||
| Posted: 06-09-2015 09:04 pm |
|
103rd Post |
|
Screenplay Member
|
The dash looks great - especially with the chrome trim rings. Is that the elm or the walnut?
|
||||||||||||||
| |||||||||||||||
| Posted: 06-09-2015 09:13 pm |
|
104th Post |
|
answerman Member
|
It's the elm.
|
|||||||||||||
| ||||||||||||||
| Posted: 06-09-2015 11:55 pm |
|
105th Post |
|
Screenplay Member
|
I have a feeling my dash is going to eventually look an awful lot like yours. Nice job!
|
||||||||||||||
| |||||||||||||||
| Posted: 07-10-2015 05:52 pm |
|
106th Post |
|
answerman Member
|
Well, I just caused myself an afternoon of work (hopefully that's all it will take). Those of you who were at the Jensen East meet might remember that Ms. Jenavieve had an odd running issue which we looked at while at the picnic: she started and ran just fine, but after she was warmed up she would miss and backfire a few times when accelerating from idle after running at speed for any length of time. Once she got over 2500RPM or so, then she would be fine until the next stop. So, I started thinking about what might have changed to cause this, and remembered that I had cleaned up the engine compartment while at the car wash right before we left for Rhinebeck. Figured it was worth a look inside the distributor, so I popped the cap and sure enough there was a little oily water in there. "My bad #1"... don't ever wash in there without covering the distributor, it's not exactly watertight. So, after removing all the airbox stuff to get at it better, I sprayed some electronics cleaner into the distributor as best I could (not like you can see into it without a mirror), blew it out with compressed air, and cleaned up the cap and put it back together. After I did all this, I decided to check the timing, so hooked up the timing light and it was way too far advanced. I then loosened up the distributor clamp to adjust the timing, and while I was doing that I thought "I should screw down the temperature compensators on the Strombergs like Brett suggested". So, I took them off, cleaned them up, screwed them down, put them back on, and went to start her up to see if it did anything, good or bad. This was "my bad #2". If you remember, I had loosened the distributor clamp a few minutes before. Oops. Of course she started, ran for about 2 seconds, and quit. Crap. So I went back under the bonnet and the distributor had pushed out about a half inch. At that point I decided it was too late in the evening and I was already making bad decisions, so this afternoon I will try to undo the damage I did. I guess the good news at this point is that I might as well take the distributor out all the way and clean it up good and check the points and such before I wrestle it back into place. Not what I had planned, but you know how it goes...
|
|||||||||||||
| ||||||||||||||
| Posted: 07-11-2015 01:18 pm |
|
107th Post |
|
Brett Gibson JH5 20497 Member
|
Mike. loose the points go with electronics, also dont forget to put a full face gasket on both bypass valves on the carb's. You also should bring the crank up to TDC and align the cams insert the dizzy and make sure your rotor is pointing at the #1, might save you a bit of trouble. Good Luck. Brett
|
||||||||||||||
| |||||||||||||||
| Posted: 07-14-2015 06:32 pm |
|
108th Post |
|
answerman Member
|
Spent quite a bit of time trying to track down Ms. Jenavieve's misfire issue. After doing all of this, it still remains. To recap: she starts, idles, and mostly runs fine under most circumstances, but once warmed up, when accelerating from an idle after a stop, she misfires and backfires once or twice. Then, she's fine till the next stop, and then it happens again. I can not reproduce this at speed (when cruising, I can stomp on the accelerator and she reacts like she should without any misfires). It only happens when accelerating after she's been idling for a few seconds or more. Here's what I've done so far: Carbs were balanced at the Jensen East meet courtesy of Ron Mau and Brett Gibson. Didn't seem to affect anything. Screwed down temperature compensators. No change. Took distributor out, cleaned it up inside and out, relubricated the wick, inspected points (seemed to be fine). Reinstalled distributor, set timing to about 5 degrees BTDC. Seems to advance fine when blipping the throttle. However, the problem persists. Properly gapped and installed new NGK plugs. Old plugs looked ok. No change. Removed timing belt cover, disconnected coil, manually turned engine to TDC. Everything lines up as it should: 110/110 on the cams. Removed bypass valves, cut and installed full face gasket. No change. I then removed most of the vacuum hoses, removed the vacuum switch, and capped all ports. Here's a before and after view, using Mark Rosenbaum's diagram, which I edited a bit for the "after" diagram: Original routing: 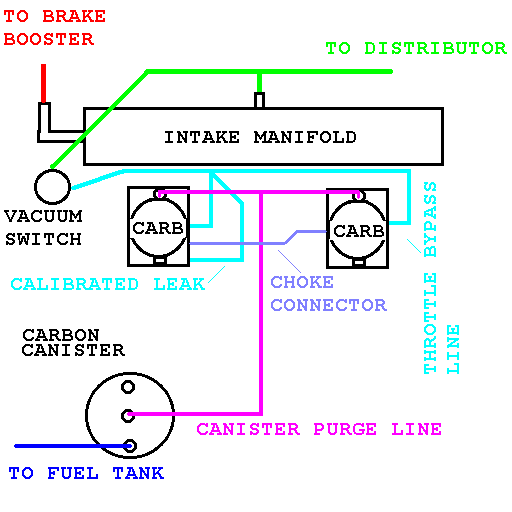 After removal and capping (caps are shown in red, I also capped the vacuum retard port on the distributor which isn't in the diagram): 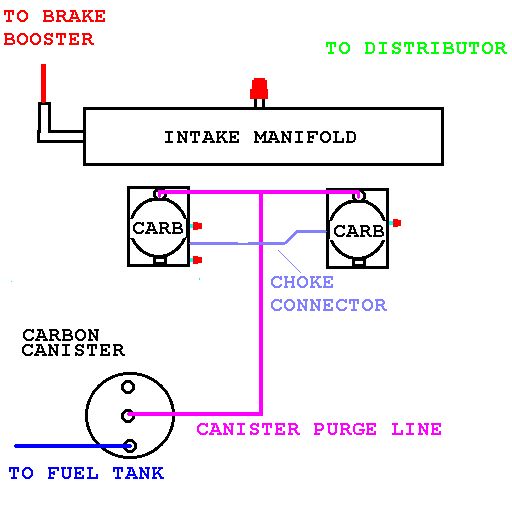 The only vacuum lines in place now are the canister purge line and then T'd to the carbs (the pink line in the diagram). Obviously, the choke connector is still there as is the dark blue line to the fuel tank. All light blue lines are gone, the vacuum switch is gone, and the line to the distributor vacuum retard line is gone. Caps installed on the front carb throttle bypass port, the two rear carb ports, and the port on the intake manifold that was feeding the green lines to the vacuum switch and the vacuum retard on the distributor. Then, reset the ignition timing to approximately 12 degrees BTDC, reset the idle to about 1000 RPM, and it advances to just over 30 degrees at higher RPMs (I couldn't see the tach and the timing mark at the same time, so I'm guessing I was at about 3000 RPM). Whew. Yet, the problem persists. I'm running out of ideas. I really think it's an ignition issue, and my next step was to talk to Mike at Delta about a Pertronix distributor and coil. I know it's a good idea, but I hate to go through the expense and time if it's not going to solve this issue. Anyone? Last edited on 07-14-2015 06:36 pm by answerman |
|||||||||||||
| ||||||||||||||
| Posted: 07-14-2015 11:36 pm |
|
109th Post |
|
Jim Sohl sn 11210 Member
|
Forgive me if this has been covered before, it is a long thread. On acceleration from an idle, a very temporary rich mixture is needed. Many carbs do this with a squirt of gas from an 'accelerator pump,' Dell's do this as do Webers. The Stromberg method is different. The air valve, the large cylinder that goes up and down with air flow, is prevented from going up as fast as the air flow goes up upon opening the throttle plates from low (idle) speed by a 'damper.' The damper is the piston-like thing that goes into the top of the carb. Unscrew the knob at the very top of the carb and gently pull the damper out. It should move freely, but slowly, as if it were a tiny shock absorber. If fact, that is almost exactly how it works, by forcing oil through a small passageway, thus slowing down the movement of the air valve. Check the oil level in the damper tube. It should be about half-way filled with oil. If not, there will be far less damping and the air valve will move up very quickly, quick enough that the temporary rich mixture goes away too soon, resulting in stumbles, misses etc. I do not frankly know what kind of oil is supposed to be used, I have used 20/50 in the past with no complaints. If your dampers have oil and are slowing down the air valve, you problem probably will be found elsewhere. I'm sure this has been posted by others, just an FYI. good luck! Jimmy
|
||||||||||||||
| |||||||||||||||
| Posted: 07-15-2015 12:55 pm |
|
110th Post |
|
Brett Gibson JH5 20497 Member
|
Mike, I believe at the show you mentioned that you have never rebuilt the carb's, so whats crossing my mind is if you have the ignition in good working order (I would switch out the points) then it's time to take the carb's off clean them up set the float bowl level's and make sure there are no air/Vac leaks along the shafts, basically give them a proper complete rebuild, it's not very complicated, put them back on and balance the air flow like we did at the show. Also I would put the vac hose line back to the distributor but check the vac piston on it to make sure it works. Brett
|
|||||||||||||
| ||||||||||||||
| Posted: 07-15-2015 04:28 pm |
|
111th Post |
|
answerman Member
|
Well, I was hoping Jim was on to something with the dampers. I checked the oil level in the dampers and it was indeed low. Topped them up with some 20W50 and they move nice and slow now, but after a test drive the problem persists. Brett, the Strombergs were rebuilt right before I got the car, about 4 years ago. I'm not discounting your suggestion, and if they need to be cleaned up I'm happy to do so, but I still think it's ignition related (distributor or coil). One thing I didn't mention in the original description of the problem is that it does seem to be heat related... the warmer the engine, and the warmer the outside temperature is, the worse the problem is. I've also noticed that she seems to be running just a little hotter than she used to (not overheating by any stretch, but enough to be noticeable). At this point I'll fiddle with it a little longer (maybe siphon the oil out of the carbs and replace it with new just to completely rule that out). Also check the shafts for vacuum leaks. Only other thing I can think of to check is compression... is it possible I have a sticking valve? I haven't done that yet since I need to have someone else to crank over the engine and everyone seems to be conveniently absent when I'm working on her. If I can't come up with another solution, then I'll wait for Mike from Delta to call me back with the news that they have the Pertronix stuff in. If I go that route, the plan is to just order and install a new complete Pertronix distributor, and a new coil. That way I can rule out pretty much anything having to do with the ignition. If I do go this route, I won't be able to reattach the vacuum line to the distributor as the Pertronix distributor doesn't have a vacuum retard. Last edited on 07-15-2015 04:32 pm by answerman |
||||||||||||||
| |||||||||||||||
| Posted: 07-20-2015 07:42 pm |
|
112th Post |
|
answerman Member
|
Here's where I'm at. Still no joy. Hooked up a Mityvac at various places (not much to check since most of the vacuum lines are capped off now). Brake booster holds vacuum nice for at least 10 minutes, figured that was long enough for a test. When I connected the Mityvac to the main manifold port, the gauge bounced all over, which according to what I could find indicates a weak or broken valve spring. Very possible, but I don't think that's the cause of my issue. Used a can of spray carb cleaner to try to search out vacuum leaks around the carbs. None that I could find. Double checked the oil in the Strombergs. Definitely full, and the plungers seem to move very slowly like they should. I still wonder if heavier weight oil might make a difference (I just used the same 20w50 that goes in Ms. Jenavieve's crankcase) but I have a hard time believing that this is the issue since this is the same oil I've always used. I also, when I had her out this weekend, experimented with different choke settings while driving (when I came to a stop, I would pull the choke a little bit before taking off). Other than raising the idle, it didn't seem to make any difference, I still had the hesitation and backfire. So I really don't think it's an issue of being too lean under those circumstances. If anything, I think it's too rich which takes me back to ignition... I still haven't done a compression test, but I don't think that is going to solve anything (other than to point out other unrelated issues). I guess I'm at the point where I call Delta and order the Pertronix distributor and coil. Last edited on 07-20-2015 07:50 pm by answerman |
|||||||||||||
| ||||||||||||||
| Posted: 07-21-2015 06:12 pm |
|
113th Post |
|
answerman Member
|
Just a little more info: Took her out for a drive last night, got her warmed up good, brought her back and checked the damper oil again. The dampers still move nice and slow at temperature, so I think I can rule them out. Also finally got around to pulling the plugs again (they look fine, no difference from one to the next) and did a compression check. Front to back: 120/120/120/125. Not exactly great but not surprising (the engine does have 98,000 miles on it), but more importantly no discrepancies between the cylinders to speak of. Called Delta yesterday and ordered a Pertronix distributor and Pertronix coil. Crossing my fingers that that will solve the issue. I'll be really ticked if it doesn't, because I am running out of ideas...
|
||||||||||||||
| |||||||||||||||
| Posted: 07-23-2015 06:35 pm |
|
114th Post |
|
answerman Member
|
Did a few more "just because" things last night just to further rule things out. Pulled the filter element out (K&N element in the stock "muffler"), cleaned it, reoiled it, and reassembled. It wasn't that dirty, and it had no effect as I suspected. I figured if it was too restrictive it could cause a rich condition, but no change. Played with the Strombergs for a while. I didn't adjust anything other than the idle speed since they were just balanced, but I did read up on their operation and ran a couple of tests to see what they were doing. I did the test where you lift the piston slightly and the idle came up just a little and then slowed right back down, so that seems to be good. I did notice several references to the piston having resistance on the up stroke but falling quickly with a "click". Well, mine are definitely not clicking, but they do seem to drop fairly quickly. I'm not sure if that's an issue or not. Also (side note) I finally installed the replacement interior light I bought from Delta over a year ago... the reason I never got to it was because when I had the car disassembled for the repaint, I had left the driver side door switch hanging inside the hinge cavity when I removed the door, and completely forgot about it when I reinstalled the door, so it's just been hanging in there for the last 16 months. Oops. Last night I removed the door, fished the switch out, and reinstalled the door and switch properly. Fortunately I didn't have too much trouble getting the door to line back up, got it on the second adjustment. Waiting for the mail to get here with my Delta package...
|
|||||||||||||
| ||||||||||||||
| Posted: 07-24-2015 06:58 am |
|
115th Post |
|
answerman Member
|
Well. It's nice when things work out the way you hope they will. Pertronix shipment arrived from Delta this afternoon. After supper, went out to the garage and spent about a half hour mapping out "before and after" diagrams of the ignition wiring. I had to remove the ballast resistor and account for all the wires... it wasn't too bad actually. I was able to remove the ignition feed wire (white/slate if I remember right) from the ballast resistor and just pull it over to the coil and connect it directly to "coil+" (SIDE NOTE: I rebuilt my tach to RVC standards with the Spiyda kit a while back, so I don't have to worry about the infamous "my tach doesn't work with Pertronix" issue). This done, the old coil and ballast resistor were removed, and the Pertronix Flamethrower coil was installed. I had to wrap a few layers of rubber tape around it to get it to fit snug in the old coil bracket... I'll find a more elegant solution later. Then, I just taped and tied off the other wires for now since they aren't being used for anything (I also installed a gear reduction starter last summer so my direct feed to the coil from the starter relay is nonfunctional... both ends of the white/yellow wire are disconnected), Connected the tach feed to "coil-" and considered the coil done. Moving on, I turned the engine to TDC, pulled the distributor cap, and noted which terminal the rotor was pointing at, double checked the other end of the wire, and it was indeed #1. Numbered the plug end of the wires, and removed one at a time and installed them on the new Pertronix cap in the relevant positions. That done, and after a quick trip to O'Reillys to pick up a new coil wire (the Pertronix coil uses a regular push on connector while the old Lucas coil used a screw on) I was ready to start on the distributor. Unplugged the remaining wire (again not being used in the new system, the other end is tied off at the coil end), removed the retaining nut, and pulled the old Lucas distributor. Noted the position of the rotor, aligned the Pertronix rotor in roughly the same spot, transferred the mounting plate over from old to new, and installed the new distributor... just had to wiggle the rotor a little to get the shaft to seat in the oil pump housing. Tightened everything up, reinstalled the cap, pulled the plugs and gapped them to .035", reinstalled them and commected the wires, connected the red and black wires from the distributor to the coil, and figured it was worth a try at this point since I knew the timing had to be at least close. Connected the timing light, said a little prayer, and turned the ignition key. And... she started right up. Wow. I wasn't expecting that. A little rough, but running. Checking the timing light, she was about 5 degrees ATDC, so I loosened up the distributor and got her set to about 14 degrees BTDC at about 1100 RPM idle. And, after tidying up a bit, took her for a drive for about 20 minutes, hammering her pretty hard, and not a single bit of hesitation. She's never run like this. So, after all of this, I just should have listened to everyone who said "ditch the points and go electronic". I would have saved myself about a month of hassle, and the conversion was actually pretty painless. Of course, all the other stuff like carbs, plugs, air filter, etc. is now checked over so in hindsight it probably was a good thing that I went through all this troubleshooting. Tomorrow, I'll go back in and route the wires properly and figure out what to do with all the extra wiring that isn't being used any more. And come up with a better way to mount the coil. Just happy to have Ms. Jenavieve running like she should again.
|
||||||||||||||
| |||||||||||||||
| Posted: 07-25-2015 02:37 am |
|
116th Post |
|
Art DeKneef Member
|
Don't you love it when a plan comes together. Good job. And you still have a few months of driving up there.
|
|||||||||||||
| ||||||||||||||
| Posted: 08-24-2015 06:45 am |
|
117th Post |
|
answerman Member
|
After some time just enjoying the summer, got quite a bit done on Ms. Jenavieve this weekend. First order of business was to revisit the whole steering shaft/motor mount issue from this past spring when I replaced her header with the Delta 4 into 1 header. I've never been happy with the way it turned out and since I had some time, I decided to take my time and try different approaches to get it right. The problem was that when I installed the header, I could not find that perfect point where the steering shaft didn't contact one header pipe or another where it passed through. It was hitting pretty hard on the right side at a half turn of the wheel, so I proceeded to make some shims out of large washers (notched to slide on easily) and shim the left side of the engine as suggested. Problem was, in order to get the shaft to stop contacting on the right side pipe, I had to raise the engine so high that the shaft started contacting the pipe to the left at about a quarter turn to the left, while just barely touching the pipe to the right. Wow, that was hard to explain... but if you've done this you know what I'm talking about. Anyway, at 9 washers (a little over half an inch of shim) I called it as good as it was going to get and that's the way it's been the past few months. The engine was way too high for my taste, in fact I had to remove the cam belt guard since it was hitting the bonnet. And finally, this weekend, I got back to it. This time I wasn't in so much of a hurry (I had the whole header and exhaust issue to deal with back then) and I decided to take my time and explore all my options. I spent a couple of hours pulling shims out, putting them back in one at a time, taking careful note of how it affected the steering shaft interference. What I finally figured out is that (and this was exactly the opposite of how I thought it worked) "shortening" the steering shaft (by collapsing the upper U-joint) actually gives the shaft less lateral movement. I thought straightening it out and making it longer would make it "smaller" in the turn radius, but that's apparently not how it works at all. So, I loosened up the lower pinch bolt, slid the shaft to its "shortest" point, and it made a huge difference. I was able to go from the 9 shim washers I had all the way down to 4 (a little less than a quarter inch) and now there is no interference at all (though it's still awful close). Much, much better. Having done this, I reinstalled the upper cam belt guard, since it fits right now, and then decided it was time for an oil and filter change, which went as uneventfully as oil changes go. Then, I decided it was time to see about the rocker switches I recently pulled off my latest parts car (which I never wrote up here other than in the VIN database thread... it was a complete rustbucket with no motor or transmission, but most of the interior parts came out nicely including the dash and all switches and gauges, along with the brakes, steering column and shaft, and all exterior lights and Mk I style headlight buckets and a mostly perfect rear bumper). Anyway, I spent a few hours disassembling, cleaning, and reassembling the headlight, hazard, and fan switches that I pulled from the parts car, and they are now in Ms. Jenavieve replacing the ones that were in there. None of hers were original: the hazard and fan switches were the squarer, sharp-edged replacements that Delta had a while back, while the headlight switch was just a SPST rocker that I found at the hardware store. Now they are back to original. Next step is to see if I can rehabilitate the turn signal/wiper switch from the parts car (Ms. Jenavieve has the MGB turn signal switch) to get even further back to original... the switches seem to function fine as far as I can tell, but the mounting collar is cracked so I'll have to see if I can JBWeld it or whatever. Oh, and I think the dash from the parts car will be going in as well (I really don't like the Delta dash cap that Ms. Jenavieve has, and removing it is not an option since her dash is really in bad shape). The dash from the parts car has one small crack by one of the defroster vents but is otherwise pretty much perfect. No big hurry, though.
|
||||||||||||||
| |||||||||||||||
| Posted: 09-01-2015 03:57 am |
|
118th Post |
|
answerman Member
|
Not an intentional part of the project, but just when things are going well, Lord Lucas strikes again (though it's technically a mechanical issue, not an electrical one). Went to a car show about a half hour from home on Sunday, one of the typical shows in the area (meaning that if your car wasn't built in Detroit, very few people are interested). Still, it's a good way to kill a day. Anyway, as we arrived, I noticed a new, interesting, and not very good sound coming from under the bonnet. Consistent with engine speed, kind of a scraping sound. "This can't be good"... After we got parked and registered and all that, I popped the bonnet (because you can't show a car with it closed, that's just wrong!) and took a quick peek under there... didn't see anything obviously amiss. After a couple of hours I decided to look further into it. Started her up, listened while walking around trying to pinpoint where the scraping was coming from, and zoned in on the alternator. Turns out that the alternator fan was just barely touching the alternator body. Hmm. Guess I tightened the belt too tight a couple of weeks ago? So, now that I know the engine isn't going to blow up, we enjoyed the rest of the show and then drove her home. Nothing out of the ordinary other than that scraping sound. Once home, I pulled the alternator out (it's the Lucas alternator) and took it to the bench, and it appears that the shaft is slightly bent... there is a noticable wobble to the pulley and fan when they spin, though the bearing seem tight enough (which wasn't what I was expecting to find, figured it was loose bearings). Did a little forum reading, tried a couple of the shops like O'Reillys and Auto Zone, trying to find a single wire Delco 10si (since that seems to be the non-Lucas replacement of choice) with no luck. Then this morning, made a call to Mike at Delta just for comparison's sake, and as luck would have it he had a Lucas 14037-HD, brand new, in stock. Apparently the "HD" means heavy duty, it's rated for 63 amps instead of 43, but he found no reason that it wouldn't be a direct replacement. So, I went ahead and ordered it along with a new plug kit since I haven't had the original plug in years (I replaced the connectors right when I first got the car with crimp on female spades just to get her going) and should be back up and running later this week. Maybe the new larger capacity alternator will actually be able to keep up to the headlights.
|
|||||||||||||
| ||||||||||||||
| Posted: 10-20-2015 05:35 pm |
|
119th Post |
|
answerman Member
|
Ms. Jenavieve is off the road for the winter, and she's in her winter home at our British car clubhouse on a hoist. Preparing to pull her engine for a new rear main seal and other engine stuff (aside: I do have to say that it's MUCH easier to get at the exhaust manifold nuts when you're standing under the car). Questions: I assume I have to pull the clutch and flywheel before I can mount the engine on an engine stand. Is it possible to do the rear main seal with the engine on a stand? Also, does anyone know what size bolts (I know they are metric but that's it at this point) are needed to mount to the stand? I assume the bell housing bolts won't be long enough.
|
||||||||||||||
| |||||||||||||||
| Posted: 10-21-2015 01:05 pm |
|
120th Post |
|
Brett Gibson JH5 20497 Member
|
Pulling the seal cover can be done on a stand but it is a tight fit and would be easier off. Threads are all standard non metric.
|
|||||||||||||
| ||||||||||||||
| Current time is 03:38 pm | Page: |
| > Jensen Healey & Jensen GT Tech > Projects > 16173 will be entering project status... | Top |