> Jensen Healey & Jensen GT Tech > Projects > 1973 Jensen Healey #10777 Lotus "Colin Chapman" Edition "Gold Leaf" Build |
> Jensen Healey & Jensen GT Tech > Projects > 1973 Jensen Healey #10777 Lotus "Colin Chapman" Edition "Gold Leaf" Build |
| Moderated by: Greg Fletcher | ||
| Author | Post | |||||||||
|---|---|---|---|---|---|---|---|---|---|---|
|
discogodfather Member 
|
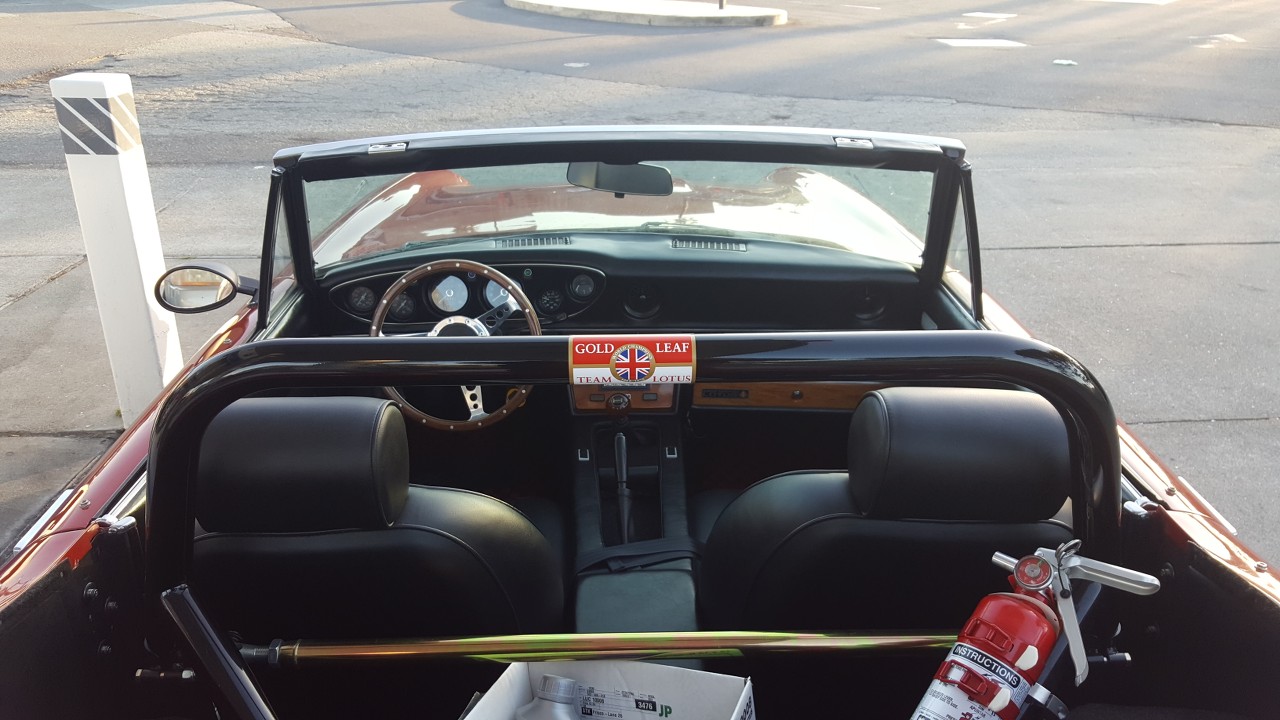
This is a build and customization thread of my JH, kind of an organization of the project and it's timeline. After nearly 12 years sitting, getting it back on the road. PART 1: The Background Around 2000 or so I had a friend in college who owned an 87 Lotus Turbo Esprit. He was technical but not a mechanic and I had the amateur mechanics / fabricator background and was in school for mechanical engineering at the time. I had done tons of work with Porsches of that period but the Esprit was my first foray into English material, and I immediately fell in love with the Lotus engine. After I successfully diagnosed a problem with the KE-Jetronic (from my Porsche experience) I got a green light to work on the car. It was a marvelous machine and at the time was affordable, at least by today's standards. But it wasn't affordable from a college kid top ramen budget. I realized I couldn't afford anything heading into graduate school but I had a good job at the university working as a research assistant, and I managed to save a bit. Turbo Esprit was out of the question but maybe an old S1 or S2? I almost closed a deal for 9k for a non-running S2, but it got away from me. I started to read about Lotus and realized the engine started in the JH in the form of the 907. In 2005 I purchased this highly customized 73 Healey from a local builder (in the Bay Area). He had been restoring cars and planes for years, and had real taste and I immediately fell in love with the car. I remember pulling up to the parking lot where I first saw it and next to it was a 66 Shelby GT-350 the same builder had just completed. I think the first time I opened the throttle I yelled "sold!" right away. For $6500 it was a damn good deal. The car was chassis number #10777 from late 73' (just found this out from the board here) and it had a highly built 74' engine. Some of the list of extensive mods and custom fab: Engine: 2.0 Liter custom cam, carillo rods, stainless exhaust valves (oversize), knife crank, high comp pistons, twin weber DCOE 45's, custom headers, head ported and polished, velocity stacks. 190hp at the crank, 2.5" custom free flow exhaust to the tips (no cat, minimal muffler) Trans: Getrag 5 speed rebuilt Body: Custom chrome moly roll bar, custom flared steel fenders (all metal), custom springs (lowered), Koni inserts, lots of custom stainless steel pieces including the bumpers, bigger sway bars, all poly urethane bushings, fiberglass hood (from Delta I think). Aluminum Turbine wheels (I believe made by Western wheels) at 13x7 front and 13x8 rear, 225 and 235 radial TA comp tires. Lecarra steering wheel. The original idea of the build was to make a kind of "what if Colin Chapman did a custom edition of the JH". The builder had been in his 20's in that time period and loved the Gold Leaf Lotus Formula 1 stuff from 1986-1971 ( the Lotus 49 and 72, etc.) and did the car in that color red with some gold pinstripes at the sills and gold accents on the wheels. Car as it appeared when I first saw it:  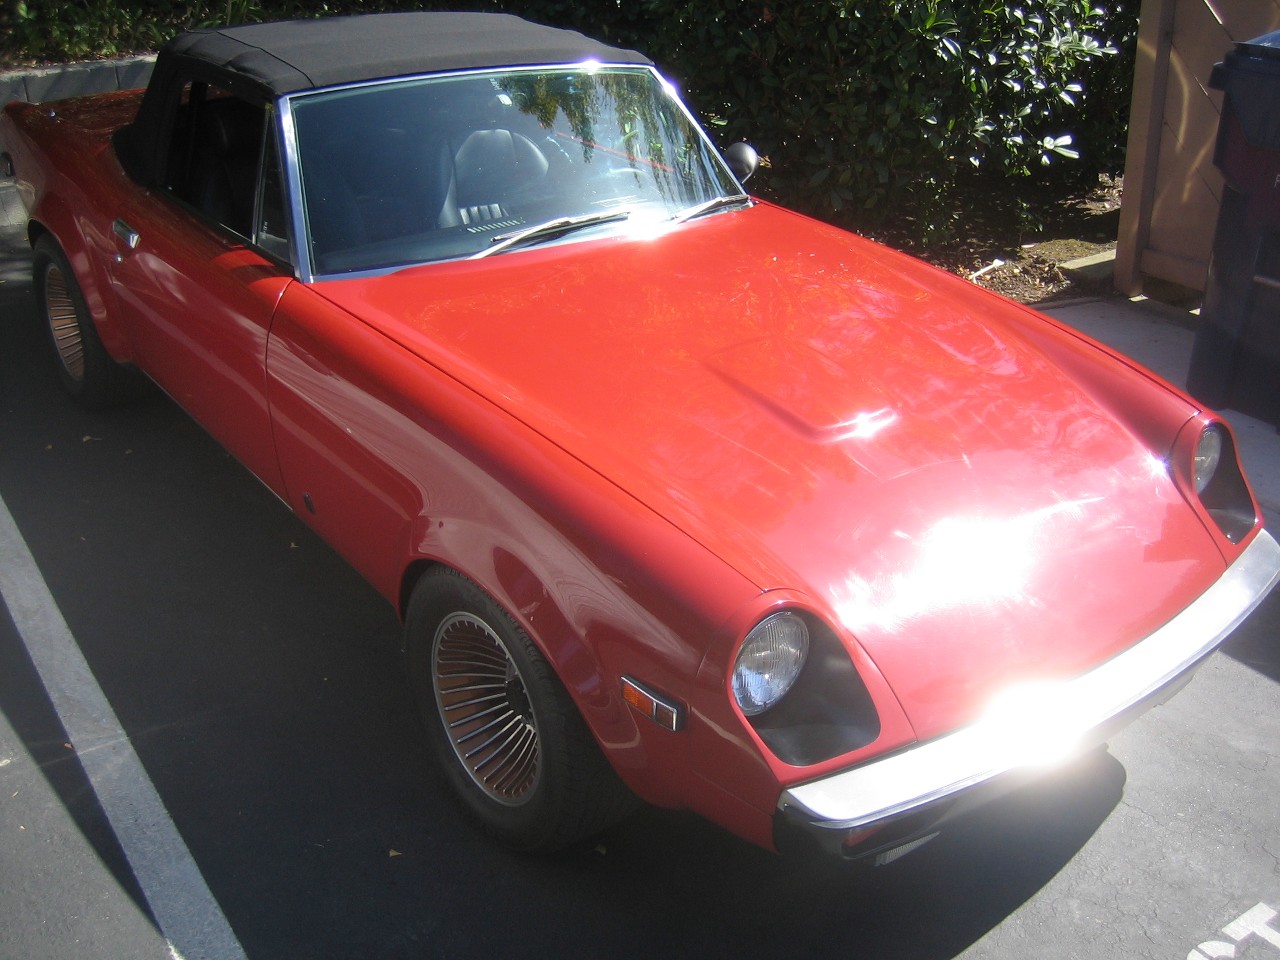 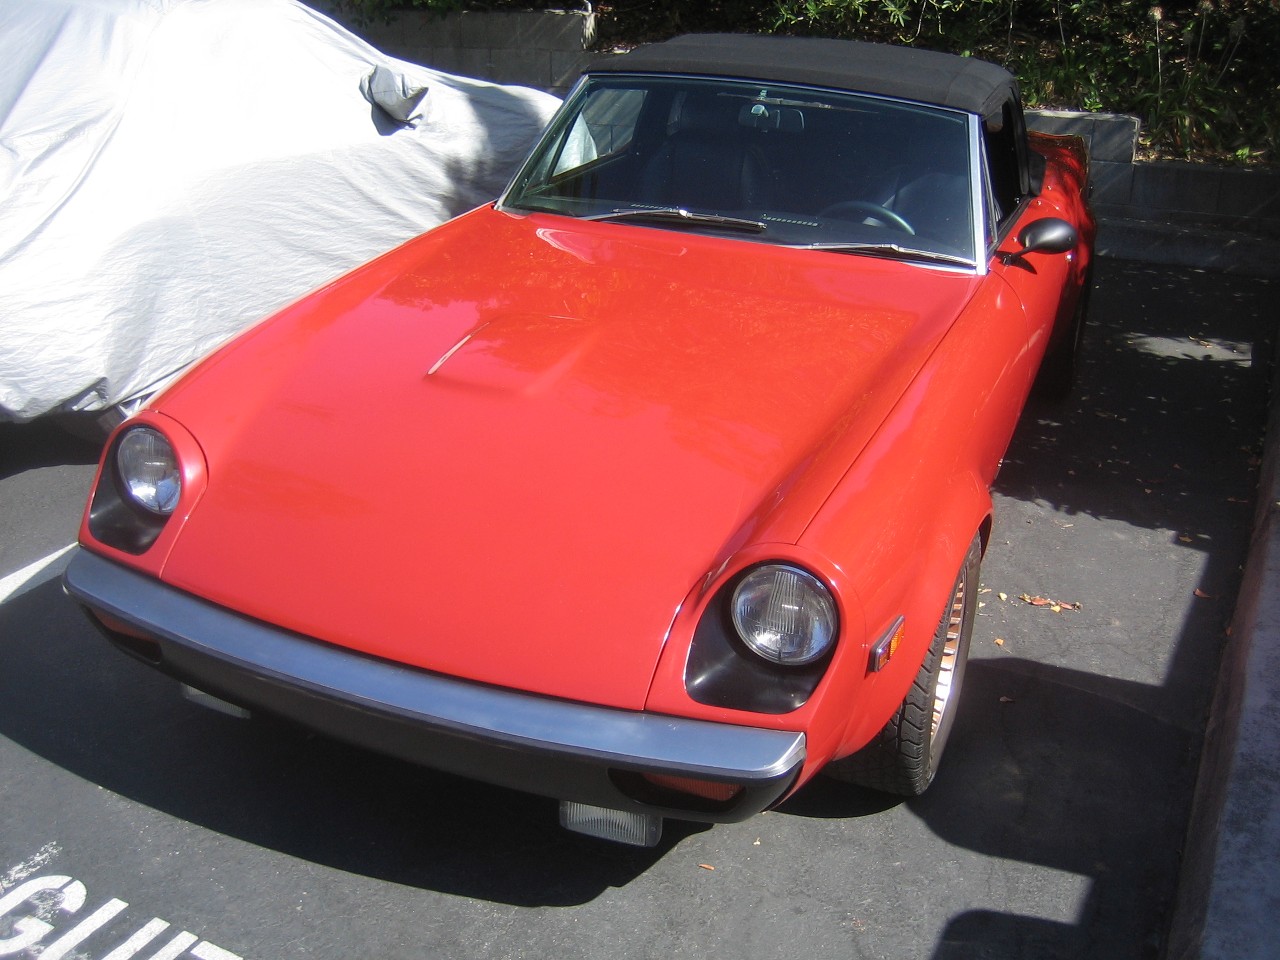 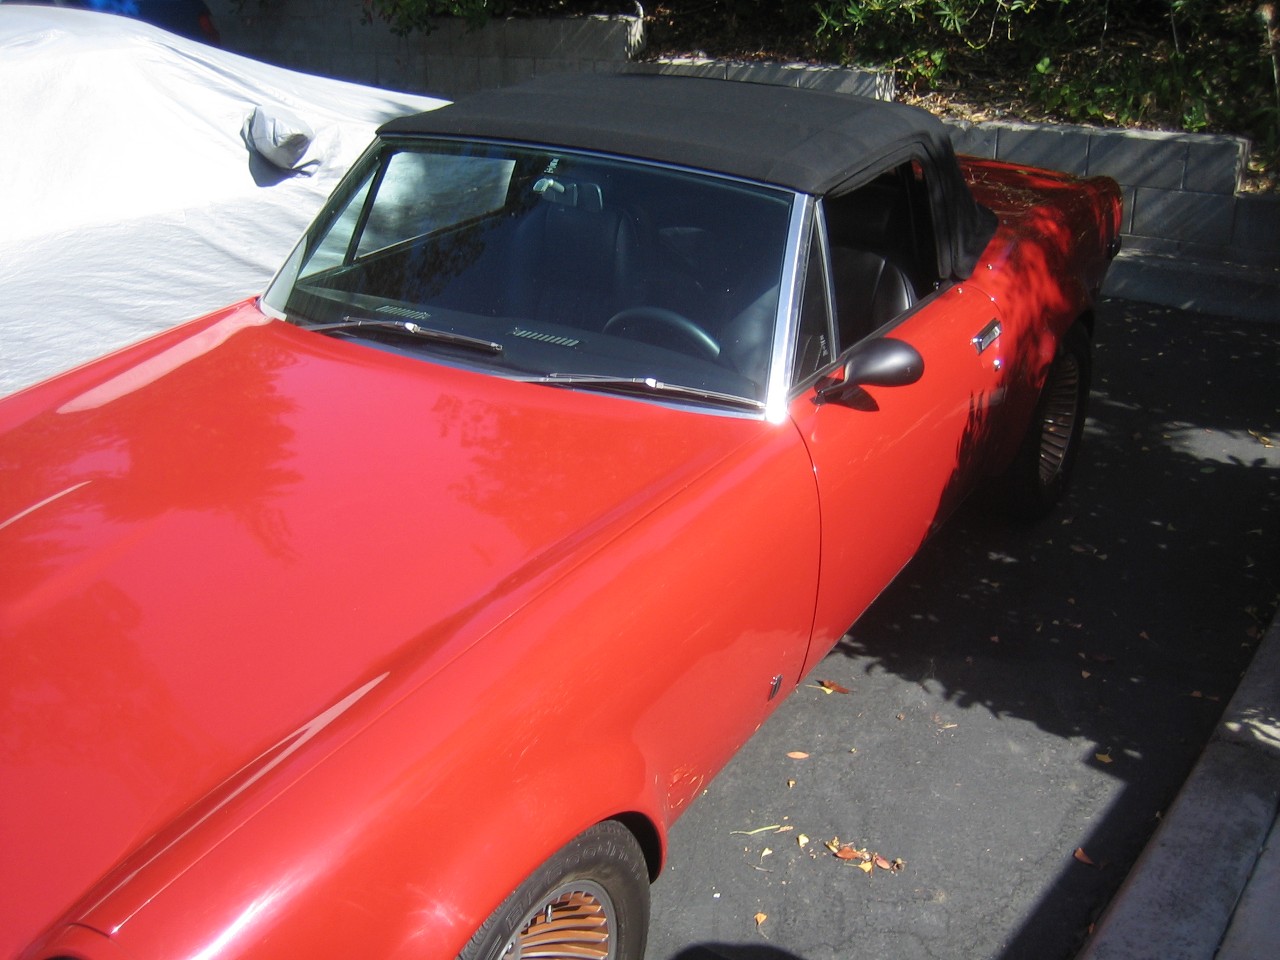 |
|||||||||
|
discogodfather Member
|
PART II: Living with it and Mods The car was a masterpiece and I didn't really want to change anything, but reality started to change things regardless. Right off the bat I had a big problem: the tires. Since the wheel wells had been flared out I essentially had to run fairly wide wheels to make any sense of it. The builder had used a custom set of very era popular western turbine wheels, and they were glorious. I loved the look, but the first issue was tires. At the time BF Comp T/A's were still being made, and they had a decent rep as a good street tire and all arounder that lasted. They had sizes in 225 up to and amazing 255 and were very low profile, if I remember correctly around 40. BF Goodrich promptly discontinued the tires in these 13 inch sizes. As if they heard I bought this car, lol! I ended up having literally zero options for the size unless I wanted to step up to some massive profiles. Sure there were tons of R1 compound and racinf tires, but that wasn't going to cut it where I live in the rain and bad roads. My tires balded as I kept looking for an alternative. But then things got worse: wheel problems. I had some shaking issues at around 55mph, but thought it was a balancing problem. I remember the builder saying that the wheels were actually not the correct 4x4" or 4x101.6mm pattern. They had been modified (maybe from a 4"x95mm or a 4"x104.5mm, I can't remember. I had the wheels balanced and the problem didn't go away. I was flying down 280 south one day to San Jose at some kind of *legal* speed, and I got a violent shaking of the steering wheel, real bad. I thought I had blown up a tie rod, it was that bad. The front passengers side wheel had come loose and was damaged - holes rounded out and ovaled with lots of metal missing, including some damage to the spindle and the studs. Towed home and pulled all the wheels and found some ovaling on all the wheel holes, and realized the bolt pattern issue had caught up to me. Big bummer. I replaced all the bearings and the front spindle on the passengers side, and looked for some replacement wheels. I thought maybe some mini-lites or something in that vein, but nothing really presented itself. Most were around 7" and I started to do all the permutations on which tire would fit, etc. I ended up not being able to find anything close to the deep inset I needed (or small backspace for Americans). I ended up going with a stamped steel wheel out of frustration with finding a good street tire/wheel combination. Final setup was a Diamond Racing wheel at 15x9 in the rear and 15x7 in the front. Cooper cobra 225 / 55's. The look was odd. It kind of reminded me of a dune buggy and the wheels filled every damn MM of the wells and it did rub a bit on hard turns. Miraculously didn't touch in the rear. But they were way too big, I went from rims that were around 12lbs with a 19lbs tire to a 19 lbs rim and a 24 lbs tire, big mistake. It was grippy as hell but it plodded along, gone was the steering response. It also raised the car about 2" so it looked like it was floating in air. Monster truck?? 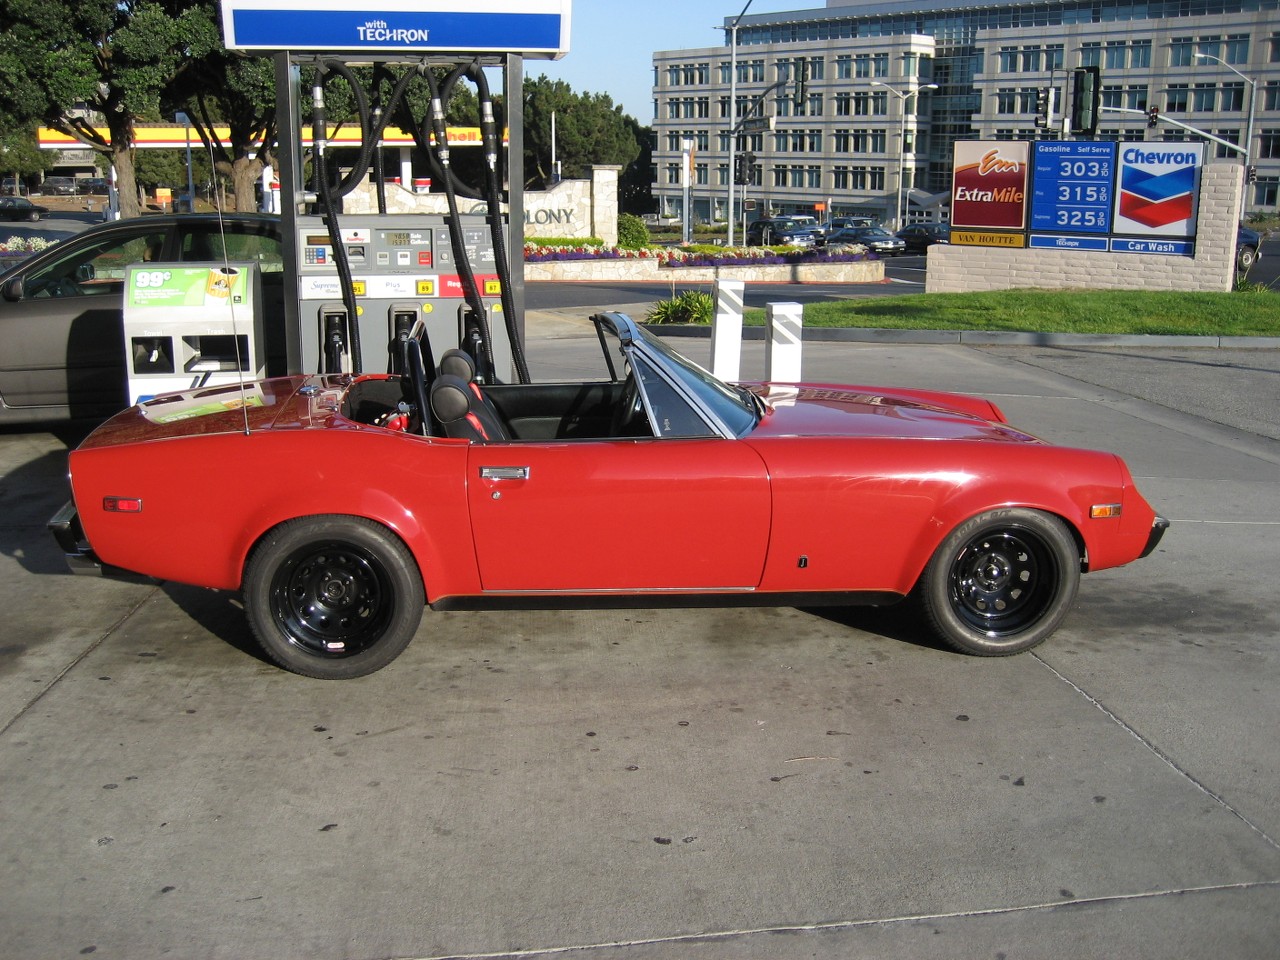 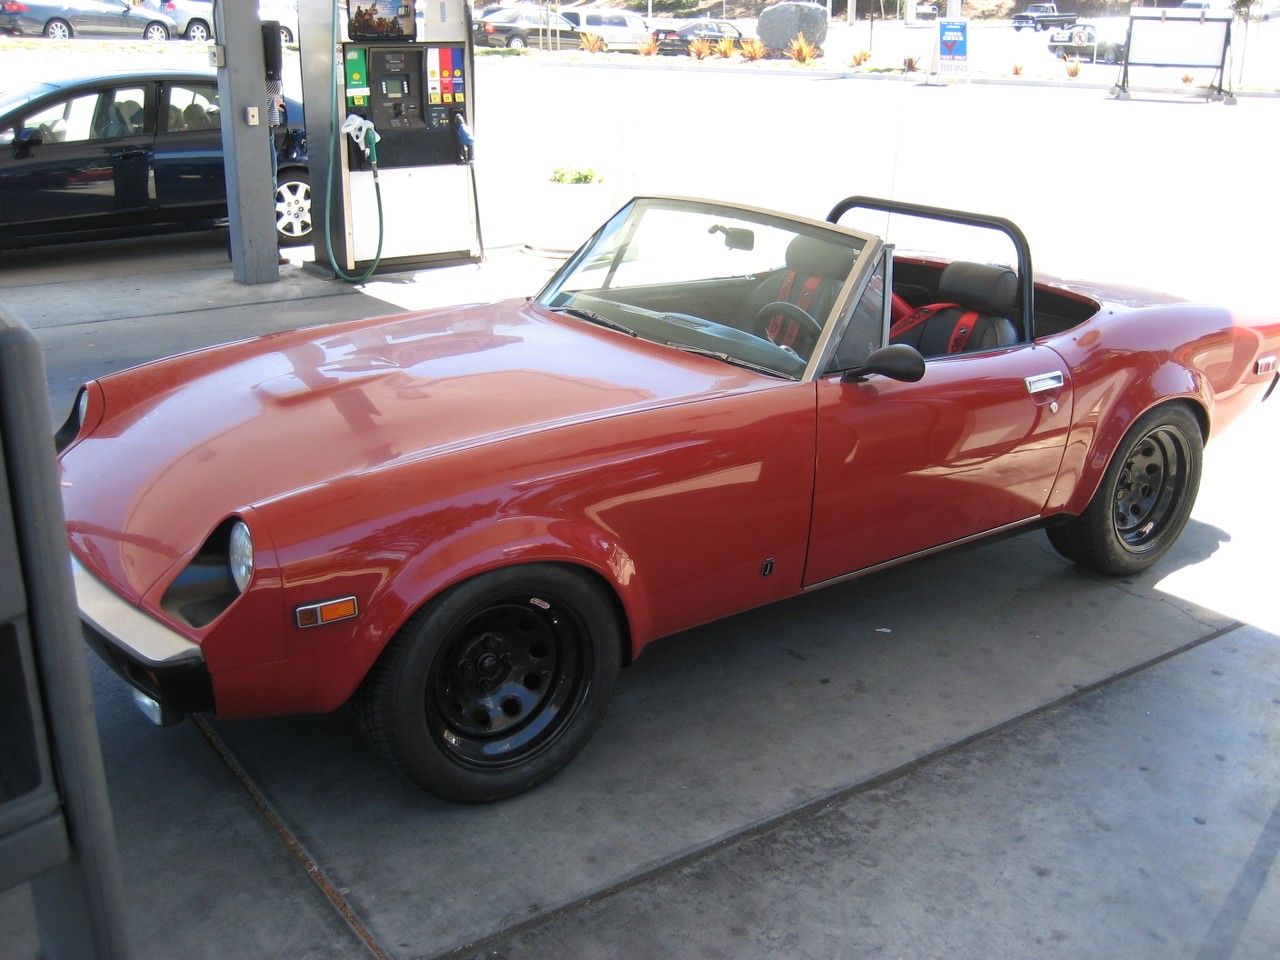 |
|||||||||
|
discogodfather Member
|
PART III: More Mods and taking it off the road The wheel issues were at least passable for the time being, so things were going ok, despite the looks and the loss of some nice handling perks. The engine was doing great except for a bit of carb popping when I decelerated. I started to mess with Velocity stacks, as the original setup was that kind of dual K&N filter. I bought some short stacks and had some filter covers made (there used to be a guy on ebay selling some custom made ones) and I ended up moving out to a very long configuration. This helped with mid range torque and the flat spot at the carbs. It sounded heavenly. The engine cira 2008: 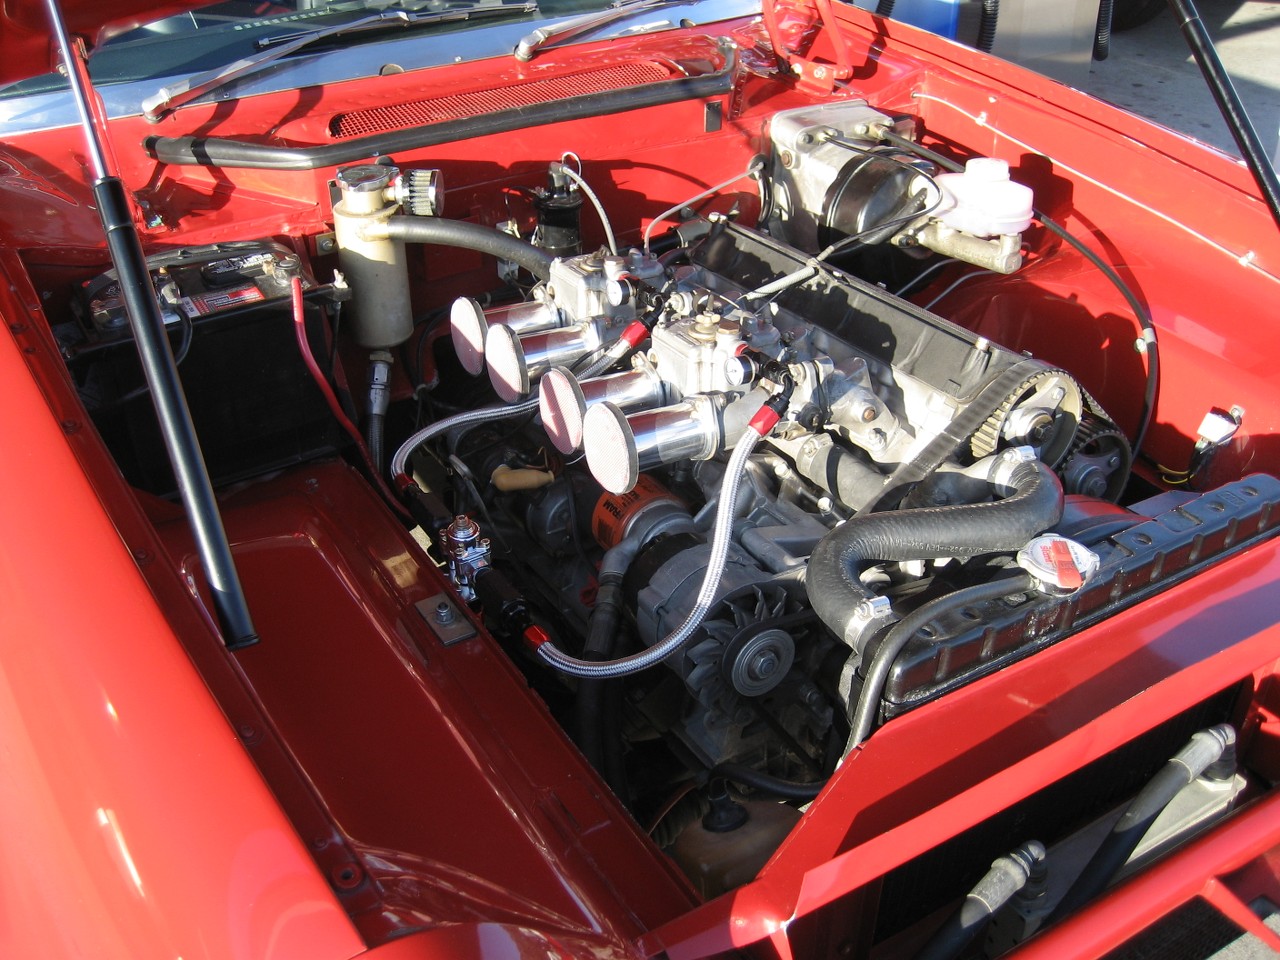 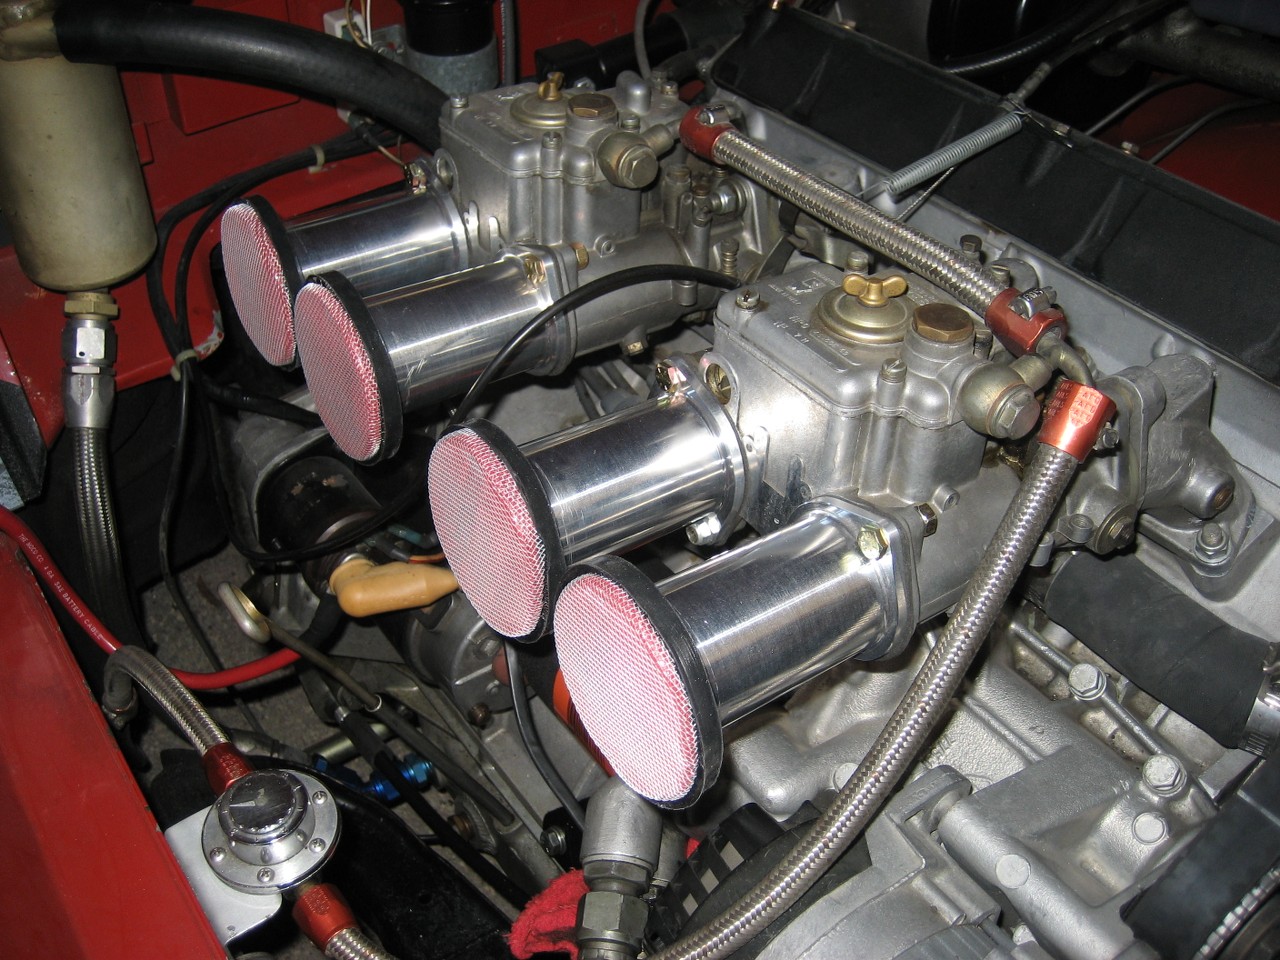 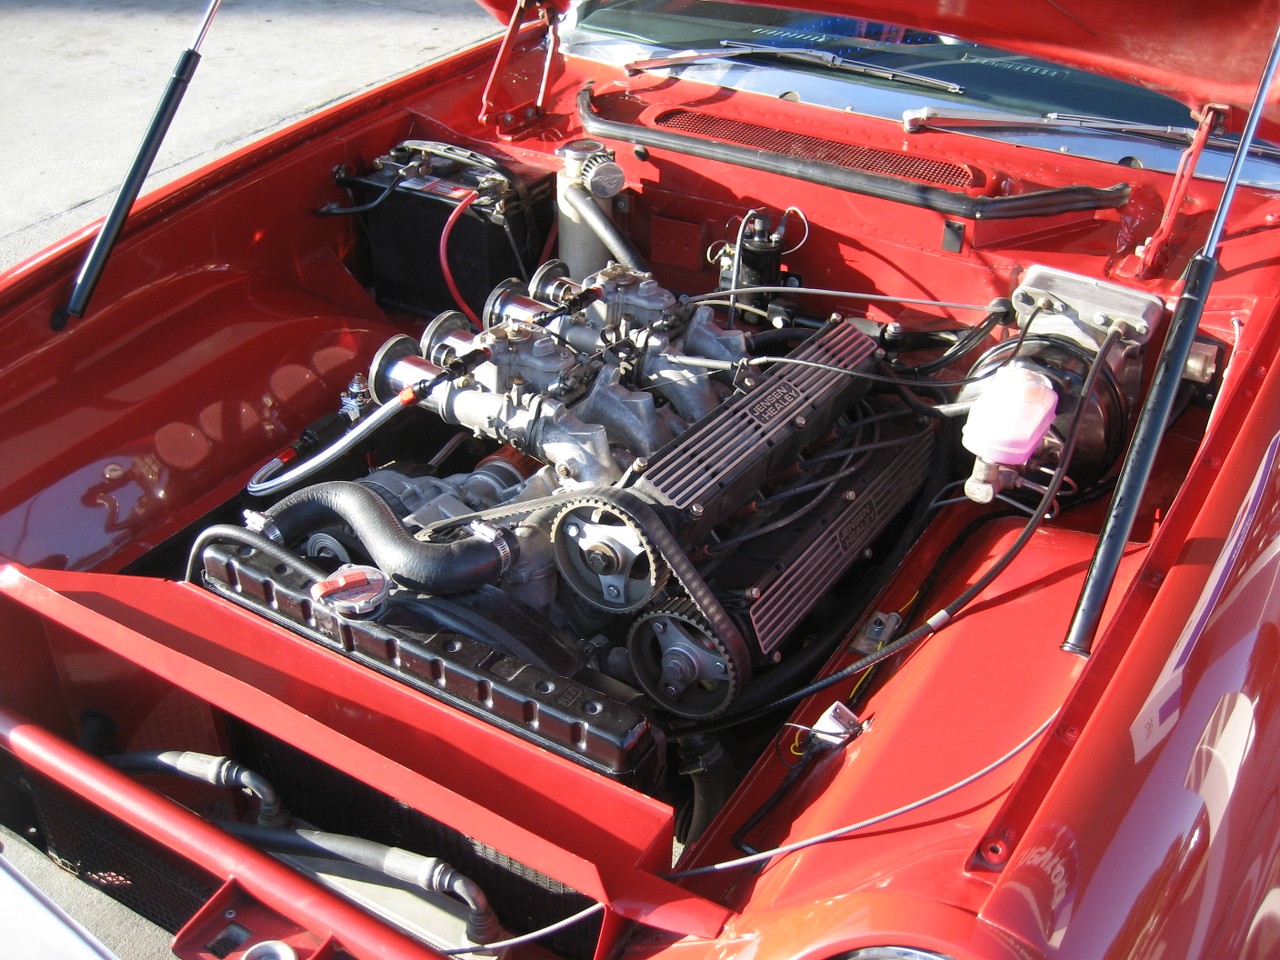 |
|||||||||
|
discogodfather Member
|
PART IV: More Life and the Takedown Started to travel more for work and ended up leaving her with a friend who had a garage when I moved to a new place that didn't have one. The plan originally was just to have her set there for a bit while I finished some extended trips. Disaster: friend left her out in the rain one night. I had a nicely made top on her at the time but it rained and it leaked pretty bad. He did this for a few days, then put her back in the garage when I yelled at him. When I got back from the trip it was damp inside. I was furious and pulled the mats to discover some nice surface rust formed over the weeks it was sitting in the water. I ended up pulling the entire floor mats and spending ridiculous hours media blasting, grinding, and prepping the floors and then putting down some heavy epoxy paint. It was again 100% rust free. This process took weeks for me working very part time as real world work was extremely heavy. Moved to a JHPS 4 piston front setup and rebuilt the entire brake system in late 2008. Went to a Petronix Ignitor instead of points, still endlessly messing with that decel popping problem. Coming back from a Sharks game in 2008 with a friend we achieved a hella of a speed coming back on 280 north! No rev limiter and this thing was pushing max rpms, a nice little treat (of course at legal :) speeds). All of a sudden carb popping was worse. I had eliminated the ballast resistor and went to a Petronix coil. I suspected ignition, but wasn't particularly knowledgeable and messed with it in bad ways, reversing polarity by mistake and leaving the ignition on without the car running. I believe that to the problem now, but at the time I was unsure and started to think carbs. I ended up rebuilding the carbs, Italian DCOE 45's. I felt like the accelerator pump piston might be worn but I really didn't know better, and started to think - maybe I should just get new carbs. Ended up selling the Italians and got a new pair of Spanish Webers, which I now feel was foolish. It was a 1:1 trade at least, but the Italians were just nicer in general. I went crazy with different Jet/Choke/Venturi etc settings. I got good advice from this board and things improved a bit. One mystery was the extremely lean main jets that the car had originally. 125's! The engine was set up with a 107 style high rev high power at the top end, or at least this was the best guess as I never got the originally cam specs. Had an engine fire. Was swapping jets and didn't tighten down the fuel line to the carb well enough and it sprayed a little and whoosh! Fairly minor as I had an extinguisher on hand and got it out in a few seconds, didn't even really burn anything. Replaced the distributor cap and spent 20 hours cleaning out all the Halon dust from the engine compartment. Live and learn. Work was crazy and I had so many other restoration projects I started to drive her less and less. I had put 20k miles in 3 years and then all of a sudden it was sitting, garaged and covered. It had some really bad days starting and running and I was confused as to the cause, and so many other restoration projects- A 69 BMW R60/2, a 67 BSA Lightning, lots of Porsche's and a ton of friend's projects, etc. A Harley chopper, etc. You know the usual excuses! I remember fitting some Lotus cam covers off an Esprit I picked up at a swap meet. Looked amazing! This period off the road gradually developed into 12 years! 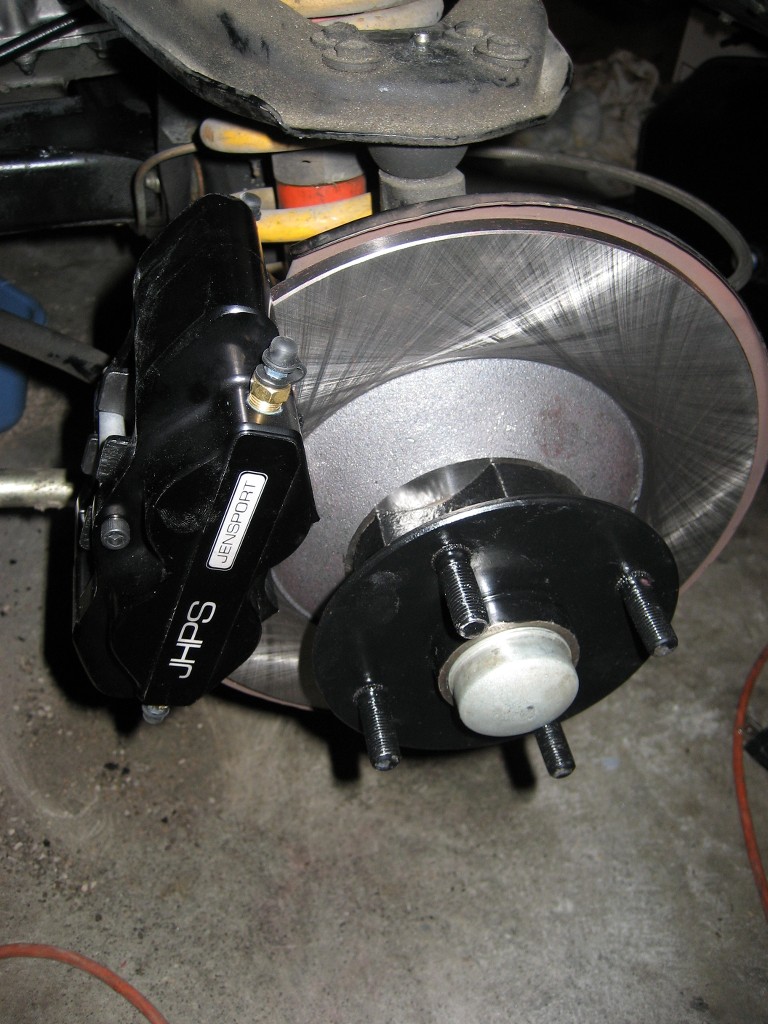 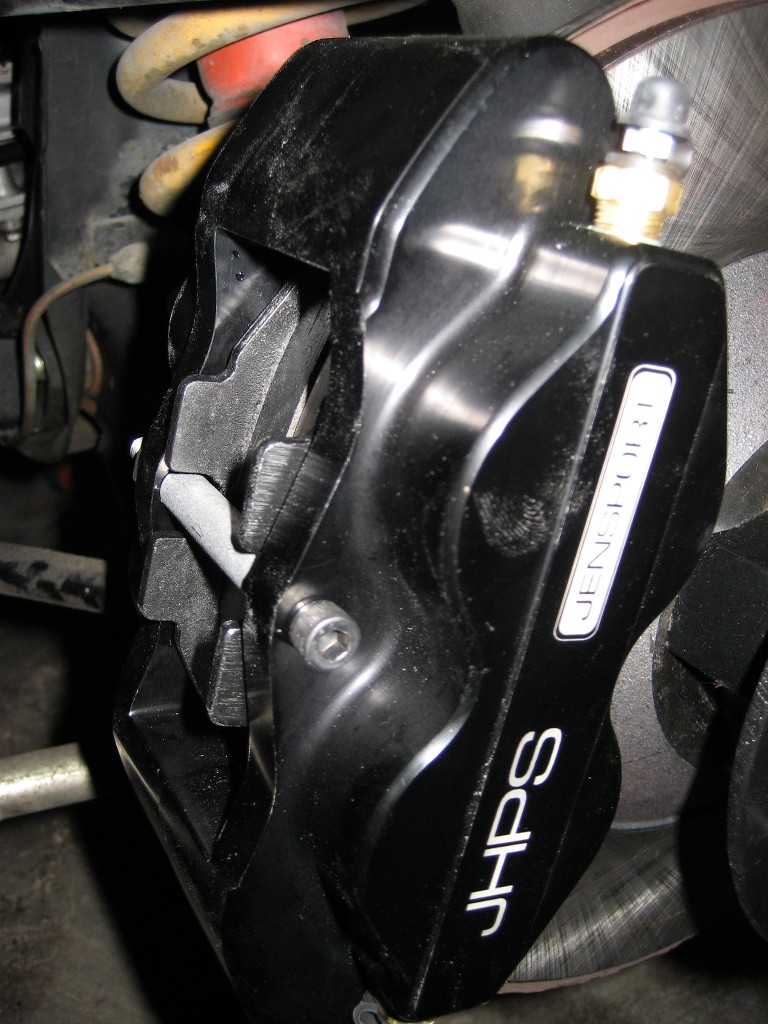 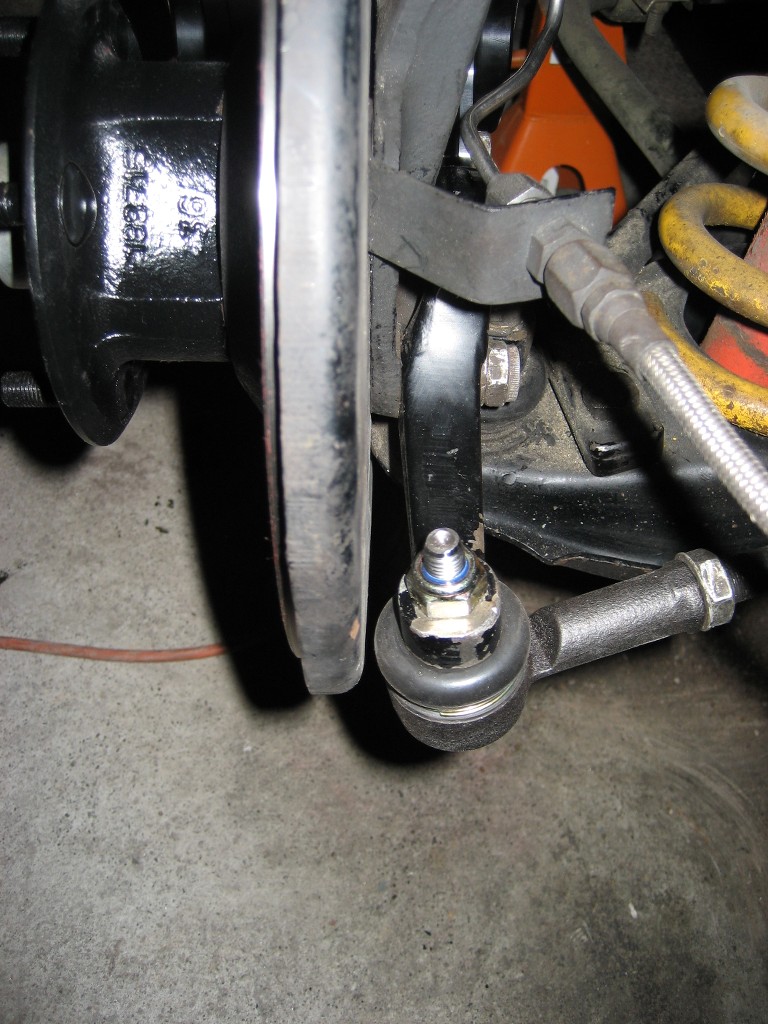 |
|||||||||
|
discogodfather Member
|
PART V: The Resurrection Part of the reason this thing sat for so long was the wheels and tires. Started to think- oh, maybe something in my inset/backspace and width was available again, and started checking around from time to time to see on the internet. I became obsessed with trying to re-create the original wheels, one of which had been destroyed. scowered ebay periodically to try and find some western "turbine" wheels but could never find something that would work. In early January I started the search again and was delighted to find tons of fairly wide rims available for the original Mini Coopers in 13" diameters. Started to notice they were also available in a deep inset (think negative numbers) that I needed. Maybe I just didn't notice earlier but this turned into a fad with original Mini's? Whatever the reason it started to look real good. Found this "new?" outfit called JBW (John Brown Wheels) in the UK that has some awesome designs. Started to wonder which would look good and make sense. It sealed the deal when I found some matching tires. BF has a Radial T/A in P205/60R13. No luck with the Cooper Cobras, as they didn't have anything in 13". Despite a higher profile this comes to a smaller overall diameter and it's a great fit for these wells, and I am finally getting back to a really light weight setup- 12 lbs for the rim and 18 for the tire! The rims I went with are the Revolite's from JBW. They are light and in the right inset of -7mm, which is workable for me. They also were very popular for Lotus's at the time as I understand, being on many Europa's and Elan's, etc. Oh, and of course they were on the Lotus 49's and 72's in some configs. The original company that made them is Revolution, which is still around and has some wheels at around twice the price of the JBW copies. Was considering them but they didn't seem to have the right inset. Ended up purchasing the wheels from Mini-Sport USA for a really good price. Shipping was only 2 weeks from the UK. Going to try and do some gold accents on them just like the Forumla 1 wheels. I figure Colin would have picked these at the time if he built a car for Jensen. On a period Europa: And the Formula 1 cars. Not sure if these were actual Revolution wheels but they sure have that look/design:    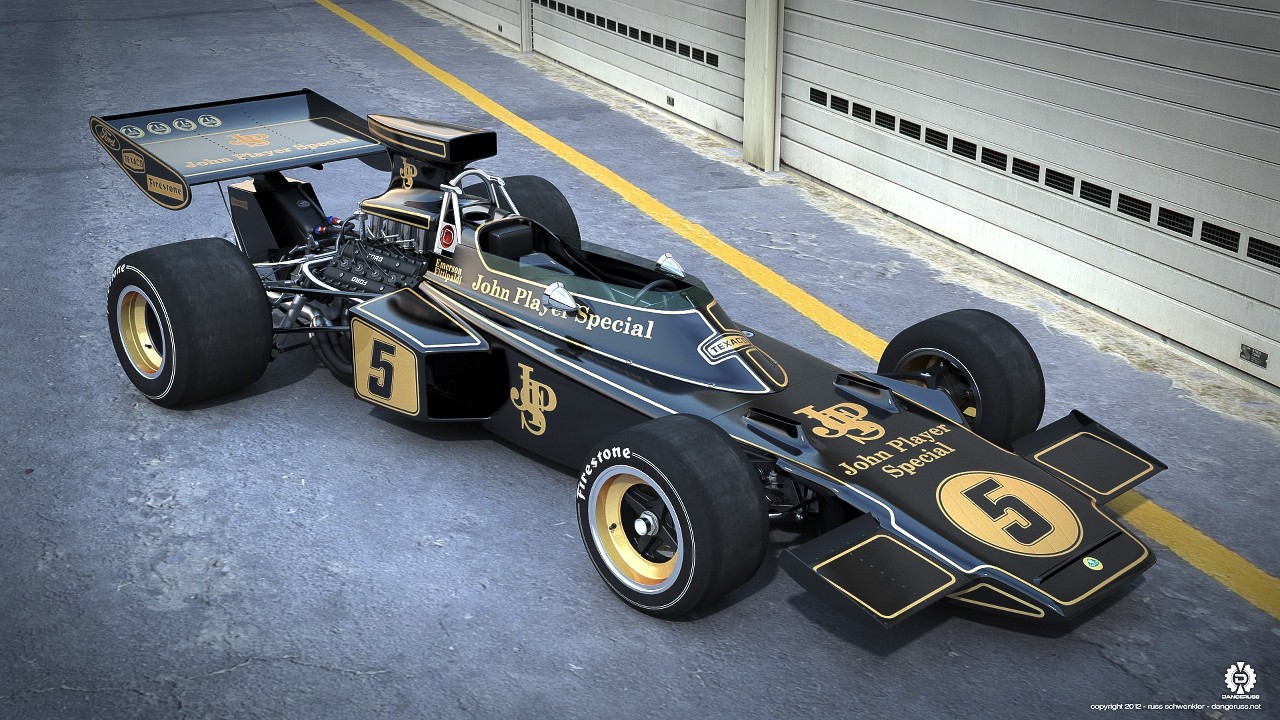  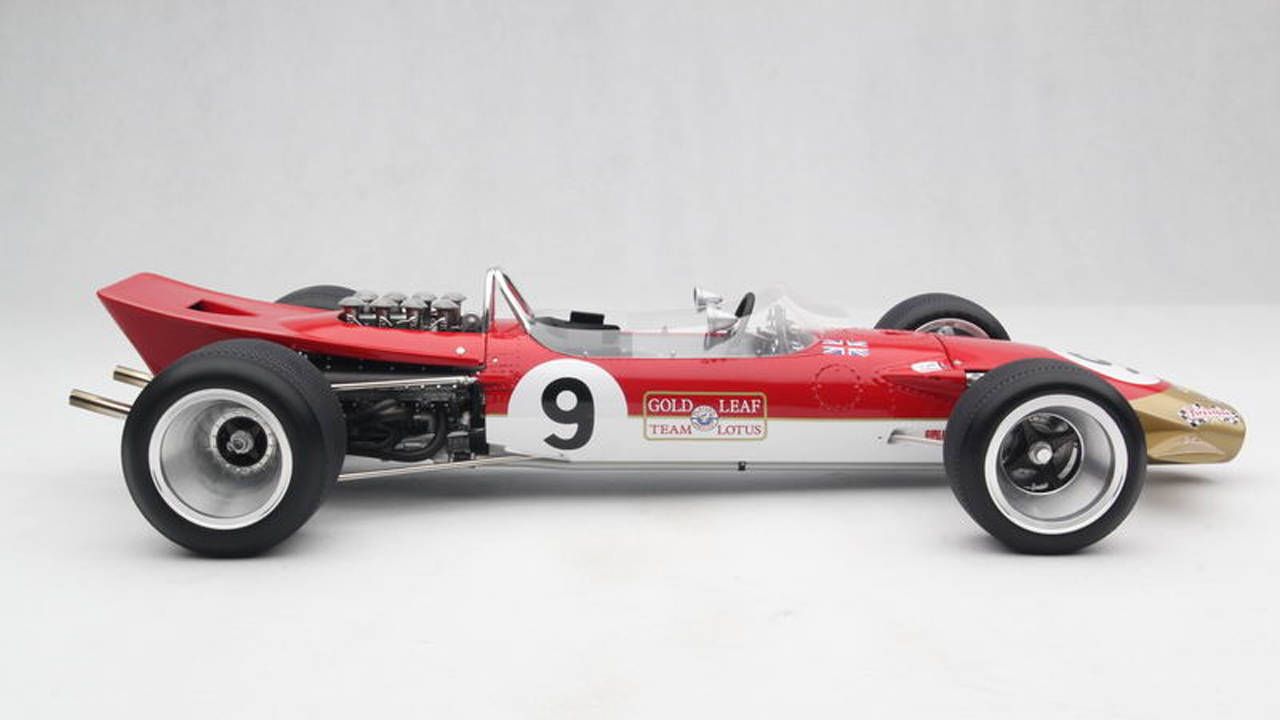 The John Brown Revolites: 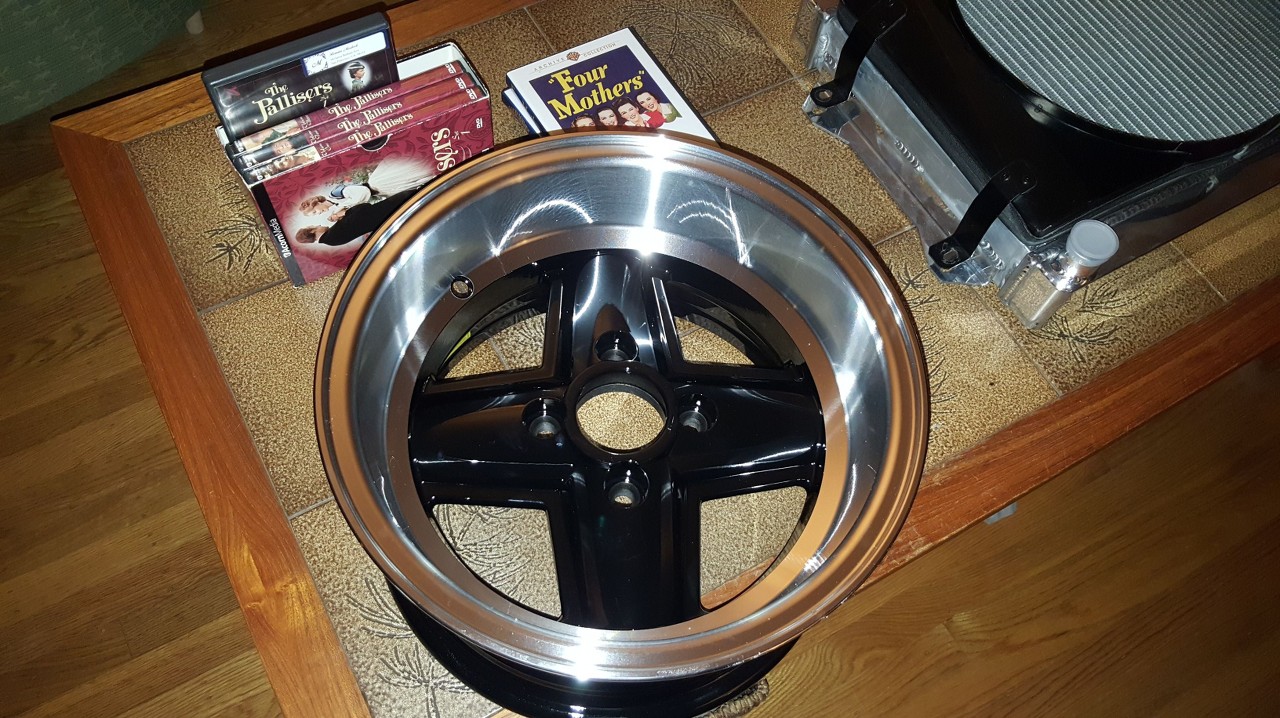 |
|||||||||
|
discogodfather Member
|
Some other new additions: Aluminum radiator: 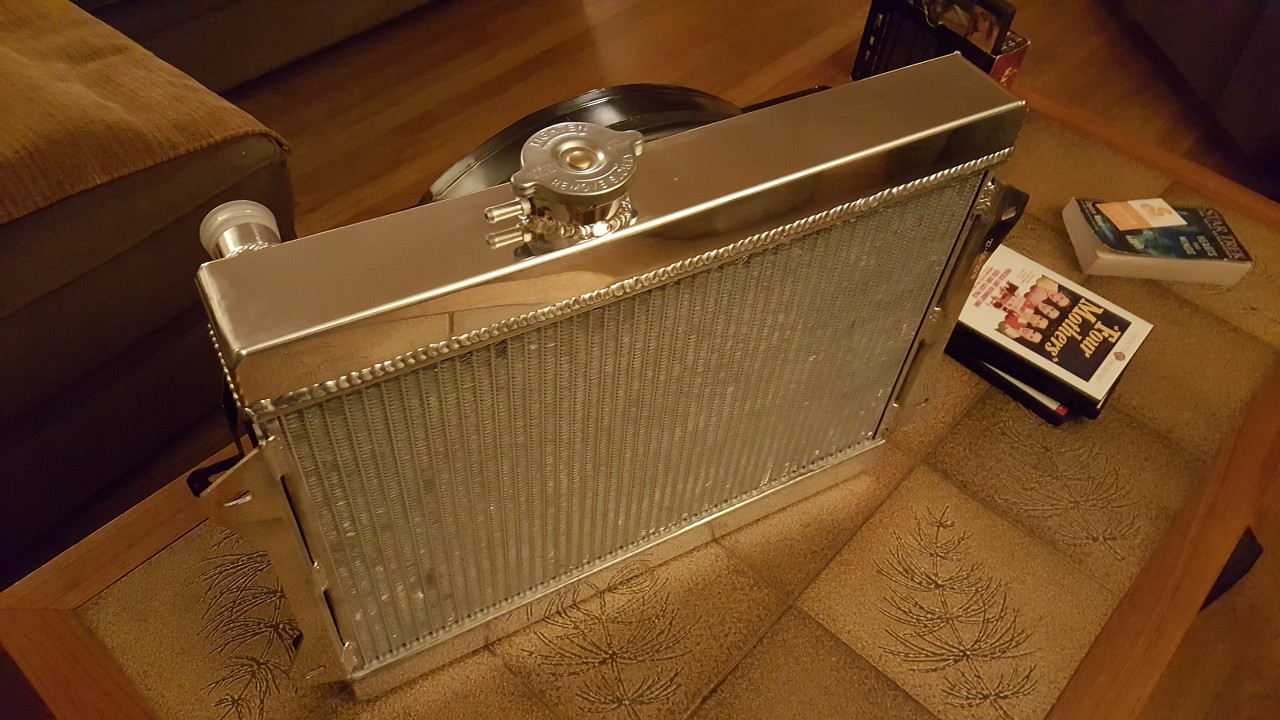  Carbs rebuilt: 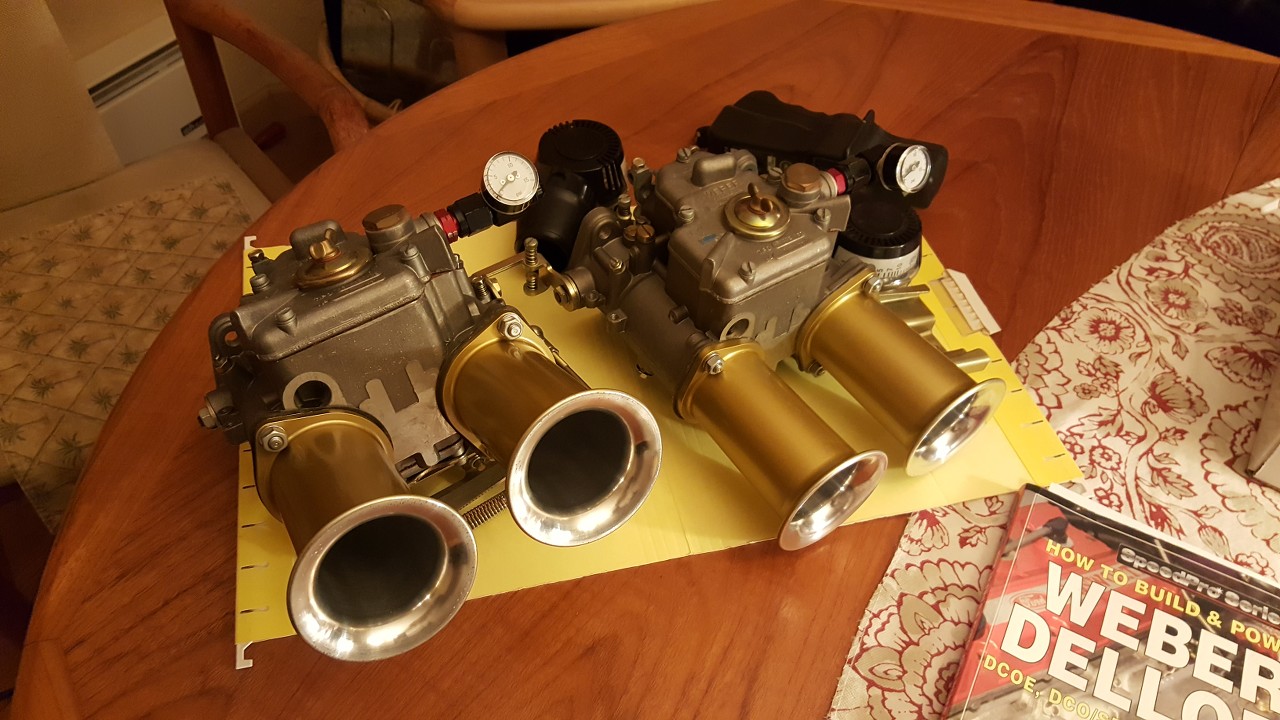 Lovely Lotus Cam Covers: 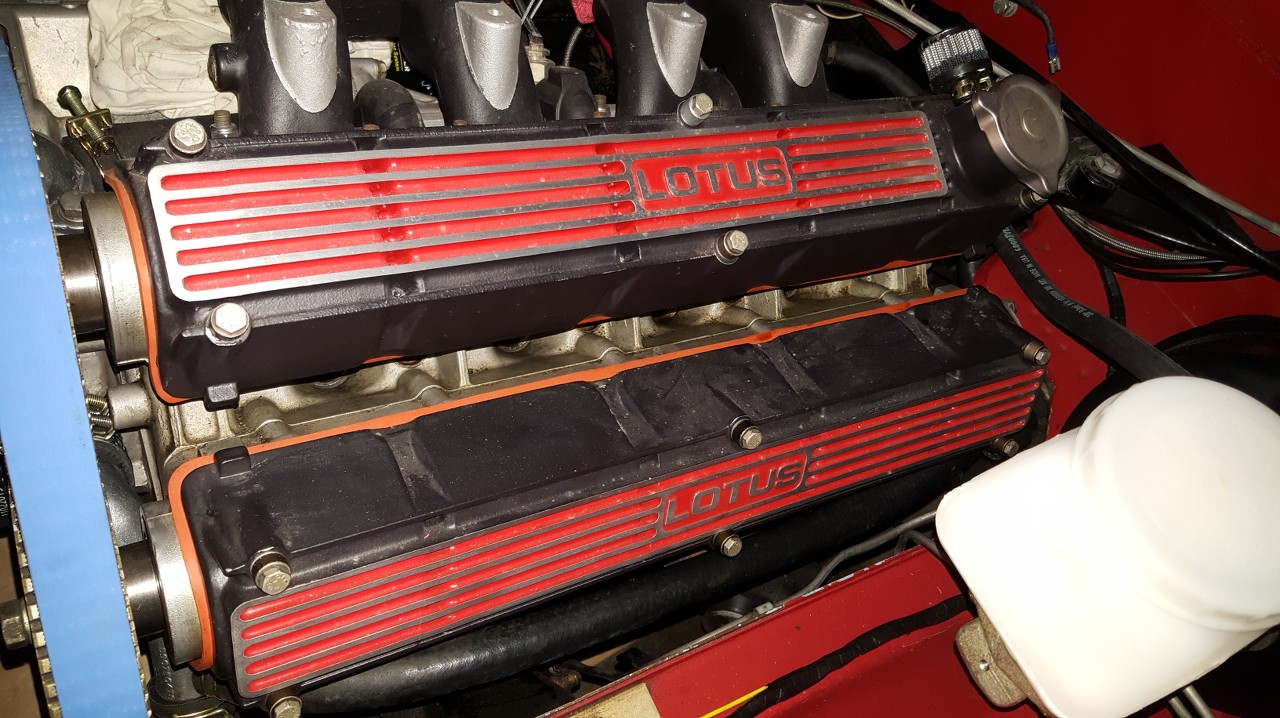 Lecarra wheel Jensified: 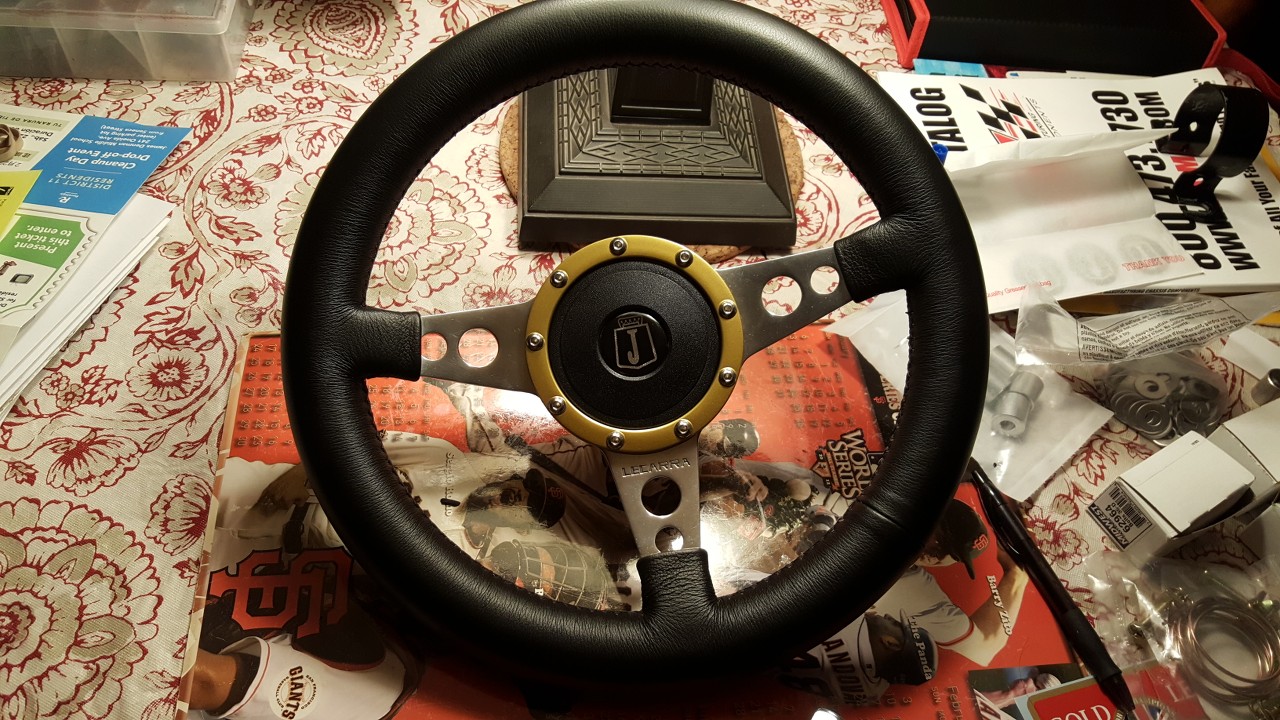 Engine coming together: 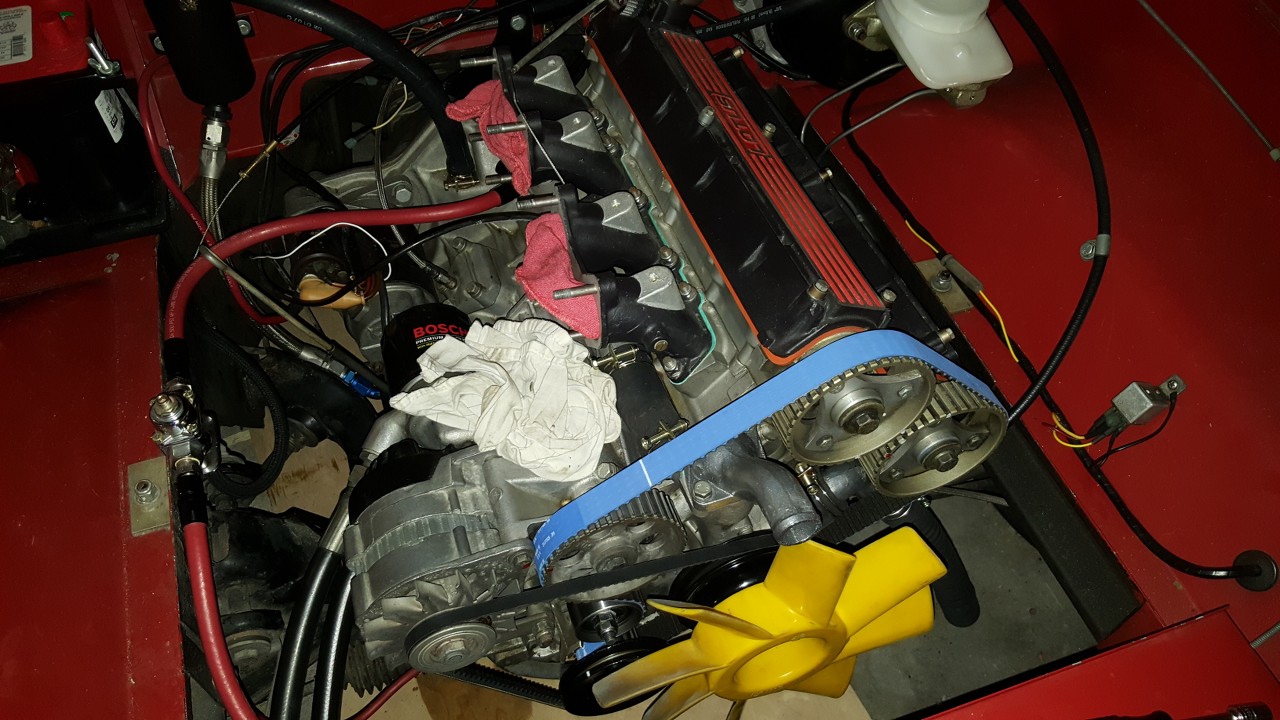 |
|||||||||
|
discogodfather Member
|
Day of truth came after a huge amount of work getting the new 43D Lucas distributor I got fitted with the proper oil seal and draining all the fluids, going through the carbs, and fitting a new battery, etc. Also replaced the fuel pump (it was running a Carter) with a Holley Red. Well, the Holley red was DOA. It didn't even turn on, after tearing it out and bench testing it was pretty much a paper weight. Not sure what it was but I bought it off Amazon and returned it. Heard many bad things about these pumps so I just cut and run. There was nothing wrong with the old Carter, but I suspected some pressure drops at higher RPM's so I just wanted to eliminate that as an issue with a higher flow pump. Ended up putting the Carter back in just to see if I could get her started. She started right away, had the choke on fully. Idled rough until I got the timing set, all good at 0 degrees advance, right? So then I feel like I time warped back to 2008 and experienced the same issues I had right before she went dormant: as long as the choke was on she ran ok but the idle steadily increased out to 3k or so, always rising. As I took the choke off she died, almost immediately. I could do a basic balance (I have two of those vacuum gauges) and see she was in the ballpark. This is my initial settings: Air correctors in all the way Idle mixture at 1 1/4 turns out My carb setting are: Emulsion – F4 Main - 150 Air - 170 Idle - 55F8 Choke - 38 Venturi - 4.5 Pump Jet - 55 Pump Exhaust- 40 The Weber DCOE's are sneezing quite a bit, seeming to suggest it's running lean. Not sure where my float level's are, didn't check that yet. Not sure where to go from here, as the settings seem inline with what they should be. As I adjust the choke, I feel like I am tuning the A/F ratio or something, a weird feeling. What am I getting wrong here? Some other settings: Fuel at a steady 3.5 psi All new ignition including the coil (it's a 3 ohm to run with the electronic ignition in the new 43D) Great voltage everywhere (new battery) Last edited on 02-18-2020 09:27 am by discogodfather |
|||||||||
|
Tom Bradley Member
|
discogodfather wrote:She started right away, had the choke on fully. Idled rough until I got the timing set, all good at 0 degrees advance, right? If you mean that the ignition is firing at TDC when idling, then that is too retarded. The JH shop manual lists static timing varying from 2 deg to 12 deg BTDC. My experience is that the ignition needs to be at least 5 deg BTDC when idling (800-1000 RPM) to get good behavior. Exactly how much depends on how modified from stock everything is. My current (mostly stock) engine likes over 12 deg BTDC best. My previous 2.2L with higher-compression pistons was best at 8 BTDC. Otherwise, it also sounds to me like the carbs are set too lean. I have zero knowledge of Webers, but I have seen posts listing settings from people who say they are getting good performance. You might try doing a search on "Weber" here and on the Jensen-Healey group on Facebook. You could also ask for help on the Facebook page: there seems to be more people reading that regularly. Attachment: static timing.jpg (Downloaded 324 times) |
|||||||||
|
Tom Bradley Member
|
Additional thought: The choke on most carbs is dual-action. It increases the idle speed as well as the mixture. One possibility is that the idle screws need to be turned in to increase the idle speed when the choke is off. My experience is that the idle speed needs to be at least 500RPM to stay running at all. With your engine mods (especially the cams), it may have to be higher than that. |
|||||||||
|
discogodfather Member
|
Tom Bradley wrote:Additional thought: The choke on most carbs is dual-action. It increases the idle speed as well as the mixture. One possibility is that the idle screws need to be turned in to increase the idle speed when the choke is off. My experience is that the idle speed needs to be at least 500RPM to stay running at all. With your engine mods (especially the cams), it may have to be higher than that. Thanks Tom, I fiddled with it forever and didn't get anywhere until I came across a forum talking about DCOE's that said the newer Spanish Webers needed the idle mixture screws to be backed out further than the older Italians. The usual is around 1.5 turns from fully in to start, they recommended 4-5 turne out. With the 55F8 idle jets I was able to get her going and pretty smooth and without the choke. Easy enough to time the engine now and it's running at 1000 rpm nicely with around 10 degrees of advance. The copy Lucas 43D is in there and running good. It has what Powerspark claims is a "high energy" electronic unit that looks pretty robust (it's all rubber coated and looks far less prototype like than a petronix) and it runs great with a low resistance (.7 ohm coil) and apparently runs "dry" and is an epoxy filled unit instead of oil. Used the Chicago Rawhide 4912 oil seal and it's not leaking a drop so far. No idea where the advance curve is, I have to measure it. A video of it running on my youtube:https://www.youtube.com/watch?v=EOqvUjW2CPE Now it's time to fiddle more with some progression on the carbs and figure out where she's running at, but great progress! Last edited on 02-21-2020 02:19 am by discogodfather |
|||||||||
|
Tom Bradley Member
|
Congrats on getting it figured out. Looks and sounds awesome! When you get it out on the road, be sure to listen for any knocking. Detonation is especially bad for these engines, so with your higher compression it may be necessary to back off on the timing advance to make sure it does not happen under any circumstances. Have fun! |
|||||||||
|
noomg Member
|
When you say you're going to do a "Gold Leaf" car are you going to paint a gold beltline stripe and white underneath? I think that color combo would look awesome on the J-H. When I painted mine I did a bit of a tribute to the JPS cars with a black overall and a double gold body stripe. |
|||||||||
|
discogodfather Member
|
noomg wrote:When you say you're going to do a "Gold Leaf" car are you going to paint a gold beltline stripe and white underneath? I think that color combo would look awesome on the J-H. When I painted mine I did a bit of a tribute to the JPS cars with a black overall and a double gold body stripe. I experimented with the idea of the gold paint on the sideskirts but it's really difficult to pass off on a JH. Also the nose of the grand prix/F1 cars were always painted gold, so I decided to leave it the way the builder originally intended: black sideskirts with a tasteful set of double gold pinstripes between the black and red. I'm going to try and make it to the Dixon show this year coming up in May put on by the The United British Sports Car Club - UBSCC. Got the front wheels on tonight, they look great. I got about 3mm of space between the large aluminum JHPS four piston calipers, so it's perfect. Still messing with the tune. I put the 55F9's idle jets back in and also put the old 125 main's it had in there originally, not 100% sure how the hell this thing runs with 125 main jets but it seems to be better than the 150's! 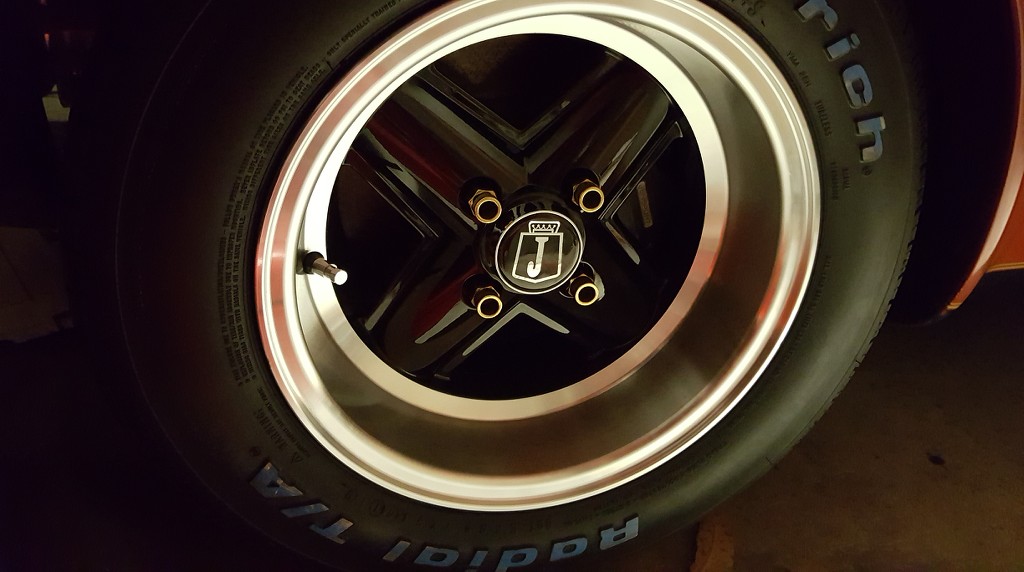 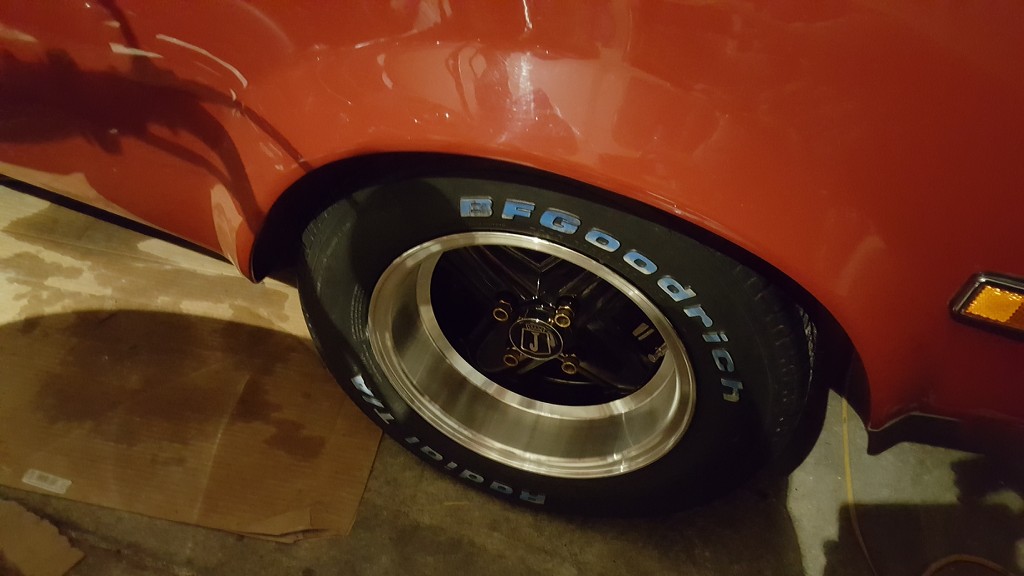  |
|||||||||
|
noomg Member
|
Before you make your final decision on paint Google "Lotus Europa gold leaf". While the F1 cars did have a gold nose which I agree is not really practical for road car the Europa had only a gold beltline stripe separating the upper red from the lower white which I think would work well on your J-H and be a real eye catcher. |
|||||||||
|
discogodfather Member
|
Finally got the new wheels on, looks great. Much better than the dune buggy look. The old stamped steel 15" wheels with the 255 cobras weighed 43lbs a piece together. The new 205 BFgoodrichs and the 13" weigh 31lbs a piece, so a huge weight savings. Stripped two wheel studs in the front so decided to replace all of them because they are damn old. Now she won't start again after I fooled with jets so I am fuddling around trying to see what's up. Thought it might be a timing issue but don't know, I did pop the distributor out because the clamp was too loose. After I but it back in it didn't run. Verified good voltage and a strong spark....hmmmmmm. Timing appears to be in the ballpark. Anyone know of a method of determining if cylinder #1 is TDC at intake instead of exhaust? The Lucas 43D is dry as can be, the oil seal I installed works perfectly. The old distributor leaked a bit and I found out it was a badly worn seal, so this is very encouraging. It just leaked a little but anything is bad. 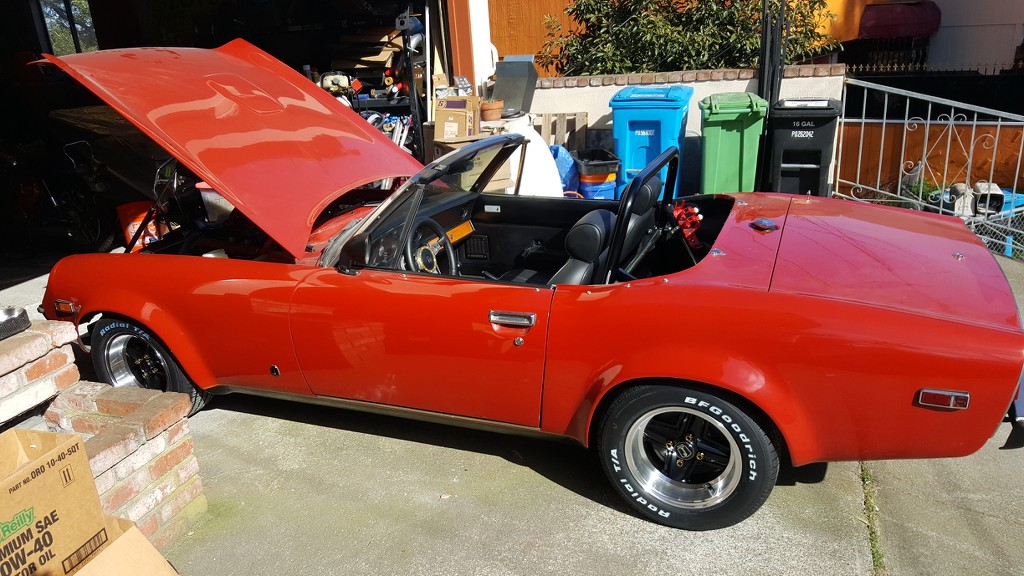 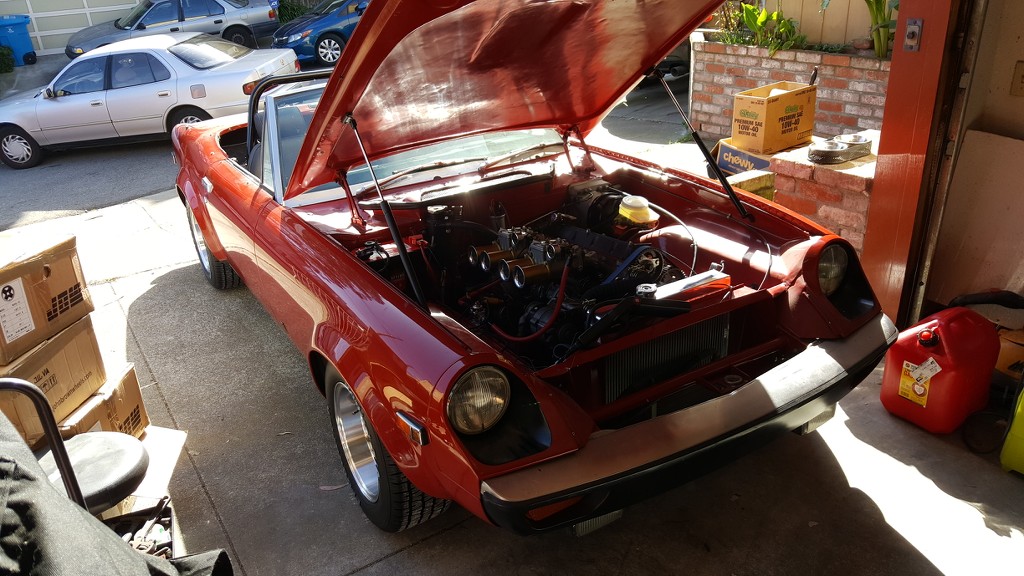 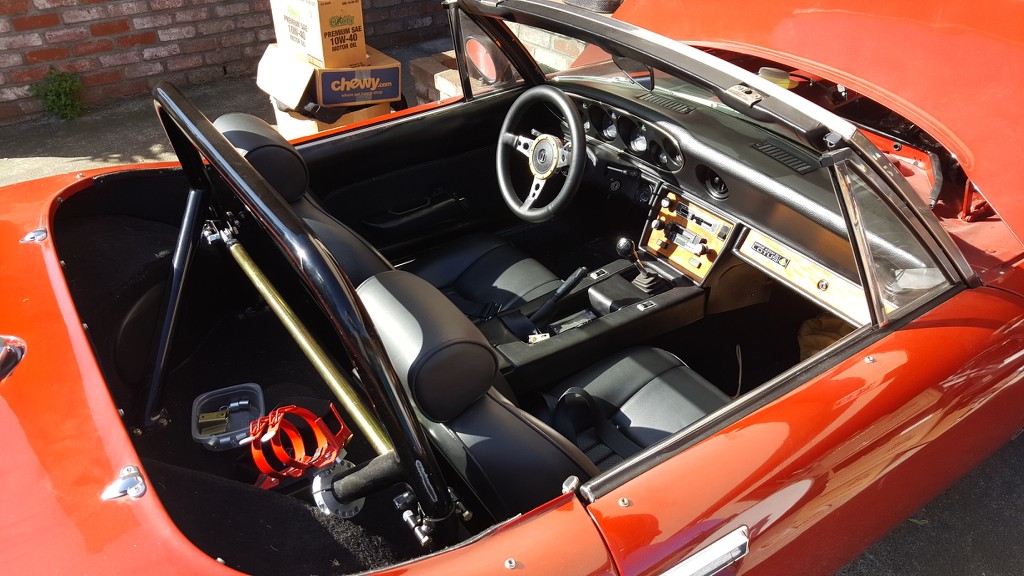 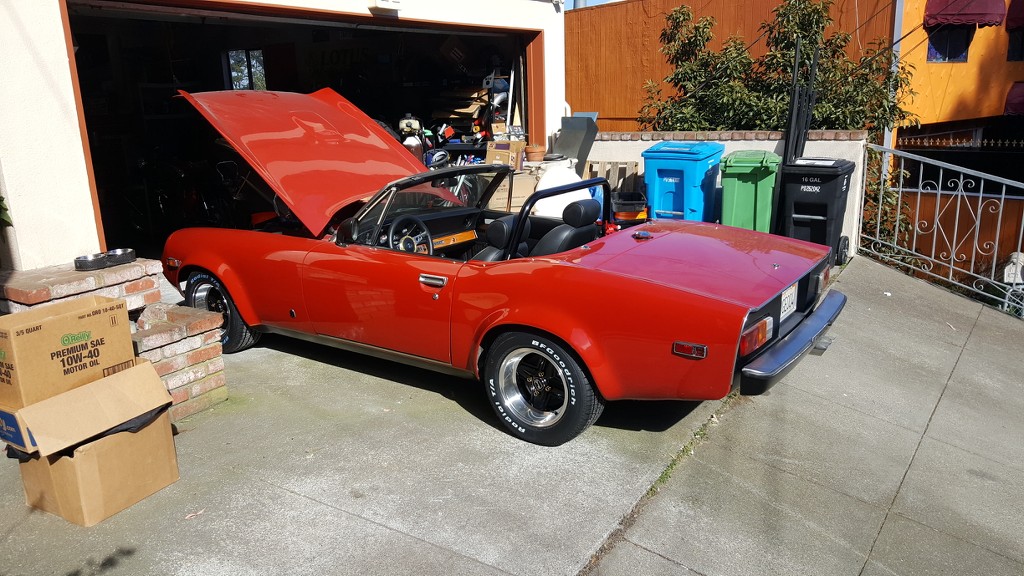 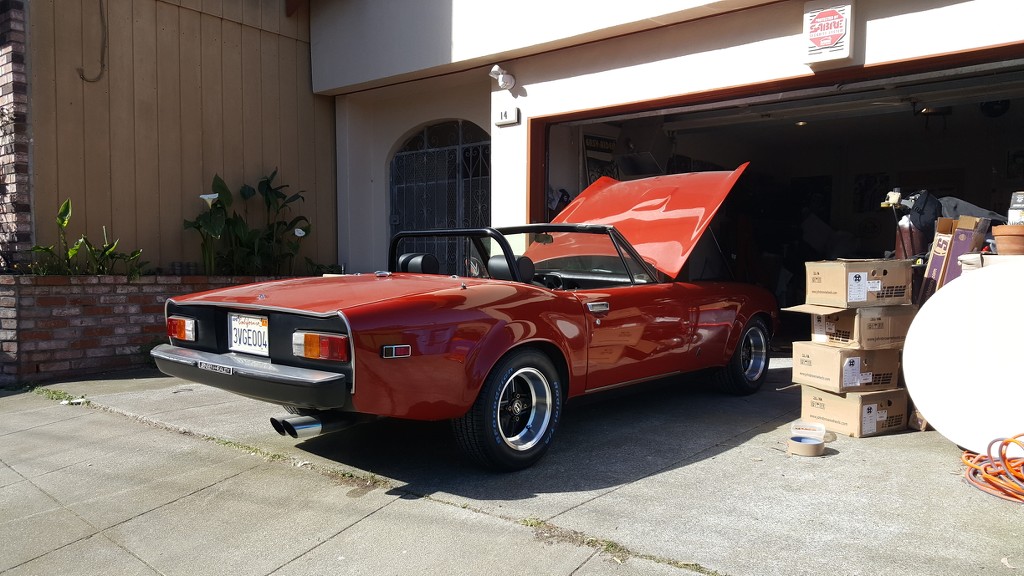 Last edited on 02-29-2020 07:14 pm by discogodfather |
|||||||||
|
discogodfather Member
|
In between the world ending I had a really weird experience. I ran her in the morning last week and she had trouble starting, so I wailed away and BOOM. Loudest backfire I have ever heard, the neighbors were all really alarmed. Sounded like a cannon. I thought no big deal, but suddenly power was down and the sound of the exhaust note was pretty muted. I thought I had seen a good deal in 25 years of working on cars, but this one was new. Always thought backfires could blow up mufflers, seen a few opened like tin cans at a shooting range, but this backfire actually imploded the muffler! Crunched it like someone smacked it with a sledge hammer. 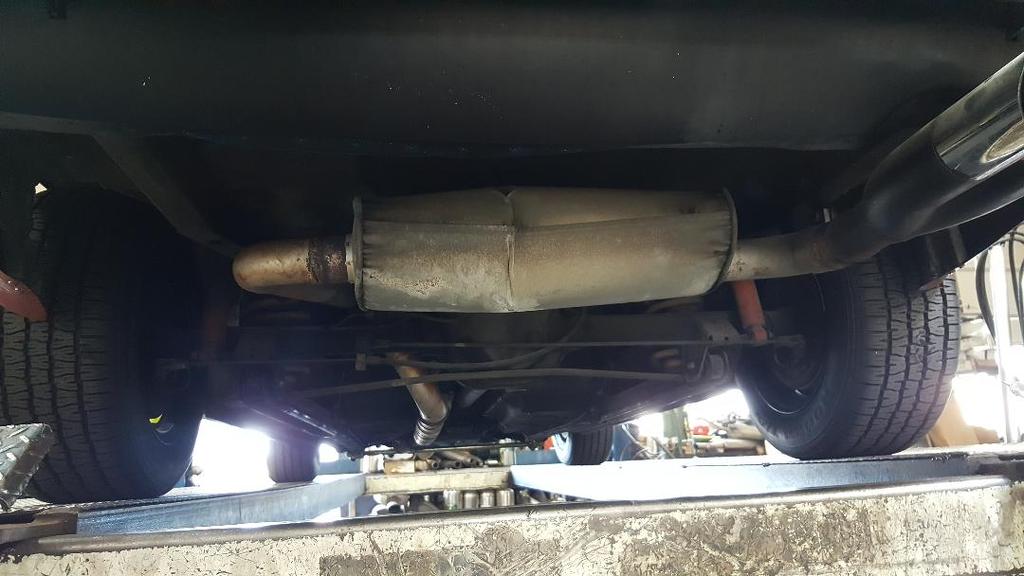 Got it out to a local muffle shop and selected a Flowmaster Super 44. Since my entire exhaust is custom made 2.5" system, there is no spare tire and the muffler just sits there. Sounds great now and a bit of performance is back. 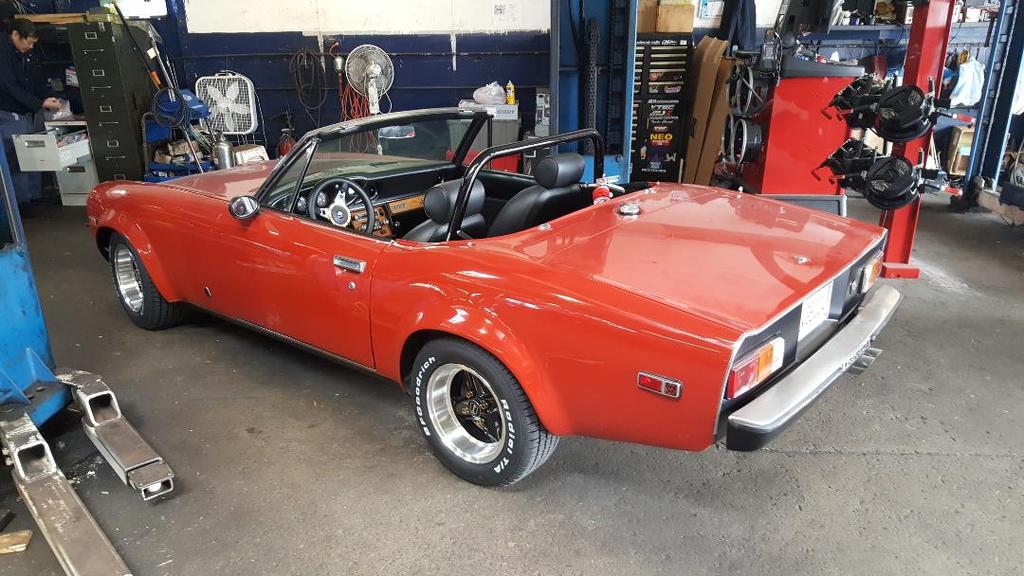 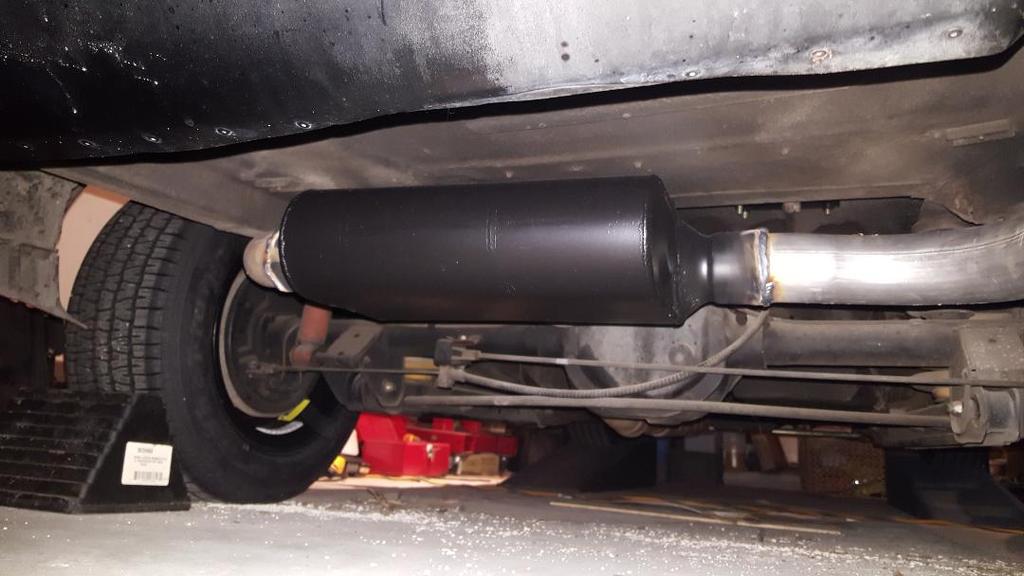 Tried to turn on the old Alpine stereo (probably from the early 80's) and it was dead. Looked around a bit and found a nice unit: a Retrosound. It has bluetooth and is a tiny thing, very well made and it's more retro looking than the Alpine was. It sounds great too with my small 150 watt amp and some custom speakers.  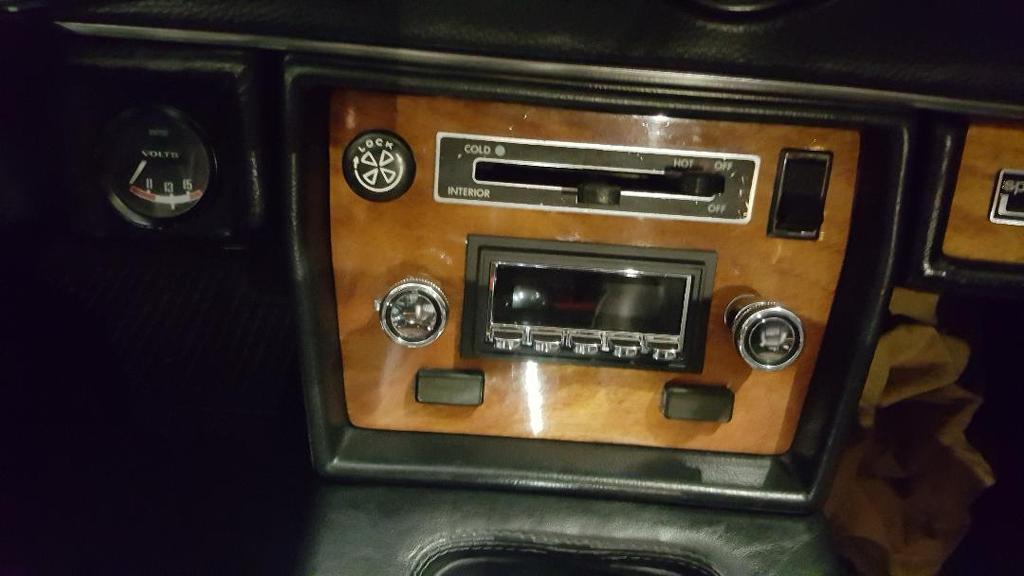 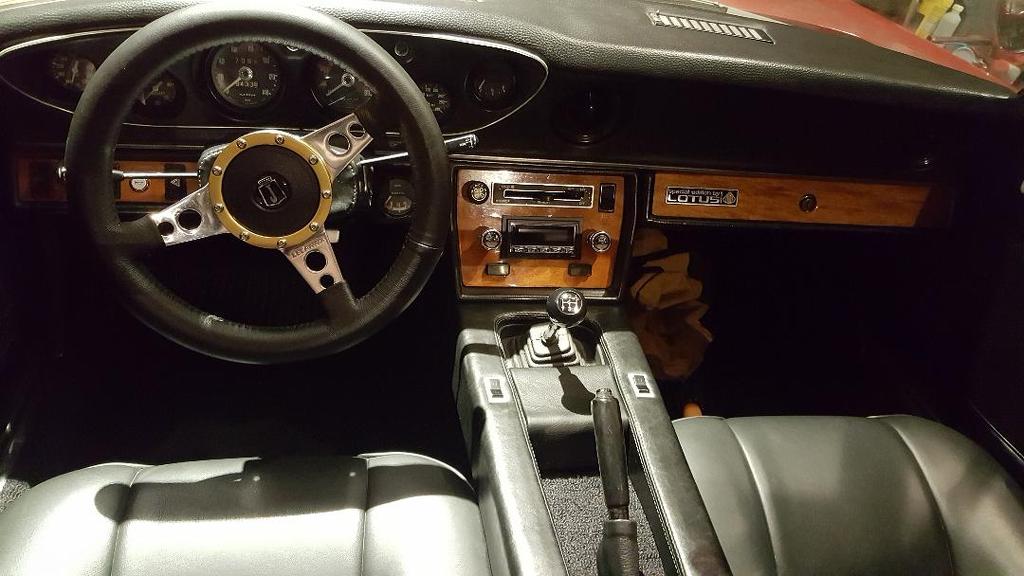 For some reason my theme song with this car is "The Kinks, Living on a Thin Line". Drove it down the pacific coast highway today listening to it. Also upgraded the starter to a WOSP high torque unit from Britain. Spoke directly with Luke at WOSP and he talked me through some tech issues. This is a Denso unit that is really 3x the starting torque and it's quiet and very modern, drawing less than half the amperage of the stock unit. It's half the size and a third of the weight too. Remarkable little upgrade, my old starter was getting hung up here and there on compression stroke. This one chugs it like it was spinning a dime. WOSP told me that I didn't need the coil cold enriching circuit, so I left it unhooked. Works just fine. The line running from your coil to the starter basically sends the ignition and extra umpf for starting cold, but because the Denso is so efficient it simply doesn't need it anymore. $350 it's pricey but it works very well and I think it's the best upgrade I have done in this resurrection so far. It's air weight compared to the original, less than 5 pounds. It also allows you to clock it anywhere you like with a custom bolt mounting system. Great immediate customer service from WOSP in the UK. 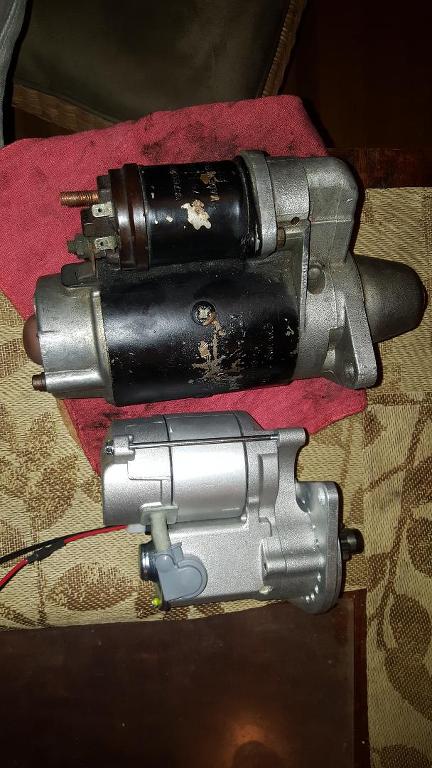 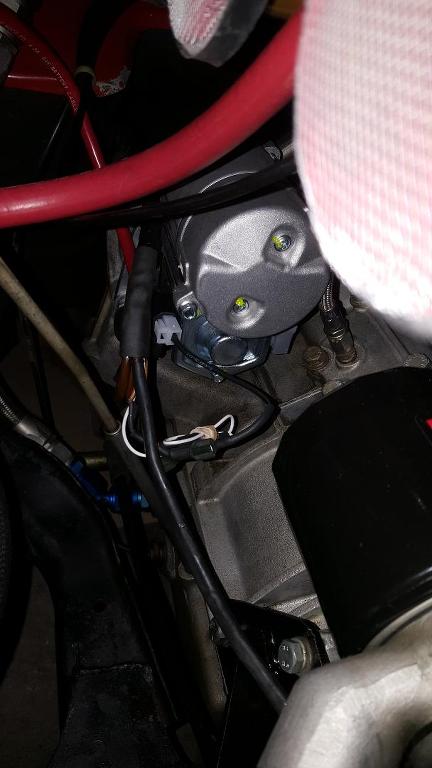 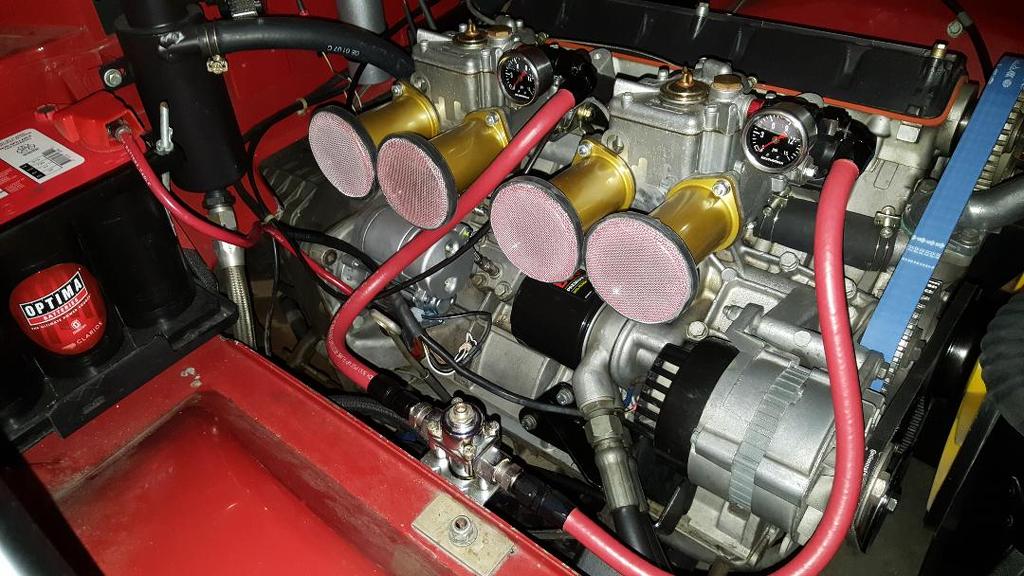 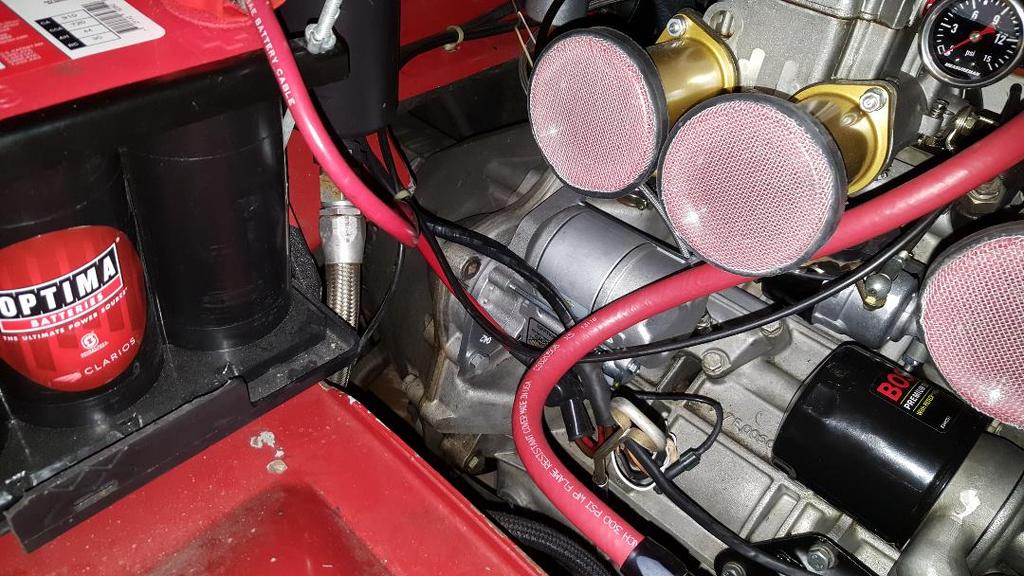 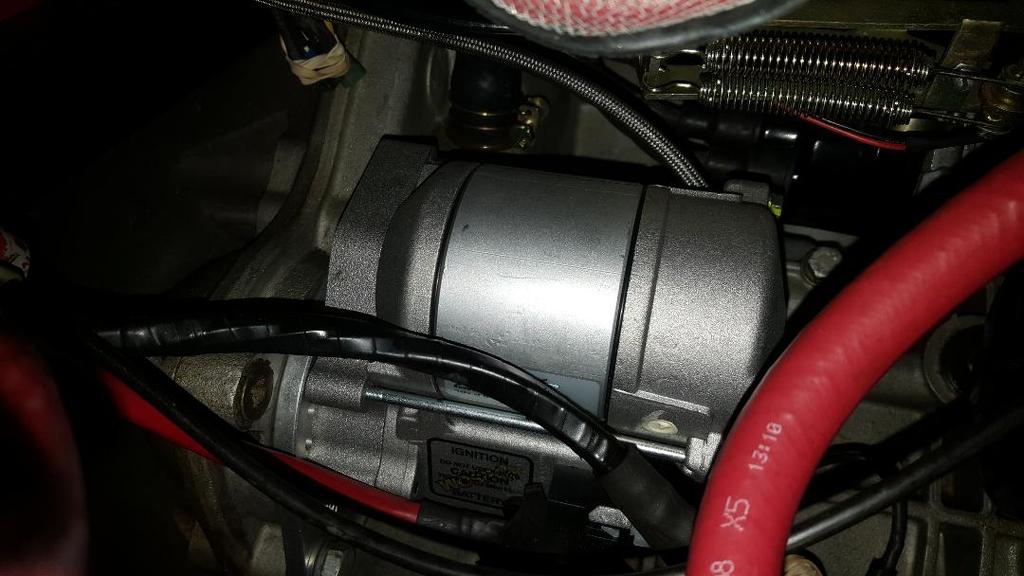 |
|||||||||
|
discogodfather Member
|
Spent the last few weeks working on her, tons of time since all my clients cancelled on me for the foreseeable future and we're in a "shelter in place" area. Hopefully working on a Jensen Healey is still considered "essential". Had a problem with her snapping out of 2nd gear (sometimes 4th too) that got progressively worse over the years and decided to look at the transmission mount. It was a soggy mess, came apart in my hand has soon as I got it out. Went ahead and replaced all the mounts, including the motor mounts, which seemed solid but I wanted to make sure. They seemed more on the hard side so it was a good idea too. Got a shift linkage rebuilt kit from Delta and finally watched the episode of "Wheeler Dealers" on the motortrend channel where they do a 74. Actually a great how to rebuild your shift linkage tutorial, the guy really explained it well and it was a breeze. Rebuilt the driveshaft and repacked it with grease and painted it. Lubed all the suspension zerks. My front wheel studs kept failing so I got some from Greg (thanks for the fast shipping) and also had a funny purchase I made a few months ago- a set of EBC "sport" rotors. I bought these basically looking at a picture, thinking they would be thicker. They advertised as slotted and drilled. I was less than impressed when they came. I found a pretty good deal and they were only about $50 more than regular rotors. But they aren't even worth the extra $50. The rotor is the exact same as stock dimensions, and it has basically a couple of "engraved" slots and little dimples. Really silly. They also powder coat it black, then warn you in the package that you should nor take it off, calling it some kind of heat treatment coating. Then they say it will wear off within the first 10-20 stops. What a joke. Silliness aside, I really think these are a total waste of time and money. This is probably the last time they will even look cool: 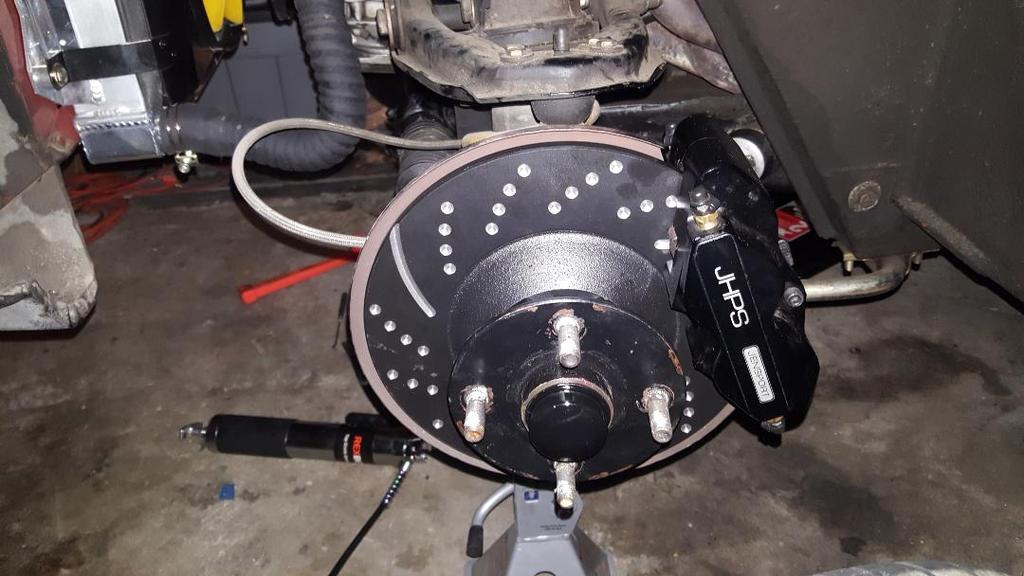 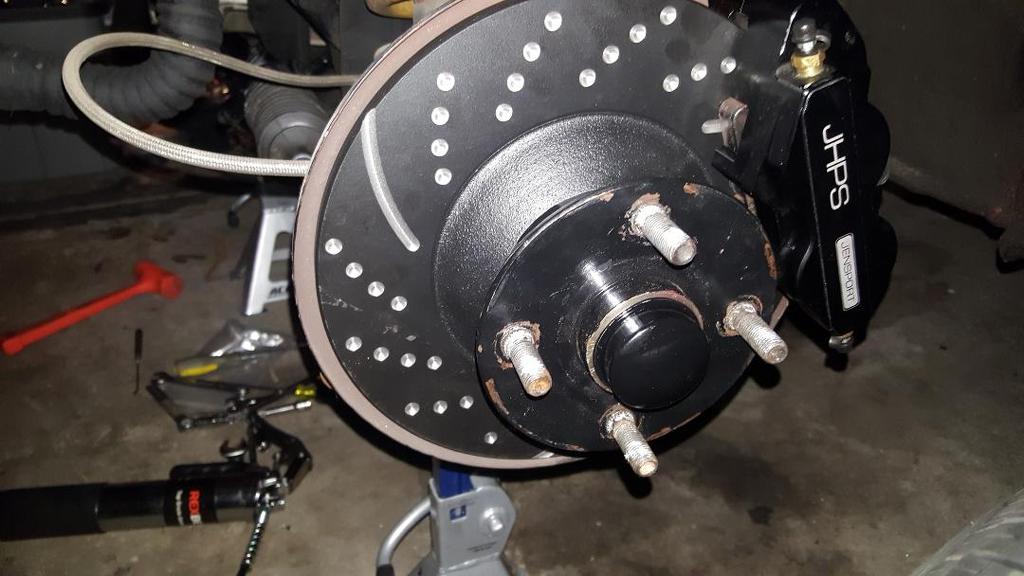 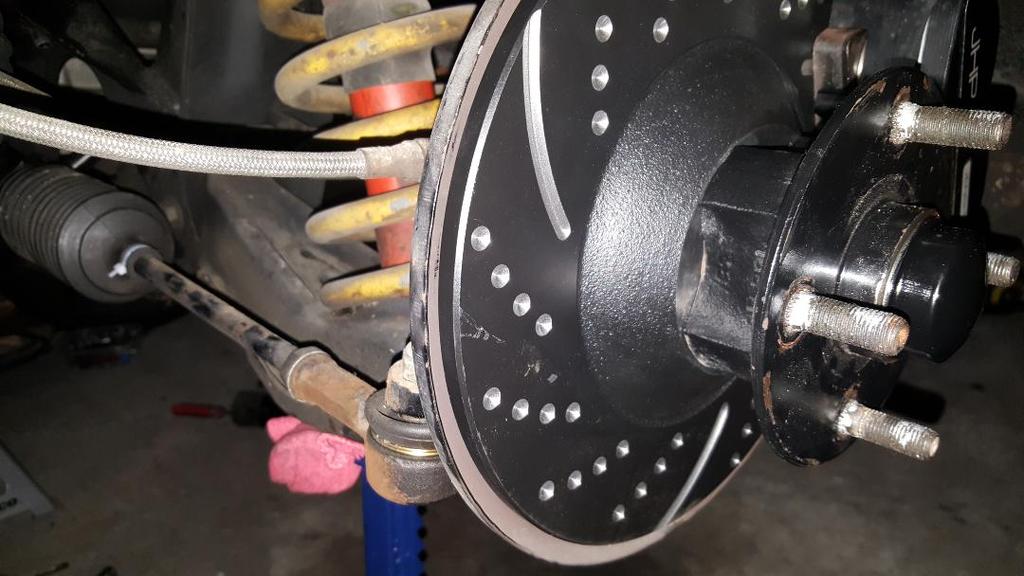  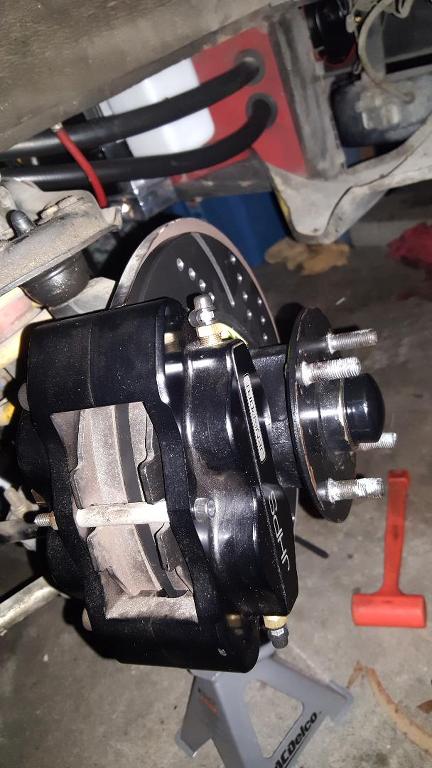 Last edited on 03-30-2020 08:43 am by discogodfather |
|||||||||
|
discogodfather Member
|
Decided to pull the head in early April because Covid has me at home out of work. I always wanted to get a better idea of the head, some of the work done to it, and especially the cam ID. Turns out, after calling Barry Spencer, that it has a Dave Bean Cam called a DB3. It has 420 lift, 290 duration, and 104 MOP. Somewhat hotter than a actual Lotus 104 grind. I called Dave Bean and they couldn't give me the opening and closing degrees, which was a little odd. They did seem to suggest I could use a 104's timing info from Lotus. Tim Engel generously provided much of the information on that. The head looks great, dead flat, head gasket was ok (I came to the conclusion there was water in the oil reading the dipstick, but it turned out to be just a little water in the actual dipstick tube. The head seems to have had some nice porting work, nothing crazy but well done. Valve guides seem fine but I do have to measure a bit more. It's .018" clearance right, both intake and exhaust? Valve seats look ok but worn, looks like a 3 angle valve job that has a deep throat on both ends. Valves themselves look good, one intake had a little roughness. Plan is to lap and then vacuum check it. If it passes I will put it together, if it fails I will have to cut some new seats. A friend has some Newall stuff and I think I can borrow it. Question: I usually always skim the deck just to have a nice surface, even if it's just a .001" cut. I noticed how close my valve seats are the edge of the deck, almost zero clearance. I think this head was decked very close to the chamber in order to get some of the compression lost back when using the thicker newer head gaskets. Does anyone think decking this thing one more time might get into the valve seats? Is that bad for the head gasket? I feel like just a .001-..002" cut would probably have the edge of the seat at the deck height. 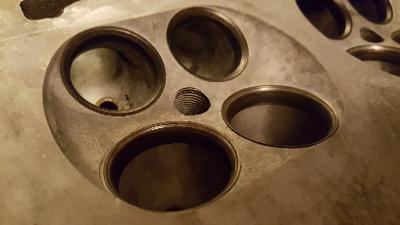 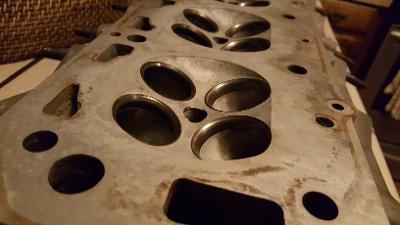 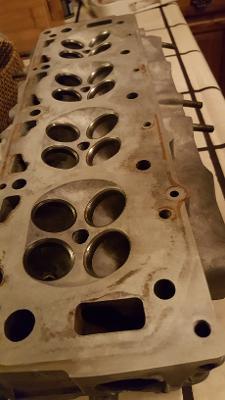 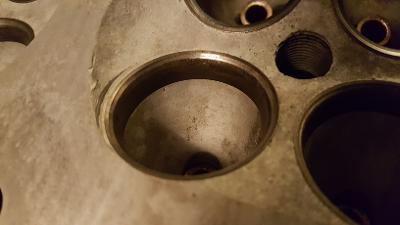  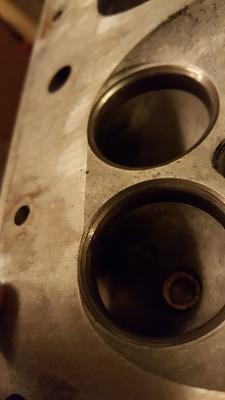 Last edited on 04-19-2020 11:53 am by discogodfather |
|||||||||
|
redracer Member
|
Enjoyed reading all your trials & tribulations with this "never-ending-project"! One thing you may wish to change is "V" notching the tab on each of the front brakes where your steel flex line goes into the hard lines. This will make it easier to change hubs, bearings, etc., instead of having to rebleed your brake system each time. Also, I still have a few of the OEM (steel-asbestos-steel) head gaskets if you're interested. keep us posted, bruce |
|||||||||
|
Esprit2 Member
|
discogodfather wrote:Valve guides seem fine but I do have to measure a bit more. It's .018" clearance right, both intake and exhaust?You're missing a zero in that clearance dimension... it should be 0.0003"-0.0018" (0.008-0.046 mm), both intake & exhaust. The stem diameter spec is 0.2805"-0.2810" (7.125-7.137 mm), both intake & exhaust. Do you have a copy of Tech Data Section A (TDA) from the 1983-87 Lotus Esprit manual? IMHO, all 907 owners should have a copy. discogodfather wrote: Question: I usually always skim the deck just to have a nice surface, even if it's just a .001" cut. I noticed how close my valve seats are the edge of the deck, almost zero clearance.I prefer to never cut the head unless you need to in order to flatten a warp. Even then, first straighten/ flatten the head as much as possible, and then take only the lightest cut possible, as necessary to flatten the bottom. Taking the maximum cut for any other purpose (ie, compensating for head gasket thickness) just takes away all future options for dealing with a slightly warped head. But done is done, and it looks to me like all your 'cut options' were previously used up. Times like this are why I resist ever taking a cut that is not required at the time, or taking a deeper cut than is necessary at any time. Always leave as much thickness available for future use as you can. I understand wanting to scuff the surface to give it a little tooth (maybe a swipe with a Scotchbrite pad), but I wouldn't acutally "cut" any further. Regards, Tim Engel Last edited on 04-22-2020 02:46 pm by Esprit2 |
|||||||||
|
Esprit2 Member
|
Off Topic, but... I've owned a number of Lotus 9XX powered cars, and worked on a lot of the engines... I feel I know them. But my favorite Lotus is the Europa, and I've logged over 400,000 miles using Europas as daily drivers. That picture you posted of a Europa in Post #5 is really pushing my buttons. I would love to have a Type 47 (Europa factory race car), and that green Type 54 S2 has 'the look' of one if you ignore some details. If you know the owner and they're open to it, I'd appreciate a name, if not an introduction. BTW, my current Type 65 S2 has Revolution wheels. The similar but different wheels on the Lotus racers you pictured are bespoke Lotus magnesium race wheels. The Elan 26R (factory race car) and Europa 47 racer did use them, but they're rare/ hard to find. But the Revolutions have the look if you squint. Regards, Tim Engel Last edited on 04-21-2020 09:47 pm by Esprit2 |
|||||||||
|
discogodfather Member
|
Thanks Bruce, I will do that mod on the brakes. Makes sense. Yeah Tim, I had a feeling this will be the last ride for this head. It's good because it's one of the flattest heads I have removed ever, good gasket surface. It's bad because of all the fancy porting work done to it so many years ago. Last edited on 04-21-2020 11:05 pm by discogodfather |
|||||||||
|
discogodfather Member
|
Esprit2 wrote:
His name is Stefan and he's in Germany, posts under "Mecky" on the Lotus Europa Community board. He was selling some revolutions years ago and talked to him a bit about shipping but it was a little too expensive to the States from where he is at. I think he still has the car. The outfit is called YART racing. His instagram: https://www.instagram.com/yart_racing/  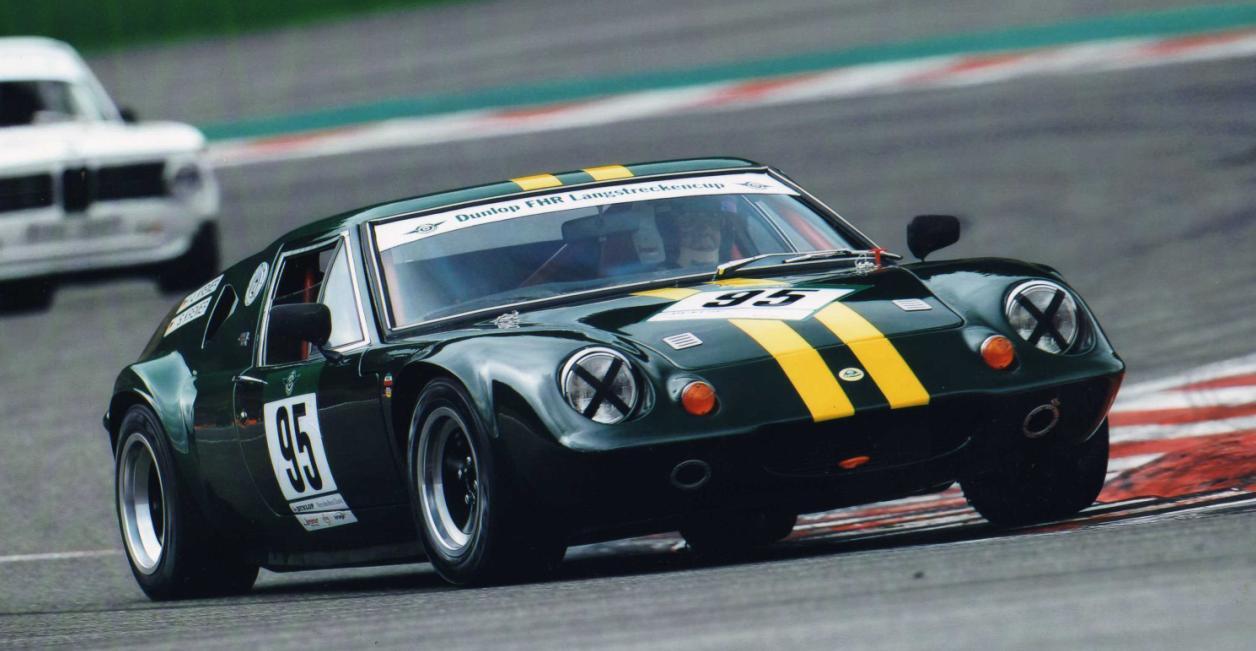 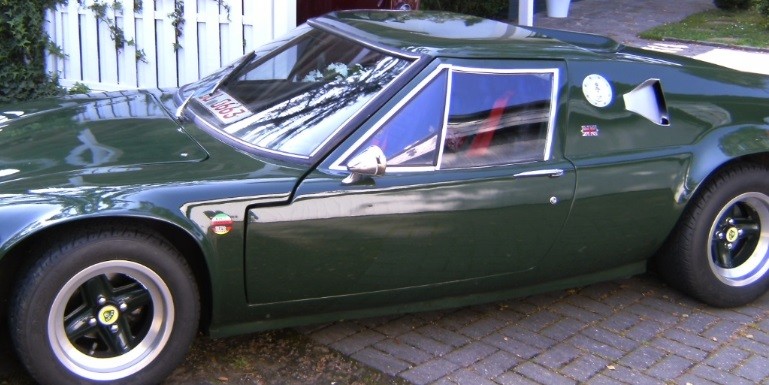 Last edited on 04-21-2020 11:21 pm by discogodfather |
|||||||||
|
noomg Member
|
Tim, If you've got 400,000mi in Europas you're either small of stature or a contortionist. I'm a bit surprised that being a Lotinista you haven't run afoul of the Super Seven. One thing they both have in common is you don't really sit in them you wear them. |
|||||||||
|
discogodfather Member
|
Got the valve job done. Cut a 3 angle with a friends Neway tools, then resurfaced the valves with his Gizmatic (also a Neway device). Hand lapped the valves afterwards. 16 valves is alot and these heads are so small and elegant. The seats and valves are such high tolerance. Lots of respect to the people working on these- they really are like swiss watches. Took my forever to get everything cut, the seat width correct, and the vacuum testing done. The valves on this head, especially the exhaust valves, seem different than stock valves. They seem thinner at the base (not due to resurfacing, the margin is the same) when comparing to another set of valves I know were stock. All the springs in the head are also not stock, maybe the old Dave Bean sourced heavy duty valve springs. Much thicker and stronger than stock. Next up: finished shimming the valves and ordered a new set to new sizes. Going to degree in the whole thing with a very nice setup from comp cams a friend loaned to me. I have some of the old marks on the vernier pulleys, so I will be able to see how badly these were off from a correct timing. ARP studs are all installed. 1 quart accusump also is plumbed but still trying to mount it. 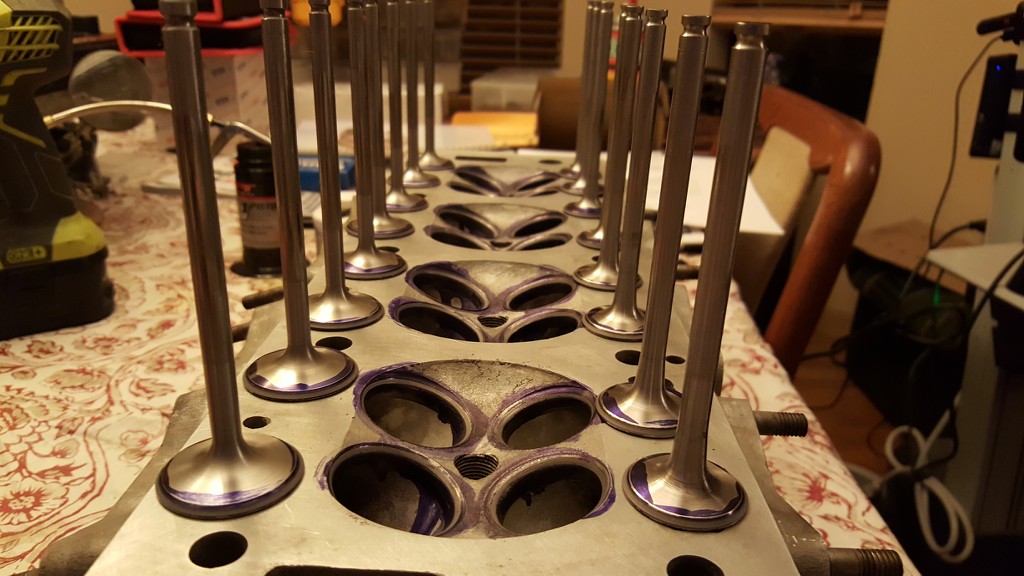 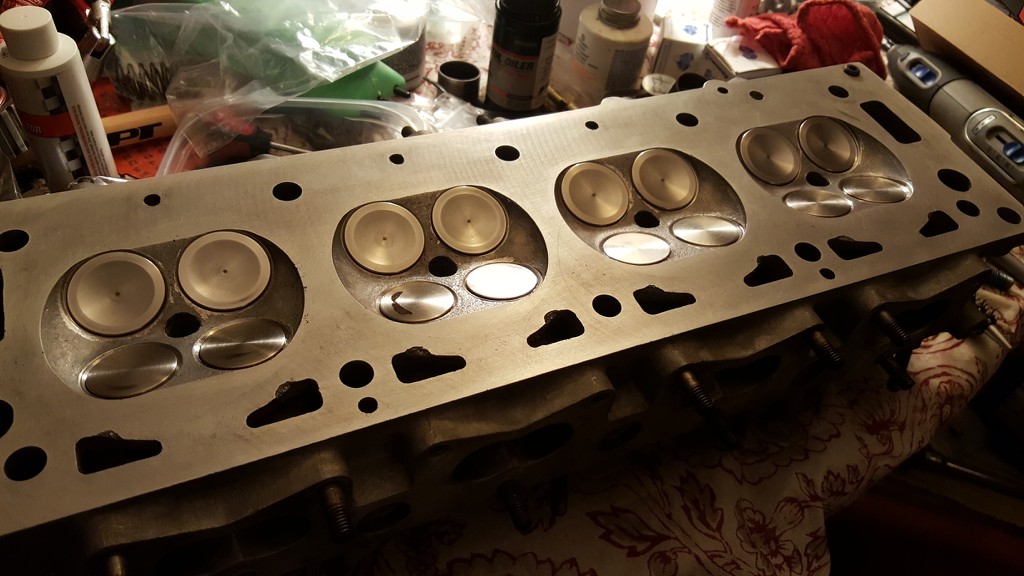 |
|||||||||
|
mtechwim Member
|
That looks super 😁 |
|||||||||
|
discogodfather Member
|
Latest installment of the saga: Got her all together and degree'd the cam to a very fine resolution. Starts with ease now without any choke and hardly any priming or throttle. Had her out the last few weekends doing some tuning with the new wideband setup. Was starting to do some 4500-redline pulls to judge the top end throttle response and just as I was coming home of the freeway she stuttered and make some pops and then went to really low power, then shut off. Barely got onto the shoulder as I went for the nearest exit. In the last 20 years I have forgotten my cell phone at home maybe two or three times. Here was the forth. I found myself desperately trying to get her started with no luck. Plenty of gas, the entire ignition system brand new, and everything basically together and tight. No puddles of fluid under the car. No loud noises or horrible sounds- the starter just spun her around and around. I had a nervous breakdown in sitting on the side of the road, with the cars wizzing by at 90 mph. This is on 280 north right at the border leading into SF, a 6 lane freeway. I thought the worst- I broke a valve, something had slipped on the cam pulleys, a rod was loose- every nightmare flashed before my eyes. I took time to compose myself and realized I was only about a 1/2 mile from home. I put on the emergency lights and ran back home, phoned AAA, and got a tow. Took my other car and pulled up behind her. No cops, no nothing, as if no one noticed. She had been sitting there for at least an hour and a half. Tow guy was nice and we towed it back to my driveway. It was getting late so I let her sit, but broke down at around midnight and couldn't sleep thinking about what the hell was going on. I ran out in the night and did a compression test- 150 psi all the way around! So no major problems, I was so relieved. Today I tested spark- nothing. Cylinder #2 had a little, but the others nothing. I thought about my "custom" Lucas 43D I had ordered from the UK and then machined an oil seal recess for. So far it hadn't given me any trouble at all. I suspected the advance curve to be not great or well matched to a Lotus 907, but nothing major. I took the distributor out and set up a bench test with a 12v battery. I must have been a little tired because somehow I think I crossed a wire using some alligator clips, and as I turned to dizzy to see if the switch was still good I saw a puff of black smoke. YIKES. Now I couldn't figure out if the switch was bad before I had smoked it, but it did fire off fine for a few seconds. I felt like jumping out the window for a few minutes, then I again gathered myself and dusted off the old original distributor. I had rebuilt it before I got the new 43D, replacing the oil seal because it was leaking badly. I had stripped out my old Petronix Ignitor I years ago, and still had it in a box. I thought I had toasted the Petronix, but something told me to give it another shot. But it all back together and returned to the car to install. Things started to get super weird. I could not, for the life of me, get the distributor to snap into the socket and get the dizzy wheel to spin the rotor! It was as if something was not meshing in there, the dizzy pulley spun around and around and the rotor didn't even twitch. I always had problems with this in the past but it always eventually popped back into place. Getting frustrated, I pulled everything out and got the 43D back in there, and viola- it too DID NOT MESH! What was happening here? I felt completely lost. Then I had an epiphany. I had noticed that the dizzy pulley, before all this, was having some problems centering the cam belt. The cam belt seemed to be drifting towards the engine, and was off the pulley by 1mm or so. Since I had replaced the tensioner with a setup from Gary Kemp, I had always chalked this up to being a tel tracking issue with the newer style single piece tensioner wheel with the integral Flennor bearing. But wait a second- was the pulley wheel drifting outwards, away from the engine? When I removed the dizzy pulley months ago, I remember tapping on it with a hammer. So I got a rubber mallet, and gently tapped it back in towards the engine. It floated a few mm's and suddenly all problems were solved- the distributor now could mesh up with the drive cog, the belt was back to tracking dead center, and life made sense again. So I smoked my new 43D's switch, and now am running the old converted 25D with a new oil seal and my old Petronix I thought was dead. LOL. Funny times, but I will take. It caused me to realize this fact: the original advance curve and centrifugal weights is far superior to the "mix and match" mystery setup on the new distributors that these companies claim works with the 907. She is running a lot smoother and the ignition advance, even though it seemed to read the right degrees statically at the right rpms (around 5-7 degrees at idle, up to about 25 degrees at 2700 rpm) the curve is a lot different. Power and progression is better. I also switched away from my .7 ohm dry coil and but in a Lucas wet coil, I think a DB110. Running real nice. What an adventure for a weekend.......... |
|||||||||
|
discogodfather Member
|
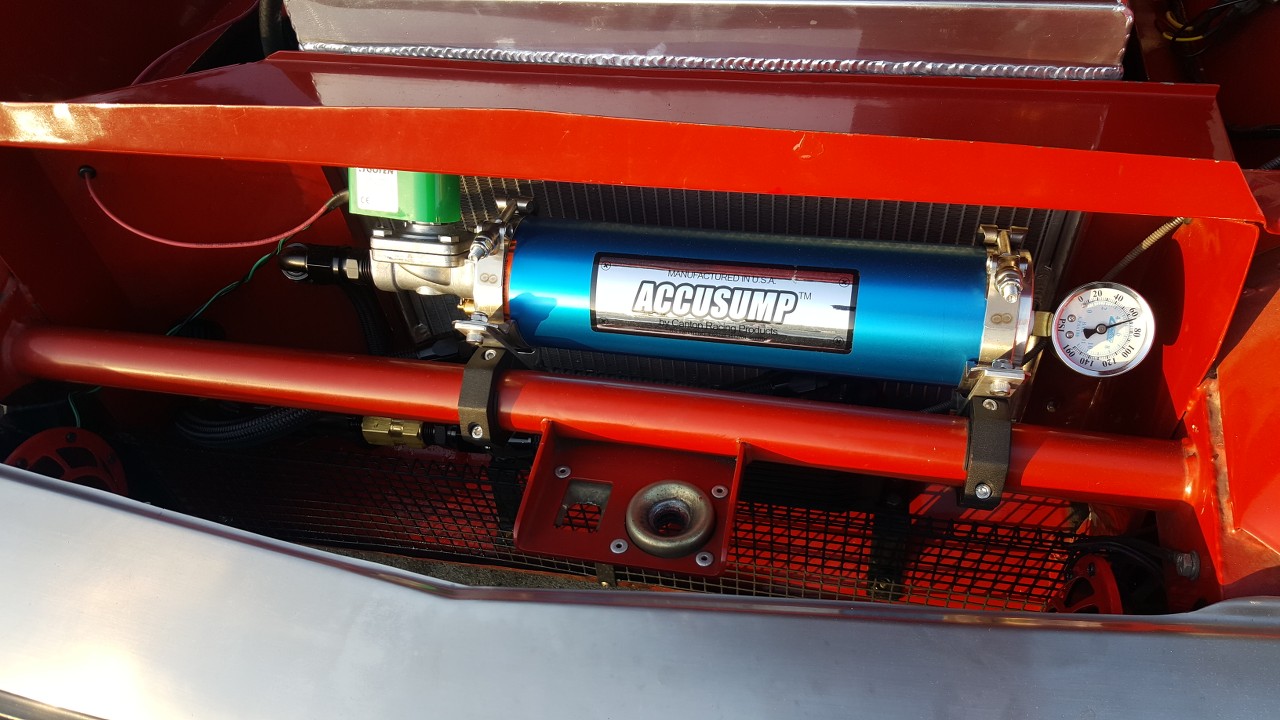
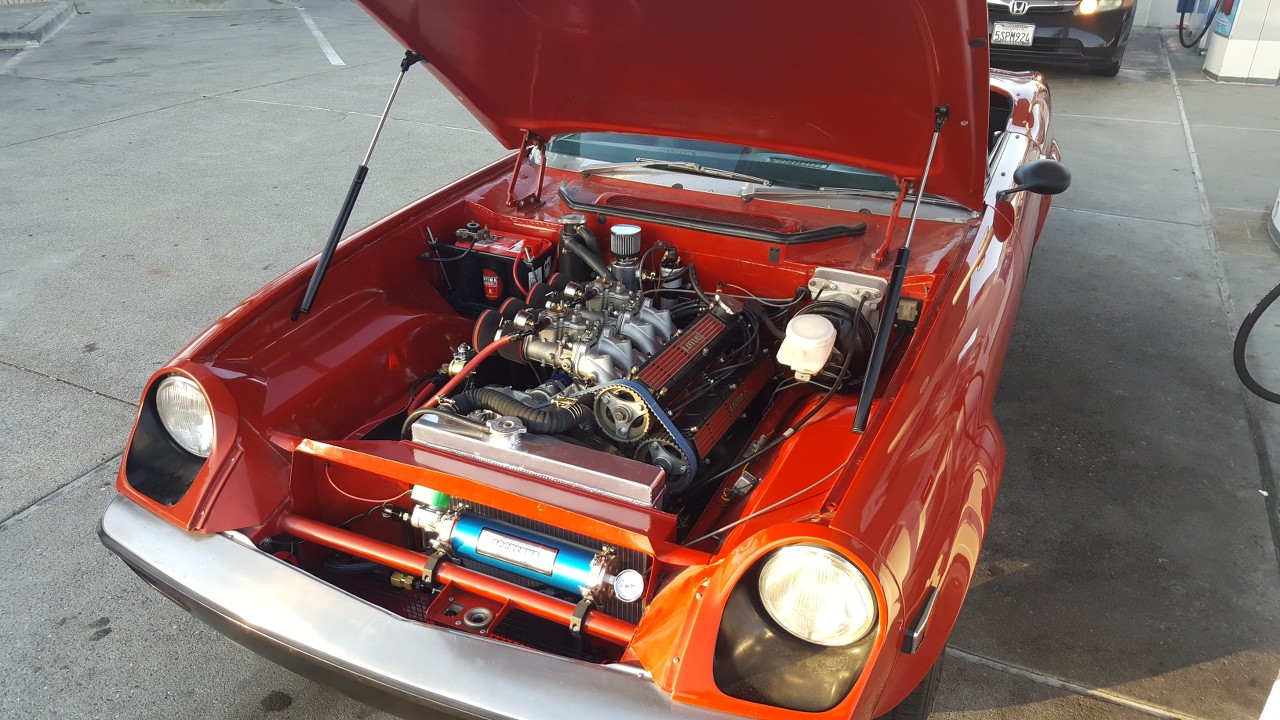
Looking good, also have the accusump setup installed and working great. A 1 quart unit mounts perfectly in the front of the radiator above the front brace bar. Gives me about 25 psi on cold starts. I got the electronic valve but with manual activation on the dash. You can see the gauge scheme I went with under the dash basically inside of glove box. Wideband, Amp meter, fuel pressure (an electronic gauge). Wired everything independently of the stock harness so no bad splices. When I don't need the info, I just close the glovebox. Does kill some storage space but I travel light with basically just the insurance info and a users manual. You can see the wideband is a speedhut unit and it works great, although I have to rev it to about 5k to get it to turn on. It's face was made up to look like an old smiths gauge. Matches pretty good, just like the Stewart Warner Deluxe's. Still running really long intake trumpets with some pipercross socks on the ends. I replumbed the crank and valve vents to go to a catch can, and that works well but it still stinks a bit like a race car, especially when hot. Decided to go to a Pipercross 600 series cold air intake airbox setup, will be my next project when it finally ships in. Going to a shorter set of full radius trumpets to see if I can optimize higher end performance. 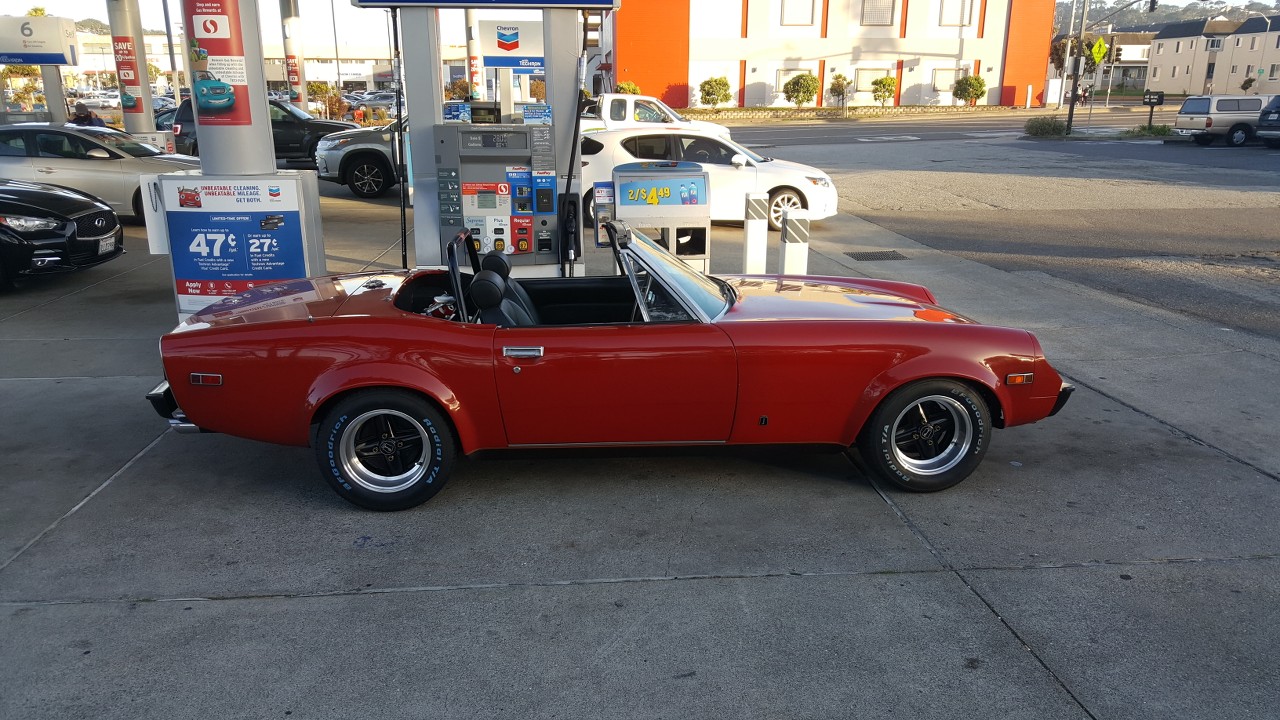 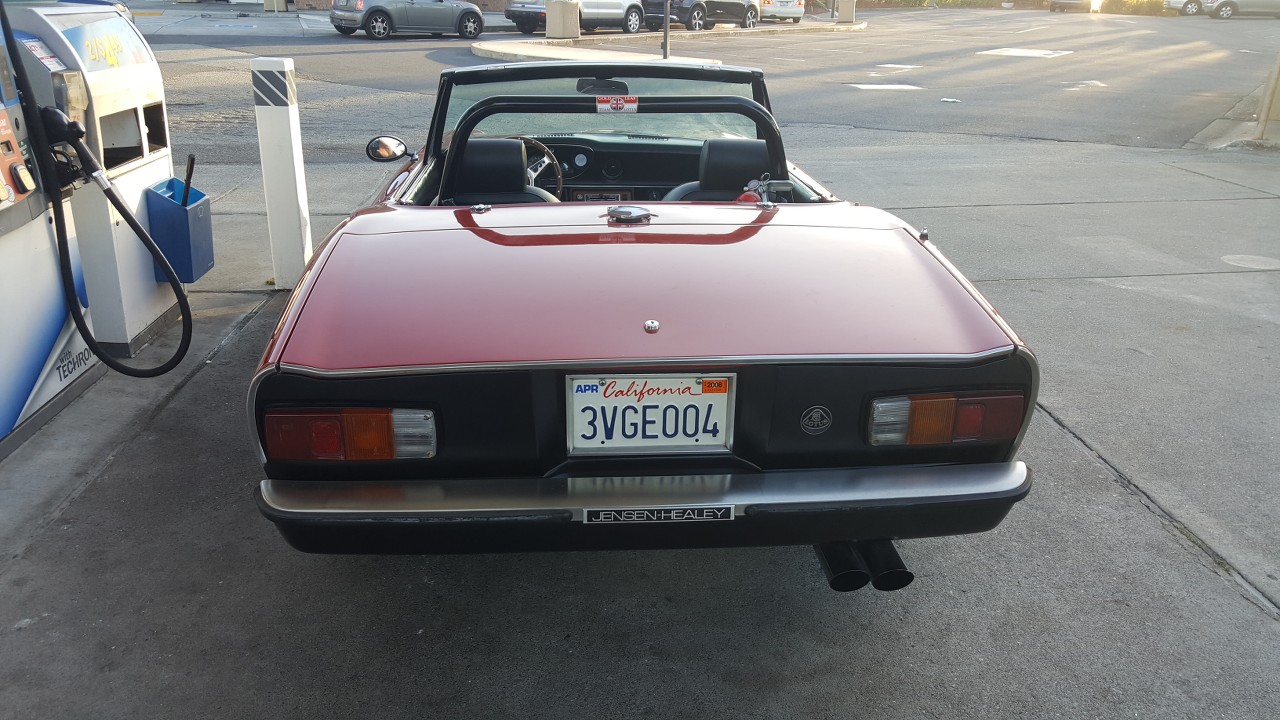 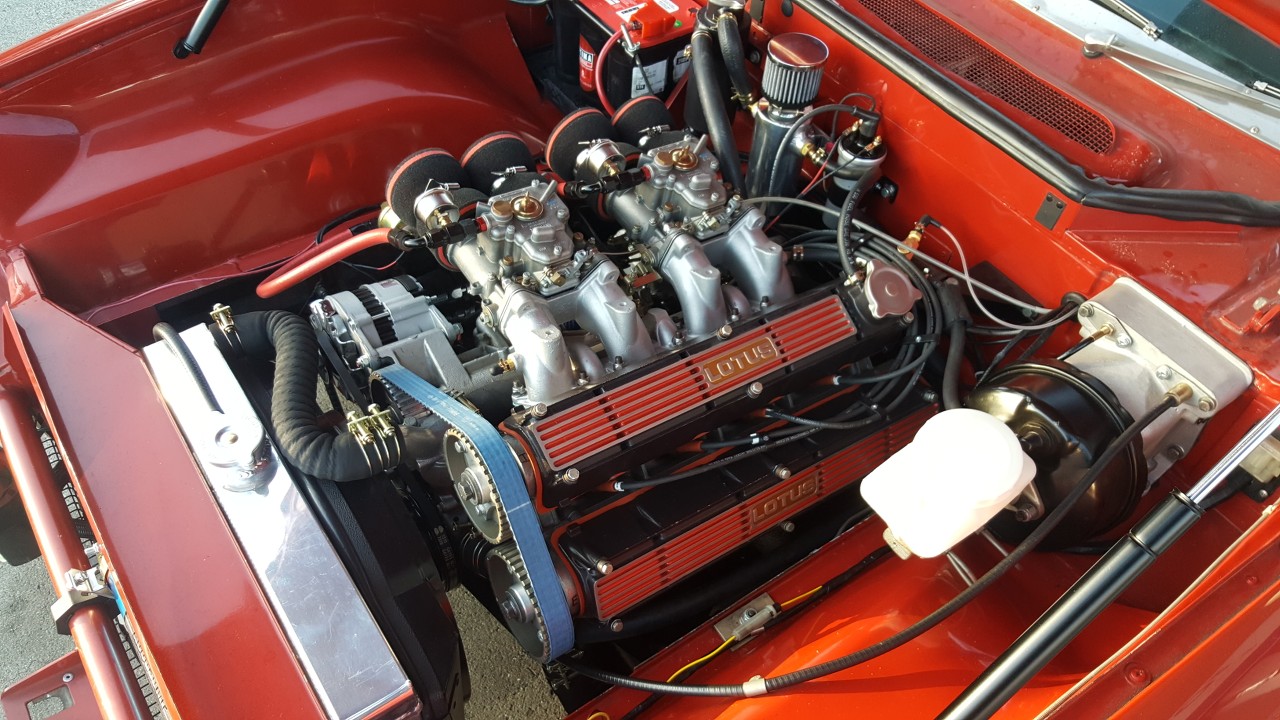 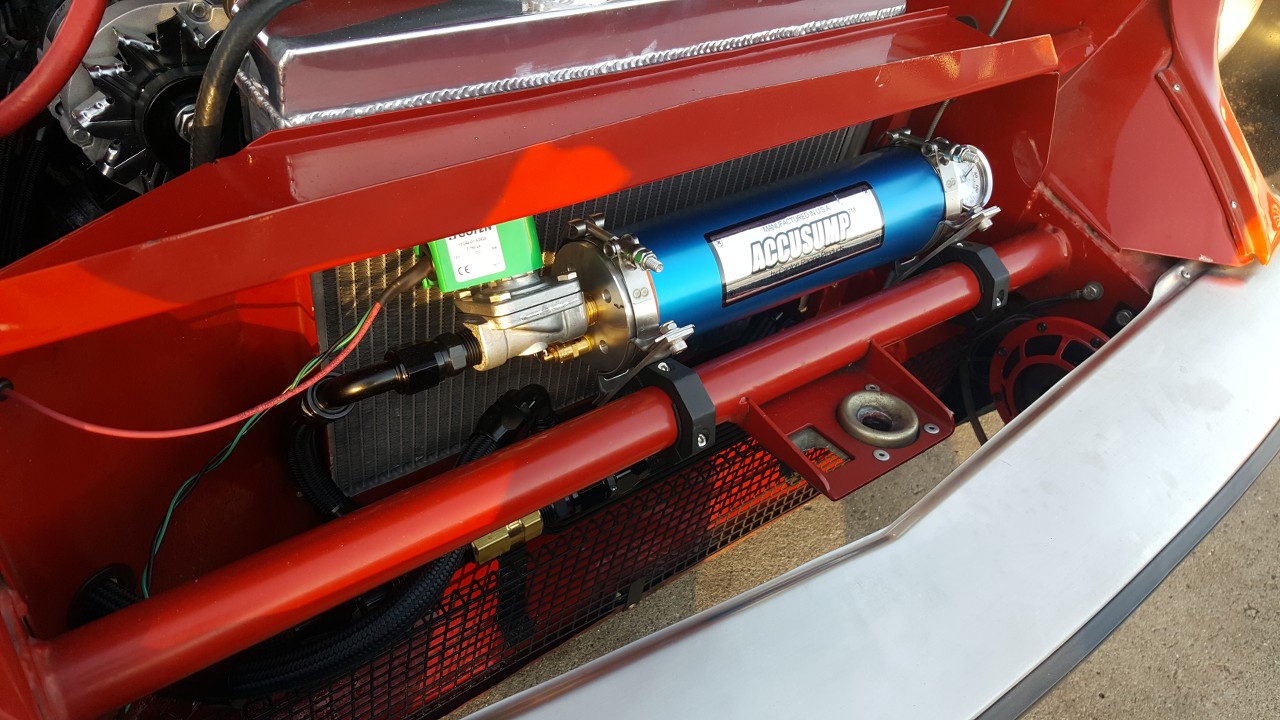 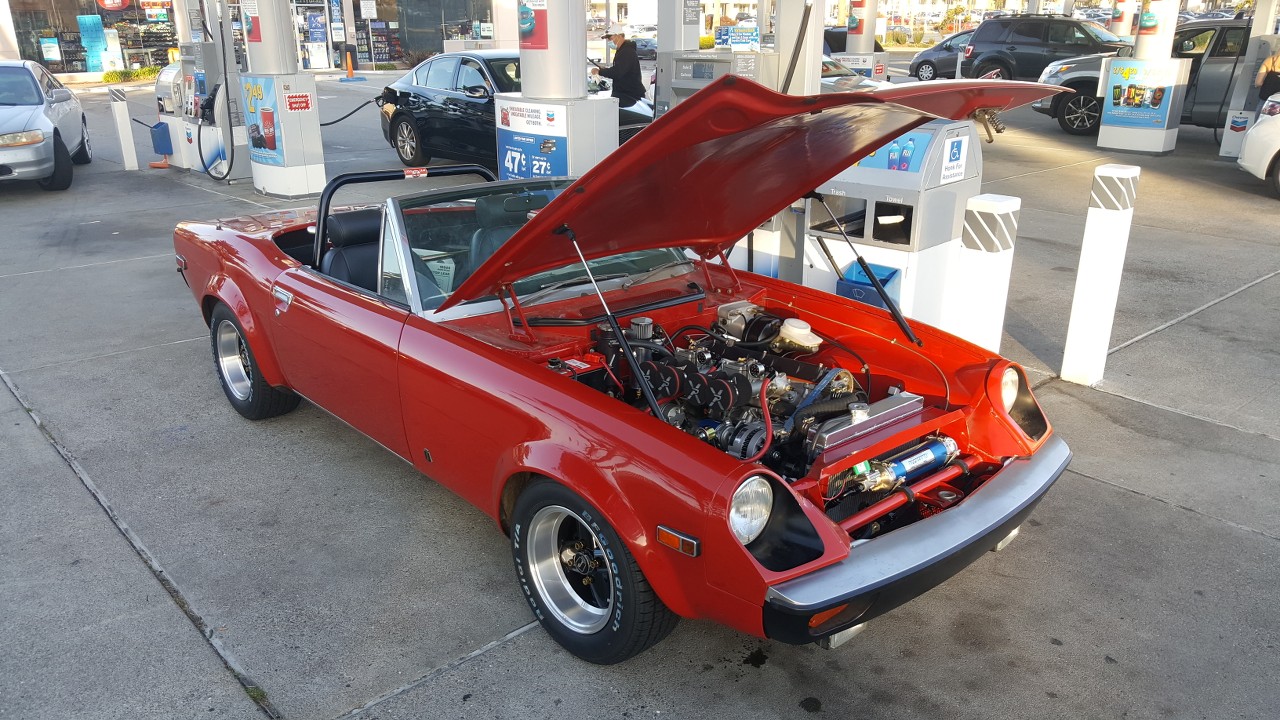 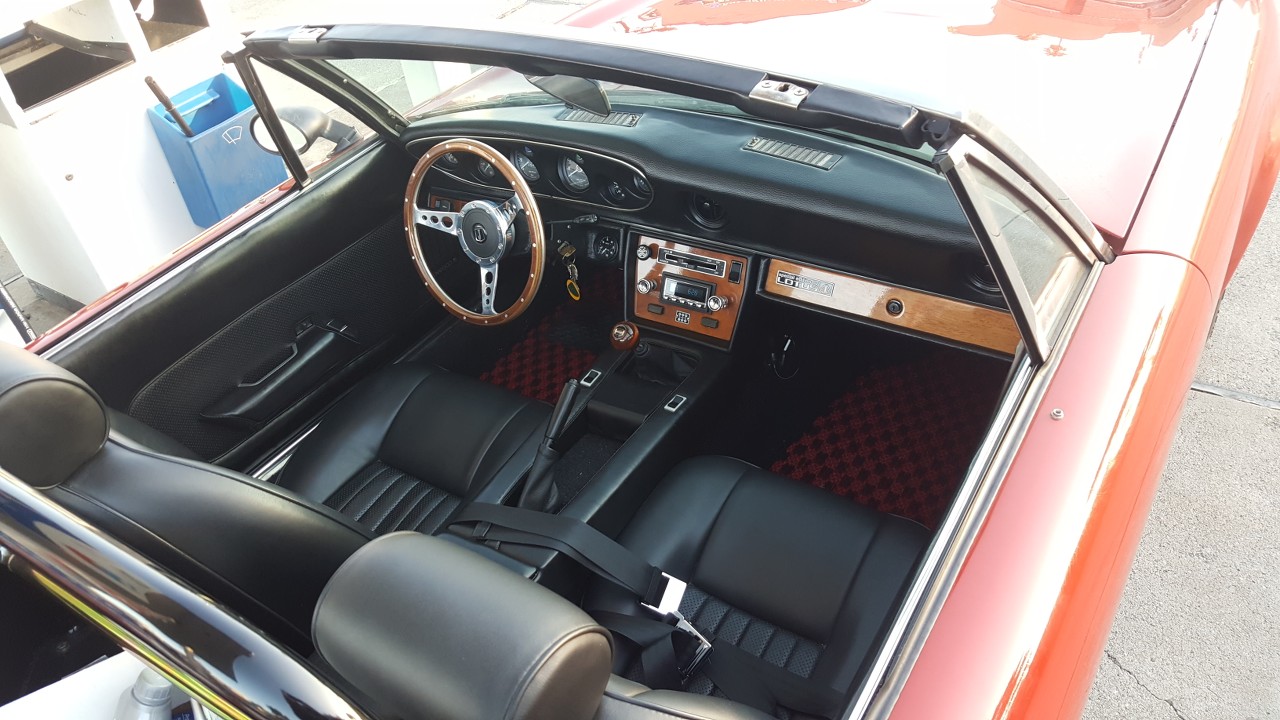 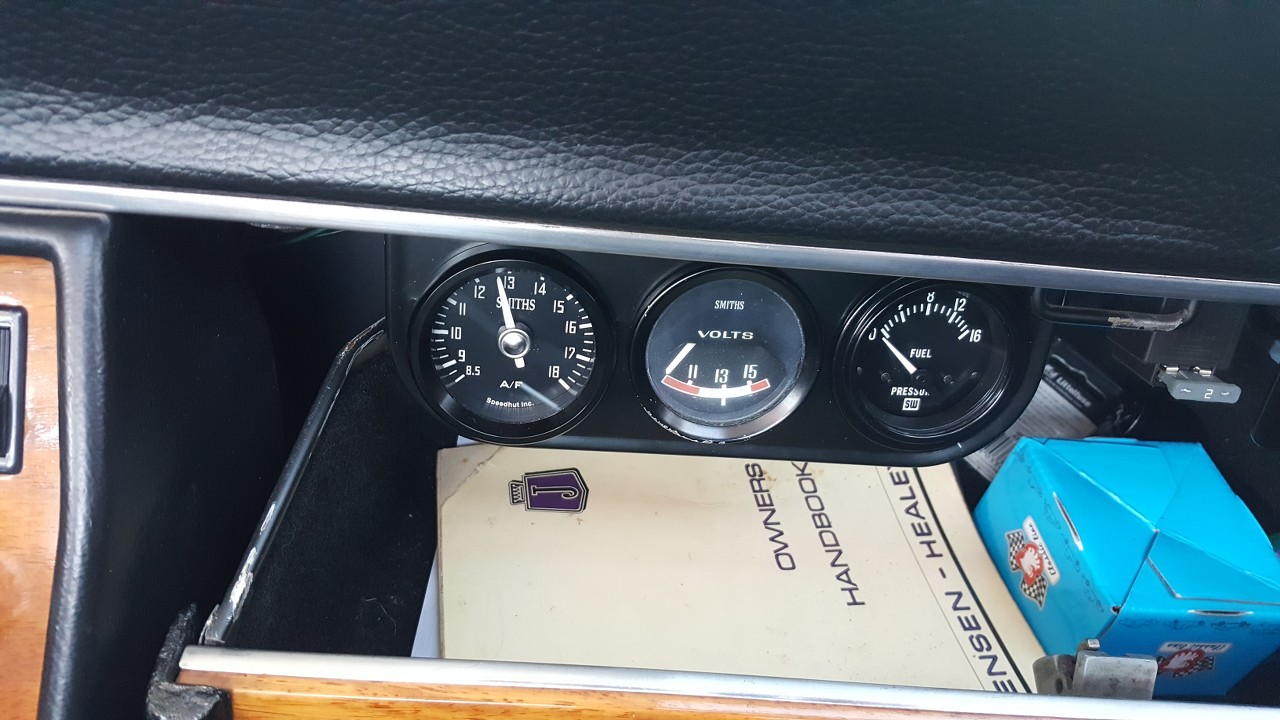 |
|||||||||
|
discogodfather Member
|
    |
|||||||||
|
discogodfather Member
|
  |
|||||||||
|
Dakota123 Member
|
First time really studying your work - just gorgeous! |
|||||||||
|
kart54 Member
|
That car is stunning! Two quick questions: 1.Where did you get your floormats and 2 How are your brake lines run? Looks like you have done away with the unit on the fender liner and the lines go under your brake master, how are they routed after that? Having just redone a portion of my brakes I would love to get rid of the crap on the fender liner. Kart54 |
|||||||||
|
redracer Member
|
Kart: the piece on the inner fender you're referring to is called the brake pressure differential switch. Here's what I wrote in 2012: Jay, Bob: what Sander has done will not compromise your brake system. The 2 end caps are removed and tapped with a 1/8" tap, around 10-12 turns (this means no fluid from one side will get into the other side, we do not tap the electrical switch outlet--no need to); then we use a brass allen plug putting teflon tape ONLY on the upper threads to ensure no tape will "clog" the fluid lines. We have to retrofit the later switches( '75 and on) since only one end cap can be removed for tapping. I keep a couple of them ready-to-go. bruce madden, red racer, atlanta, ga have plenty of the 1/8" brass allen plugs if you need them |
|||||||||
|
redracer Member
|
Here's a copy I wrote for the White Lady back in the early -90s: I wrote about this over 25 years ago and had it published in the White Lady, our now defunct mag. for all Jensen owners.I believe I had it entitled "Another one of Nadir's stupid safety ideas"(or something to that effect). Our dual master cylinders had one side do front brakes and the other the rears, unlike modern cars which do diagonal pressure, i.e. left front with right rear, etc.. You can live and drive easily without the rears(I have), but not the fronts, and you will NOT need a light to tell you so. Plus, bleeding the brakes has sometimes "locked" the pins on one side or the other causing the light to always be on. The "fix" is fairly simple and requires you(or friend) to have the small 1/8" pipe tap(27 threads/inch and NOT the British pipe of 28 threads/inch, which is what the oil pressure line fittings are). Remove both ends of the switch, remove the 2 sliding plugs and the small steel ball, then turn the tap 12-13 complete turns in each end(no drilling is necessary as the holes are the correct size to begin with!!). Using 2 brass allen plugs(takes a 3/16" allen wrench), wrap a little teflon tape on the "starting" ends of each plug and install, being sure none of the teflon is exposed in the chambers(snip extra off). (if you can't find the brass plugs, I still have plenty) |
|||||||||
|
discogodfather Member
|
kart54 wrote:That car is stunning! Two quick questions: 1.Where did you get your floormats and 2 How are your brake lines run? Looks like you have done away with the unit on the fender liner and the lines go under your brake master, how are they routed after that? Floormats are cocomats. They are made in USA (down in LA) and they are like the rolls royce of floormats. Very expensive, but it's a lifetime investment. I think I paid around $220. They send you a paper pattern and you can custom modify it down to the mm, send it back to them, and they make it tailored. Extremely durable and many styles and colors and fabric. Probably out of place on a stock car, but this is a hot rod. The brake system uses a different pressure differential switch, I believe off an old toyota but I could be wrong. It sits on the side of the subframe, I will take some pics and show the setup. The original unit with all the plungers and stuff was always too complex for me to understand. It's been 20 years since we set up those brakes, but they work very well with just the right bias. I was at one point considering a race car like adjustable bias valve (like with a knob) but I never got around to it. Thanks for all the compliments! I wanted this to be ready for the Dixon British car show up in northern CA but it was cancelled. I have a feeling many of us are getting projects done and living off of gas station and internet forum positive comments! As long as people give me a pat on the head and they like the car, yes it's an MG! |
|||||||||
|
noomg Member
|
kart54, You can order a set of cocomats from cocomats.com they based in South Carolina. I think I paid about the same as Disco, at $195 plus shipping $220 sounds about right. I don't think for a set of custom made floormats made in America the price is unreasonable, but that of course is for you to decide. As far as cocomats being out of place, they were quite common as an aftermarket accessory in the '60s and '70s and would have been available for brand new Jensen-Healeys at the time. I'd say they could be considered a period correct accessory. |
|||||||||
|
kart54 Member
|
Thank you to both of you on the cocomats. I agree on them being commonplace. In fact, I have a set in my car now that are falling apart that were done some time in the late 70's or early 80's. That was why I was looking for a replacement set. |
|||||||||
|
redracer Member
|
You may want to take a lok at Lloyd mats; I got them for mine and they are very well made and not that expensive; I had J-H embroidered in the center to add some "pop", on a sandy backfield https://www.lloydmatsstore.com/ |
|||||||||
|
discogodfather Member
|
kart54 wrote:How are your brake lines run? Looks like you have done away with the unit on the fender liner and the lines go under your brake master, how are they routed after that? I realize now that my brake system doesn't have a differential / proportioning valve at all. The front circuit of the master goes to the front, then tee's off. The rear goes to the rear, single line. Everything is stainless. Still the Lucas master. No problems locking the drums, and I used to track this thing. 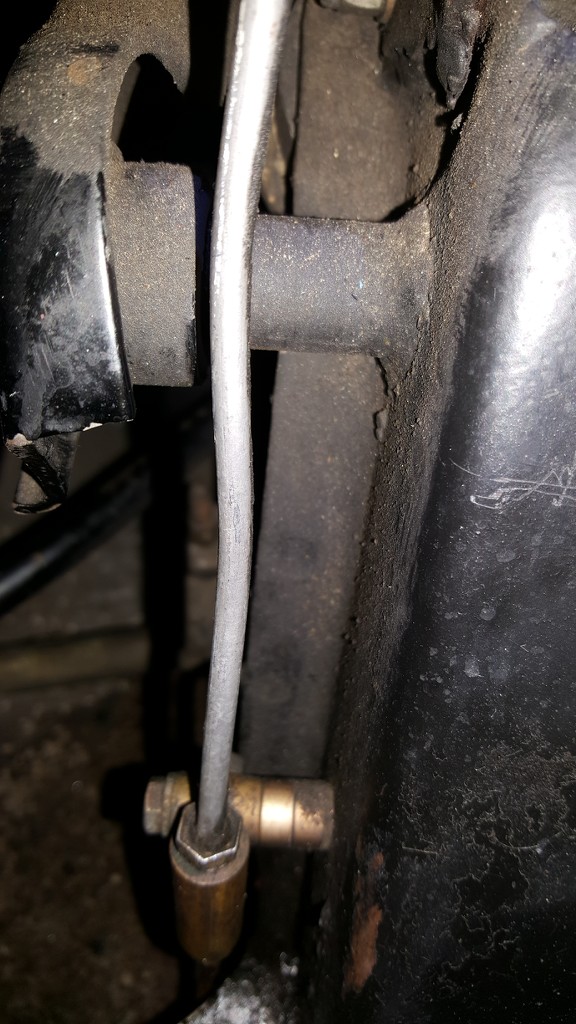 |
|||||||||
|
JensenMike Member
|
Beautiful Jensen Healey! |
|||||||||
|
discogodfather Member
|
Final steps on building a kind of custom cold air intake system. With this 104 cam and the headers and the Weber 45's, she always ran best with extremely long velocity stacks (air horns) at around 4". I loved the stacks, but hated any air cleaner option out there. I tried some foam socks and they were atrocious. The performance went down so significantly with these socks on it wasn't worth running the stacks. I tried some minimal flat screens, but lets be honest: these aren't air filters. I ended up loosing two on the freeway one day so they aren't really worth it either. Factory air boxes were on the large side and could accommodate long stacks but they were hens teeth, and the ones I did find were falling apart. No problem, I can do some fiberglass work, but finding one even remotely worth of patching up was also nearly impossible. Factory air boxes also fed centrally, since the "muffler" style air canister sat on top of the passengers side wheel well. So it wasn't the best place to run a hose, since I wanted to put the hose 90 degrees downward from the front of the airbox into a 4" hose that would run into the area in front of the passengers wheel and out to below the bumper. I started to look at universal airboxes. There is an outfit called EPI in Australia that made a large universal fiberglass box that would allow for long air horns, but it was rather large and hefty. I didn't like the look of a massive air box on these beautiful engines, I like to be able to see as much of the engine as possible. The EPI required a lot of custom work to cut out the back of the box to fit the weber intake pattern. Even then all dimensions seemed close- like in the mm's of clearance. On the back you have the oil canister, under you got the starter, and in front you got the alternator. Big chance you could no longer reach the dipstick! So I needed something small enough to fit, and found the Pipercross 600 series. They are a UK company and the 600 is a universal box designed for tight installs. Used mostly in Lotus 7 style cars with twin cams, mazda miata engines, etc. It's got an aluminum back plate that can be ordered blank for custom fitment. I saw that they had a list of cutouts available, and then the Talbot Sunbeam Lotus cutout caught my eye. Ordered than one. The Talbot Sunbeam Lotus used a 911 engine if I recall correctly, when twin Dells (maybe a 912??). I was counting on the spacing being the same as a 907. Turns out I think the 911 engine used a larger 48mm carb (or maybe even 50mm?). I don't know, because the cutouts were slightly larger than a 48mm apeture. I had to cut some of the area around the bolt holes to allow the plate to fit on the Weber 45's. The plan all along was to still use very long velocity stacks and figure out a way to attach them to the backing plate. Unfortunately, this proved harded to solve than it seemed. Originally I wanted to try and tack weld the plate to the stacks, but it made little sense. If I welded the front lip of the plate to the front of the stacks, I felt like any benefit of the round lips might be compromised. What I really needed was to fit the plate an inch or two back from the front of the stacks, and make everything air tight. Again I found an Australian company called Racehead Engineering (RHD) that does some nice fuel injection stuff. They had a 45mm to 48mm velocity stack "extender". Got to be honest, I had no idea what these were supposed to be used for, maybe like a extension between a custom DCOE/DHLA bolt pattern intake on a fuel injected car, but immediately I saw exactly what I needed. I would bolt the RHD "extenders" on the carbs, then the plate to the ends of the extenders, then bolt a set of short length 30mm trumpets to the front of the plate. That way, I get an effective length of 4"+ on the stacks, and the airbox itself sits neatly on the ends of the stacks. Since the Pipercross 600 is only really about 55mm tall, it can't really accommodate anything but stubby stacks. With the 30mm stacks and the 80mm RHD extenders, it's perfect. Clearance to the wall of the pipercross from the aperture of the stacks is a little over an inch. One thing I have been reading about Weber and Dell sidedrafts and "lopey" big cams, and how they have a tendency to cause reversion. It makes sense, and it cause some issues with sneezing and general grumbling. I read in Des Hammil's book that sometimes reversion plates were fitted in Shelby cobras and GT40's etc. I did an experiment several months ago where I put a plate in front of the naked stacks to see if it made a difference, around 1.5" inches from the mouths. It did seem to stop some popping and sneezing here and there. So the theory is now I have a pretty decent reversion plate at the front of the stacks again in the airbox wall, let's see if it makes any difference. Part II tomorrow, the plan is to use a round aluminum canister style universal cone filter cold air intake in front of the Pipercross 600 airbox, sitting where the stock coolant expansion tank used to be. Had to get a custom coolant expansion tank that was really long and narrow, arond 3" in diameter so the 4" hose could get through there. The nice things about an airbox (with cold air intake): 1) Decent filtration off a K&N cone cotton gauze filter 2) Stack mouths undisturbed 3) Now I can run my oil catch can (which collects from crank and top of valve covers) into the box, which should tidy up the gassy and oily smells I have been getting with the direct vent setup 4) Cold air right from the front bumper 5) I little bit (I am hoping) of a ram air effect pressurizing the air box slightly at high speeds 6) Dipstick readily accessible 7) Distributor is accessible without removal of anything Cheers, hope this works, more soon................ Stacks Mounted: 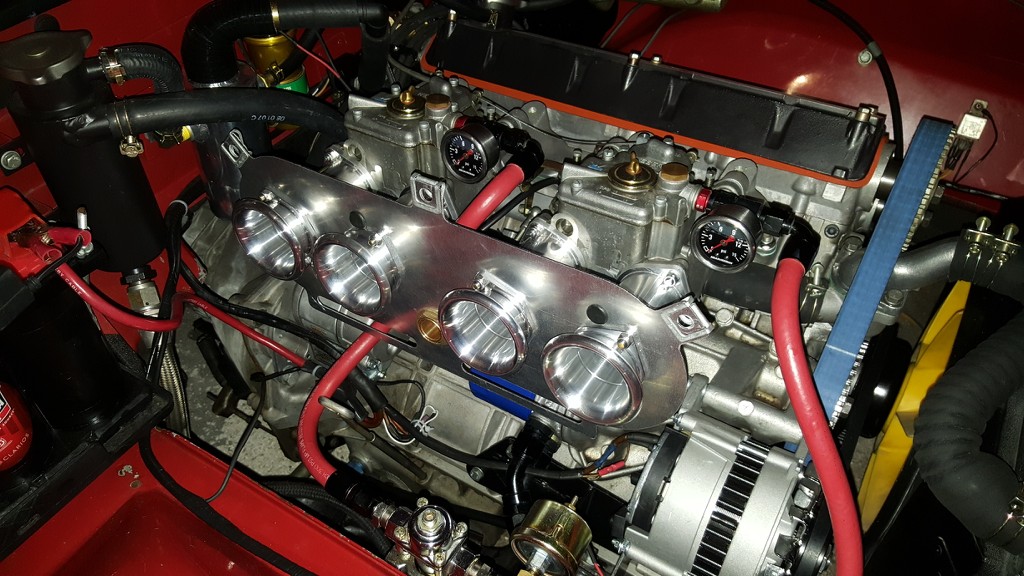 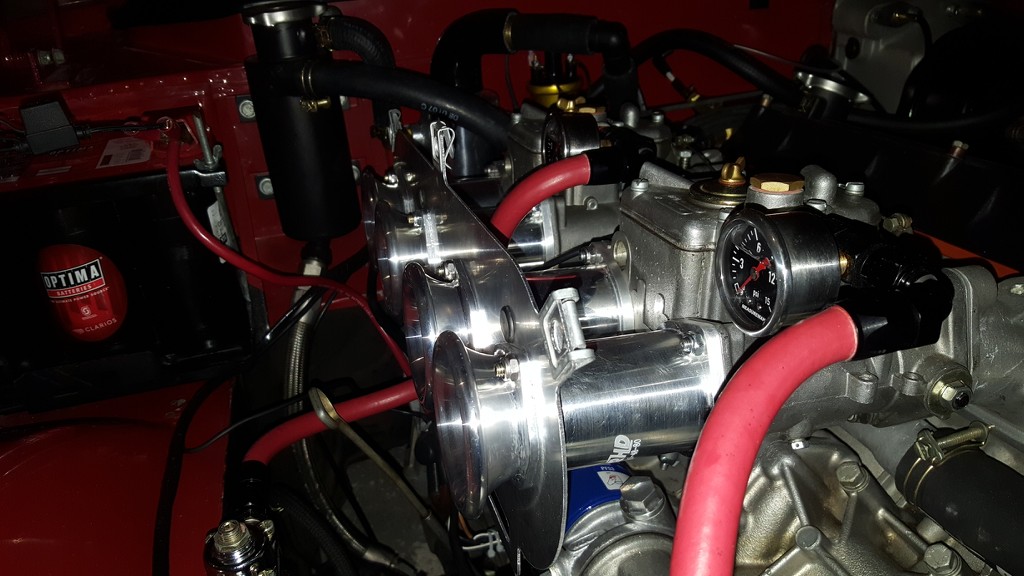 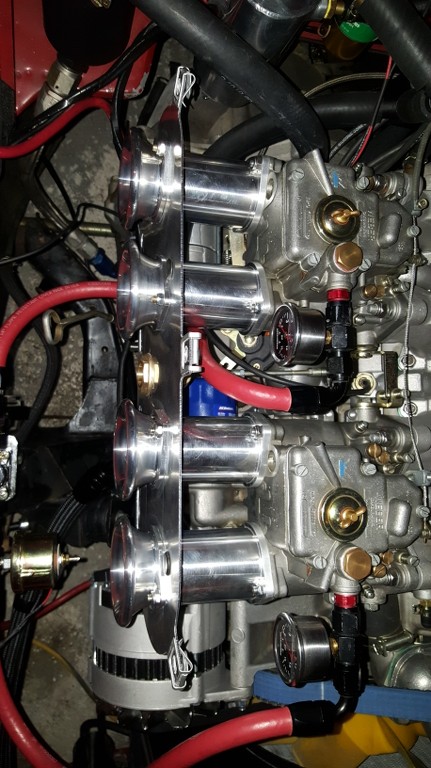 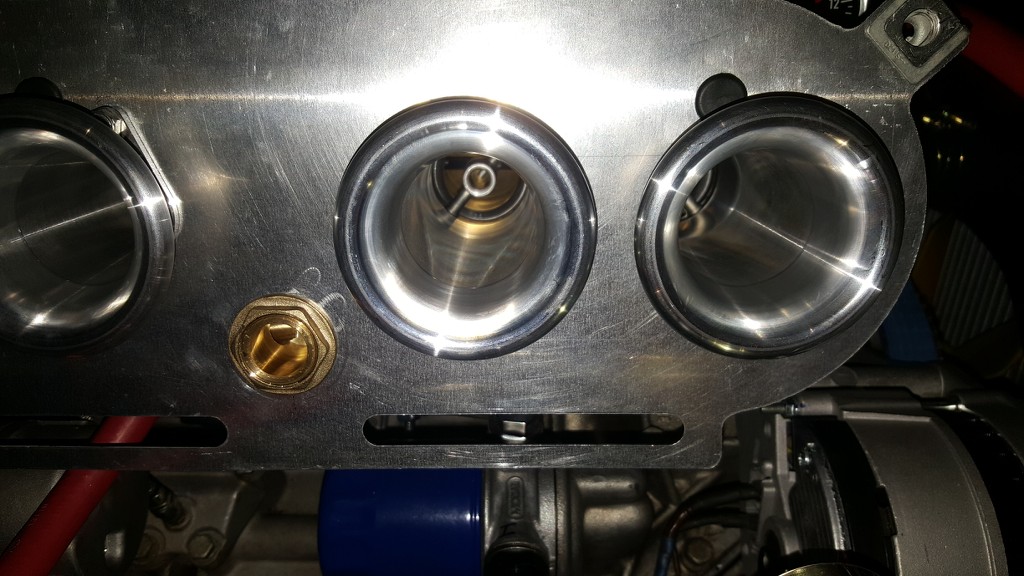 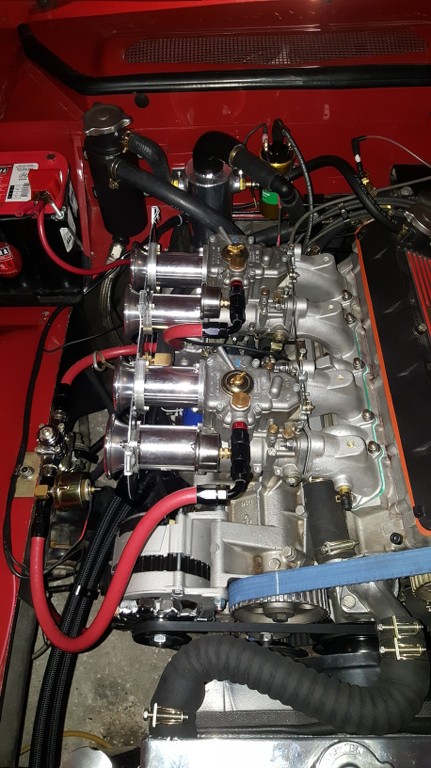 Airbox half on:  Airbox mounted:   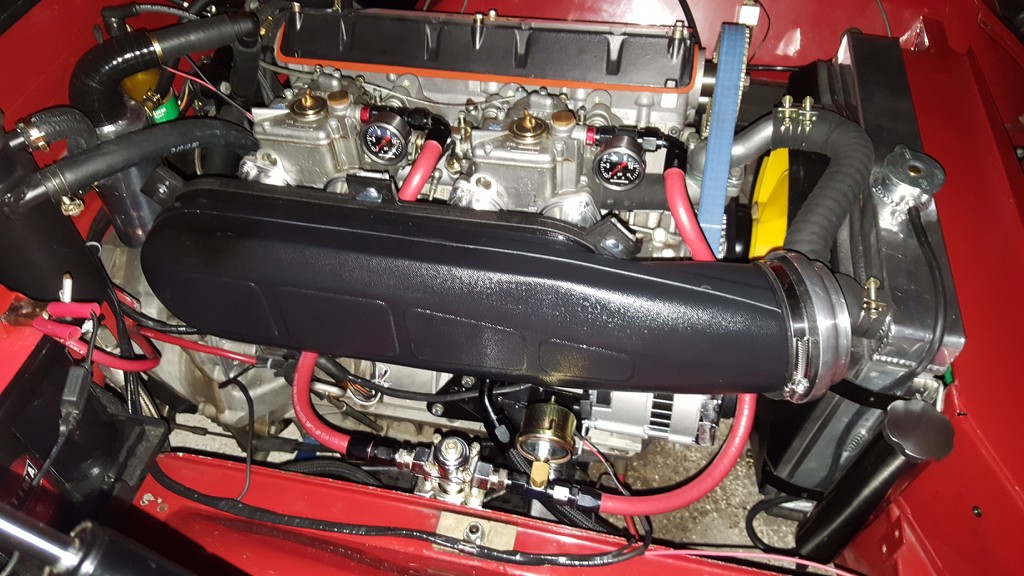 Stack airbox clearance: 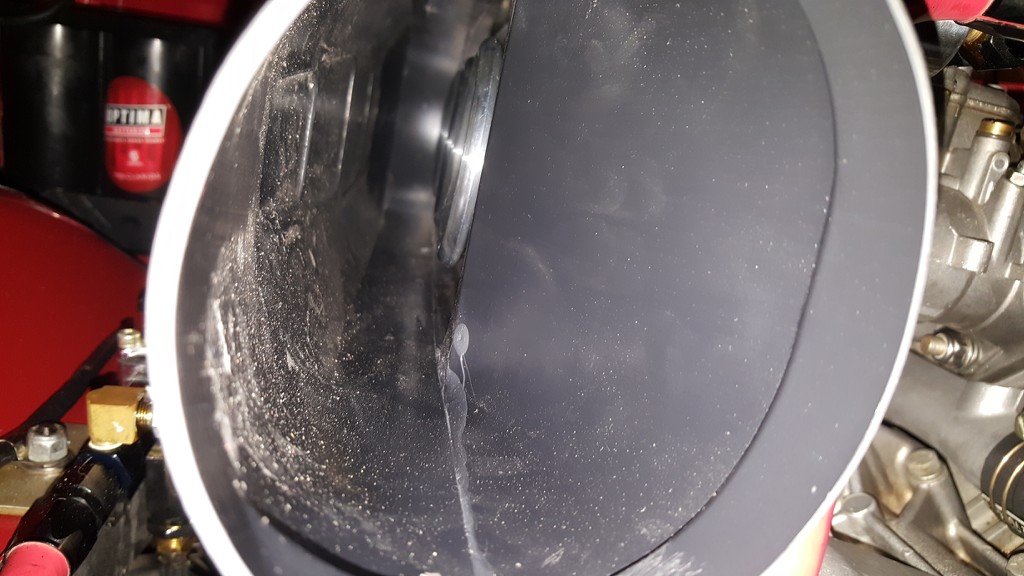 Some ideas about the routing into the cold air intake:  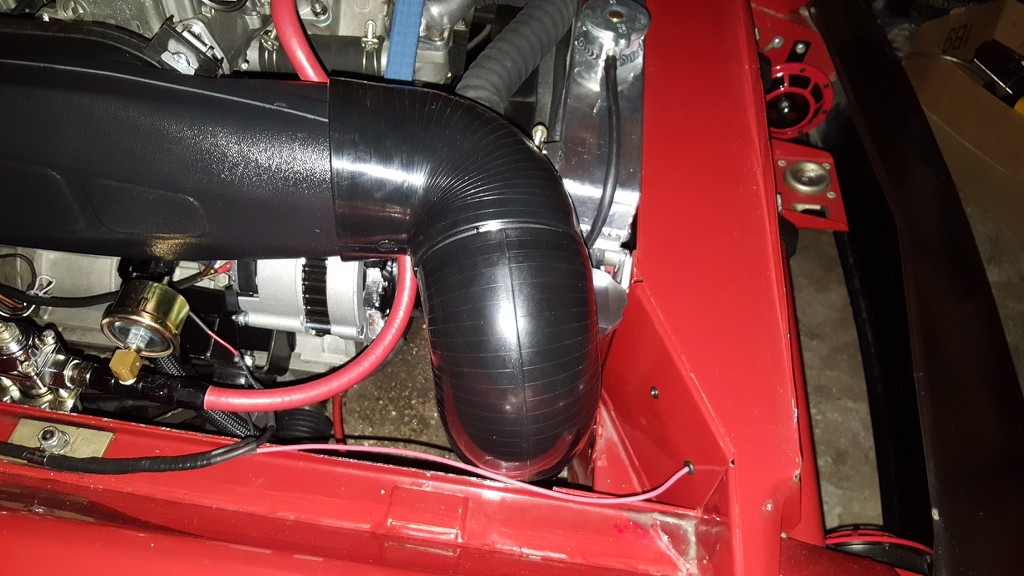   The ultra slim polished stainless coolant overflow:  Last edited on 07-19-2020 09:09 am by discogodfather |
|||||||||
|
discogodfather Member
|
New project, new look. Added a front spoiler from Greg. Quality fiberglass piece, very sturdy. Had to fabricate an aluminum piece to go inbetween because the GT spoiler was designed to bolt on the later lower sheet metal piece (for the larger radiator) and does not directly bolt on to the non-GT's without a 1" gap towards the middle. Painted the spoiler with yet another theme of the "Gold Leaf" Lotus F1 cars. Does anyone like it? I think it looks good. Also used some spoiler stabilizers at the front to give it even more sturdiness. Even at my considerably lowered spring height I am still at a decent 4.5" of clearance to the street, which is enough if you are careful. Alas, my very nice Pipercross 600 cold air intake is a bit of a wash. It seems to require some rejetting, and I have it so nicely sorted right now I was bummed. Idle drops by 100rpm when I connect the system so I know there is a restriction, probably the cone filter housed in the 4" ducting. It's a bummer because I fabricated a lot of stuff out of sheet aluminum to make it work, but here's the deal killer: I would be willing to live with some of the performance drop with it on but it KILLS the intake sound. Just totally gone from the experience, it sounds just medicore at best. All the nice snarling.....I just can't live without it. Rather than junk everything, I am going to remove the cold air part and the plastic intake box and replace it with a Pipercross box like filter. This will hopefully preserve the sound! It also allows me to keep the venting system that now puts crank vapor back into the engine and cleans up the smells in the engine compartment on a hot day. Still runs through the catch can so it's nice and clean. Fingers crossed that I can finally find a filter system that preserves the marvelous sound of the open trumpets while giving some protection! Down to some final options here. Also love the new Lucas PL headlamps, pricey but they really make the front end look cool. 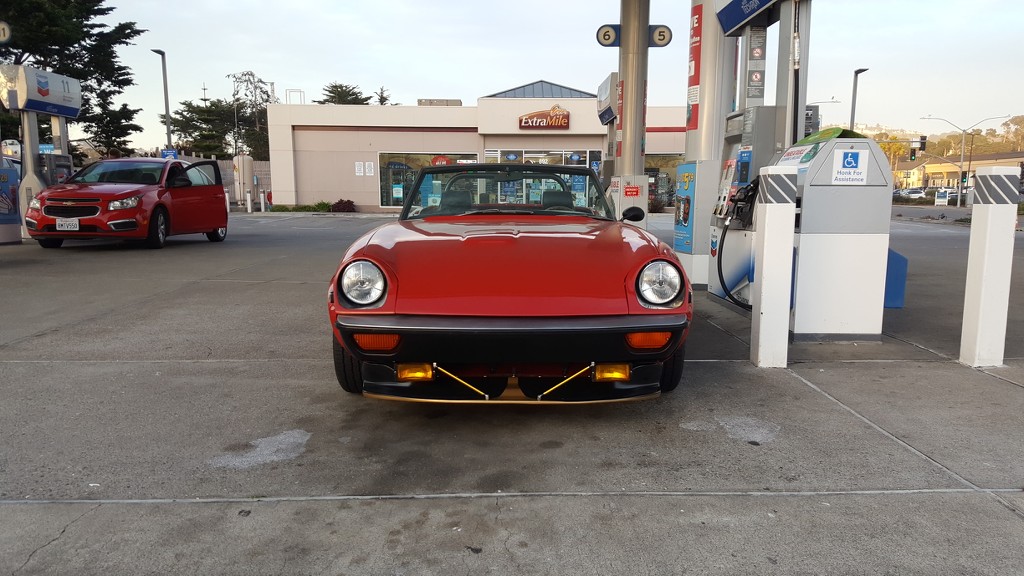 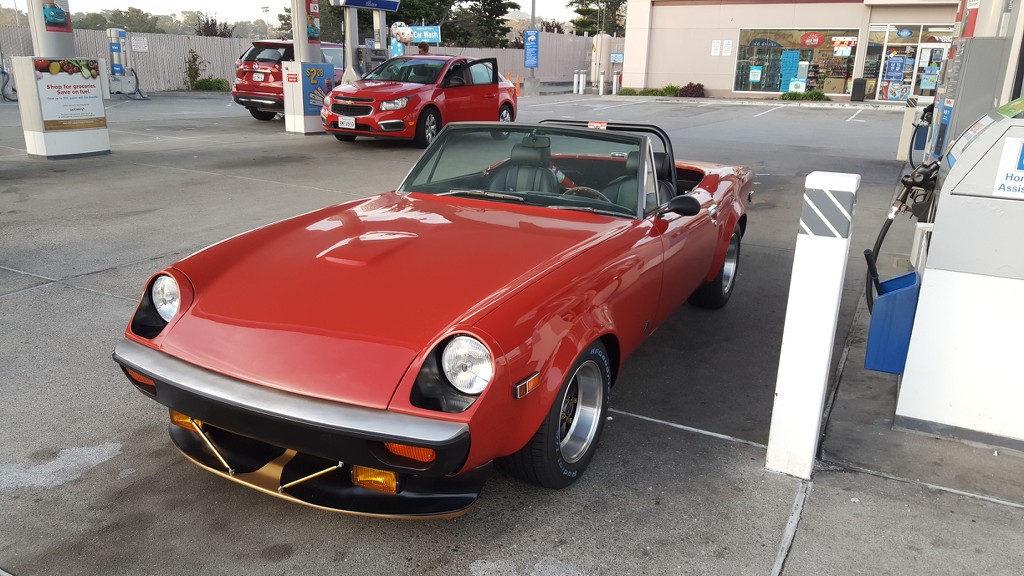 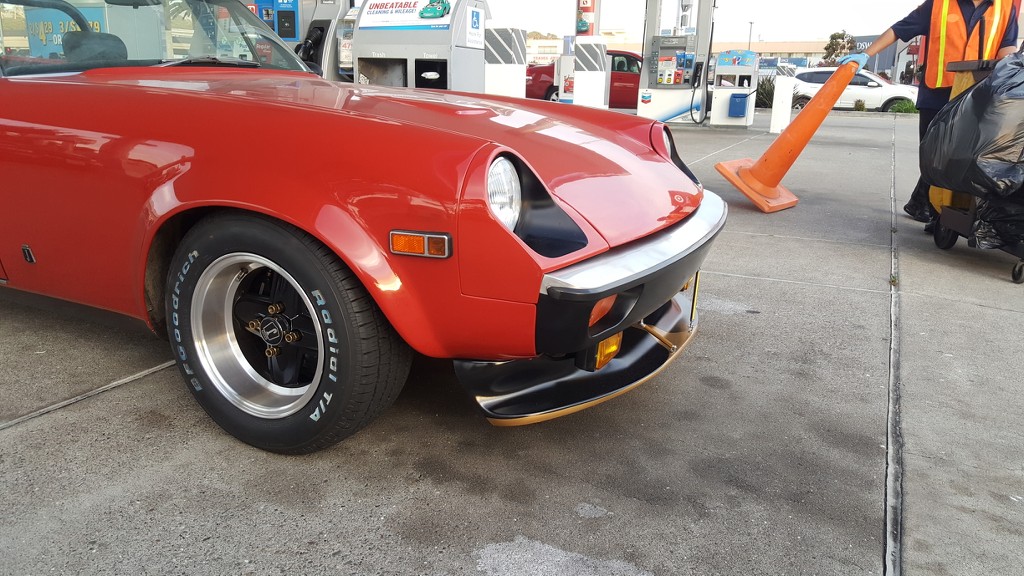 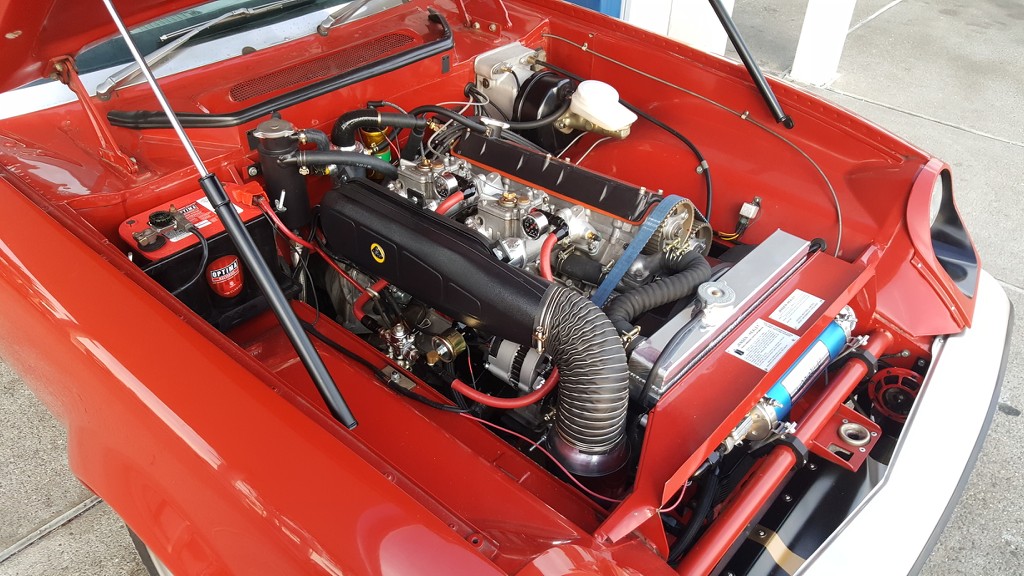 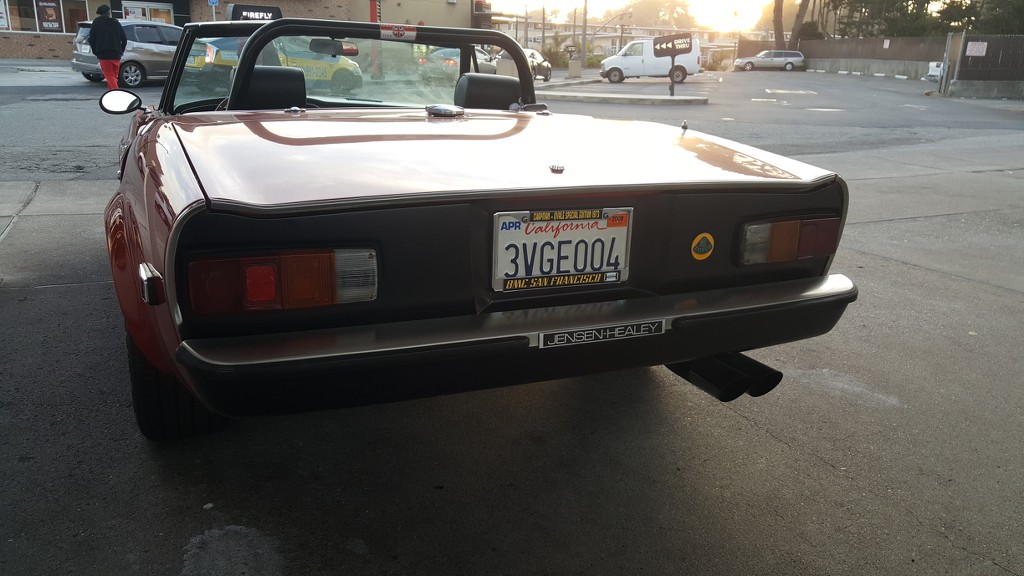 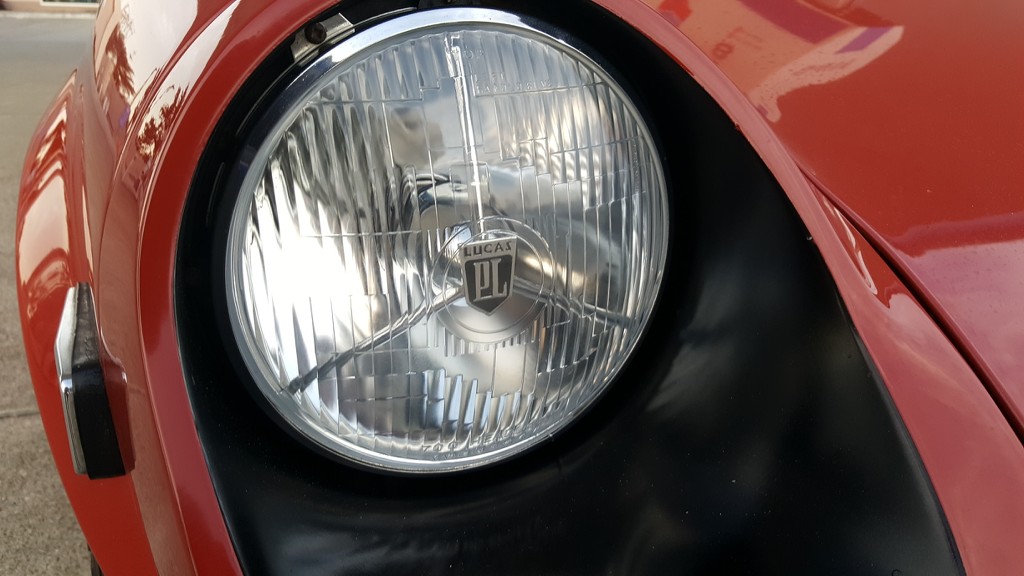 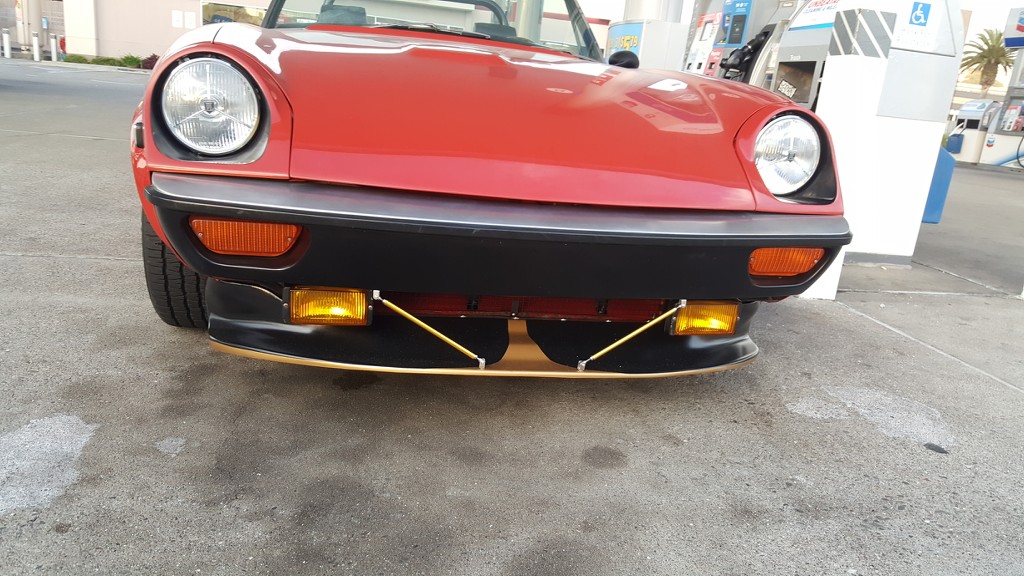 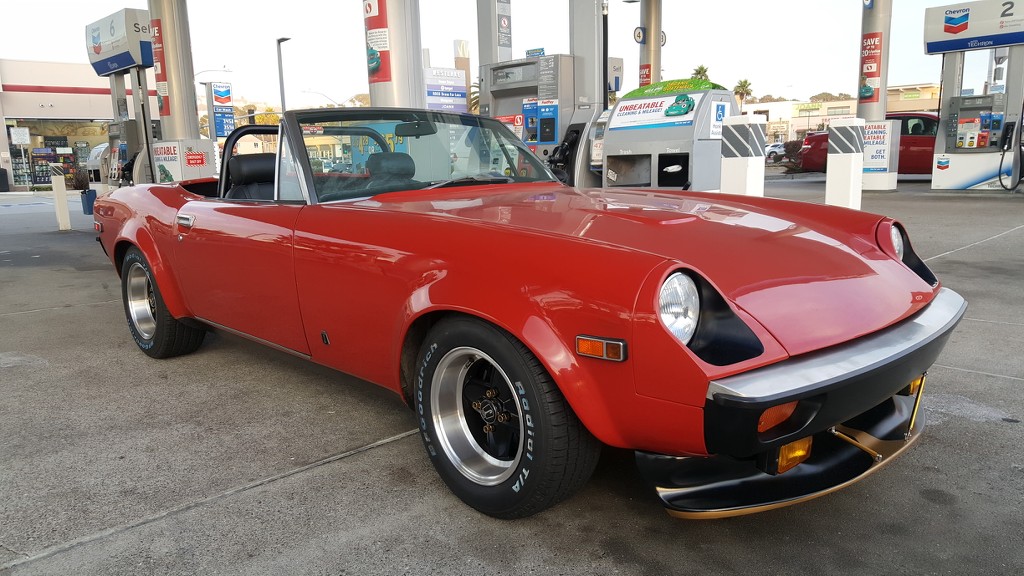 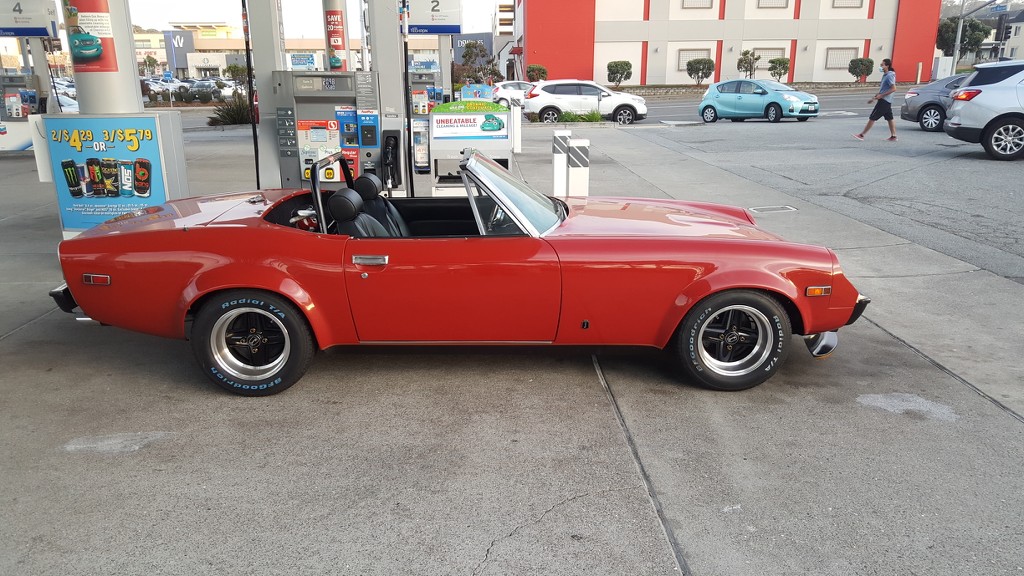 |
|||||||||
|
kart54 Member
|
There is a real problem here with this car. The fit, finish and look are just way too clean, pretty and correct to be a Jensen Healey. The factory never came close to that look. You might need to rename it as a Jensen Lotus or something along that line. Really nice car. With your air cleaner set up make sure you keep a filter of some kind on it. I recently pulled my set up off. I run a cold air hose to the front. I couldn't believe the amount of gravel that was up in the body of the air cleaner. I took several tablespoonfuls of junk out of the air cleaner body. Some of it seemed to heavy to get blown that far up but it had made it. Kart54 |
|||||||||
|
discogodfather Member
|
kart54 wrote:
Thanks much! I wish I had thought of the whole Lotus-Healey thing but I wanted to keep the Jensen in there somehow, too many "J" logos around the car. Still conceptualize it as a special edition that Lotus made for JH to sell alongside the regular cars. Very interesting about the JH history: apparently Chapman tried to talk Qvale into doing a two-tiered model lineup. The lower end car would get the Vauxhall powertrain and the higher end version would have the Lotus 907. I think Qvale was receptive to the idea but the Jensen board said no, it would create "model competition" and no one would want the Vauxhall stuff. Interesting! Got to wash this thing, hasn't been washed since 2008. Added a final touch:  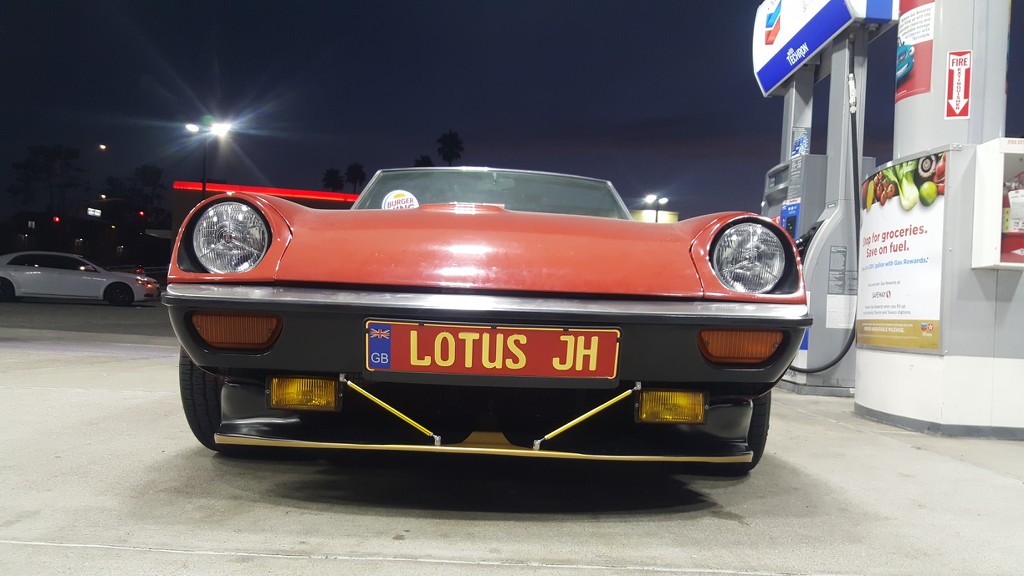 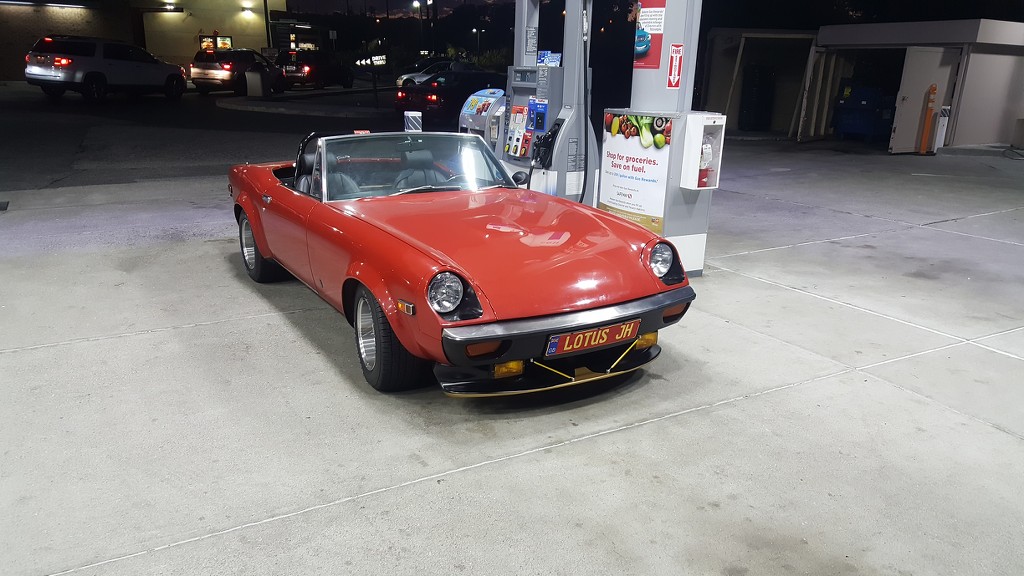 |
|||||||||
|
discogodfather Member
|
After a good wash and a polish. Went over the paint with a dual orbital and then waxed it. Used McQwires swirl X, did a decent job. 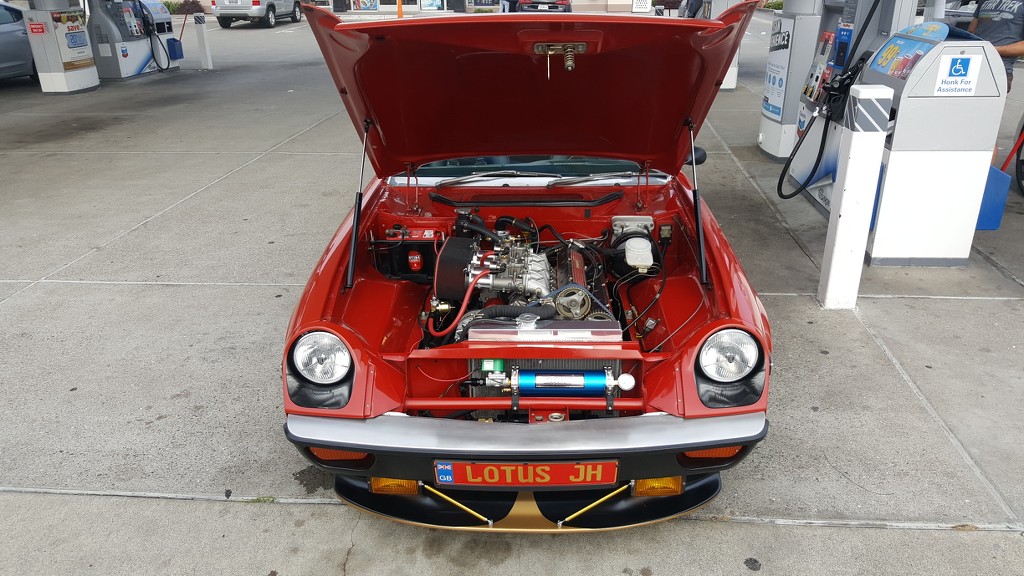 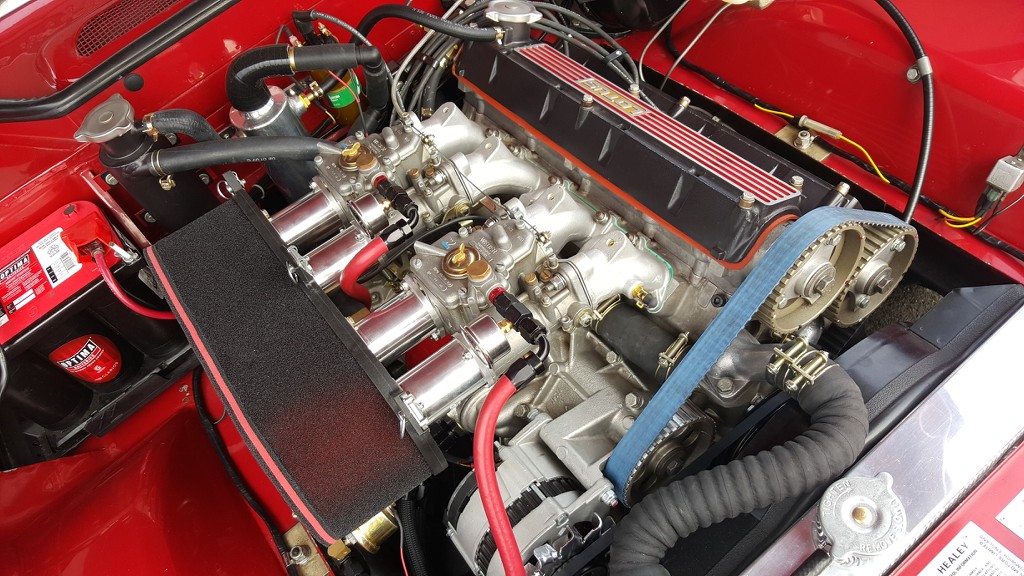 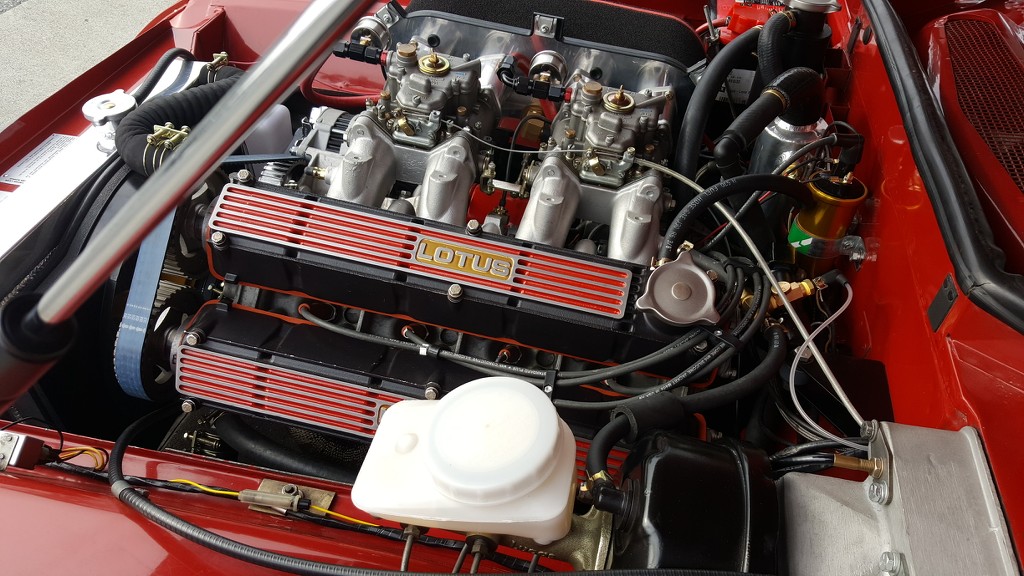  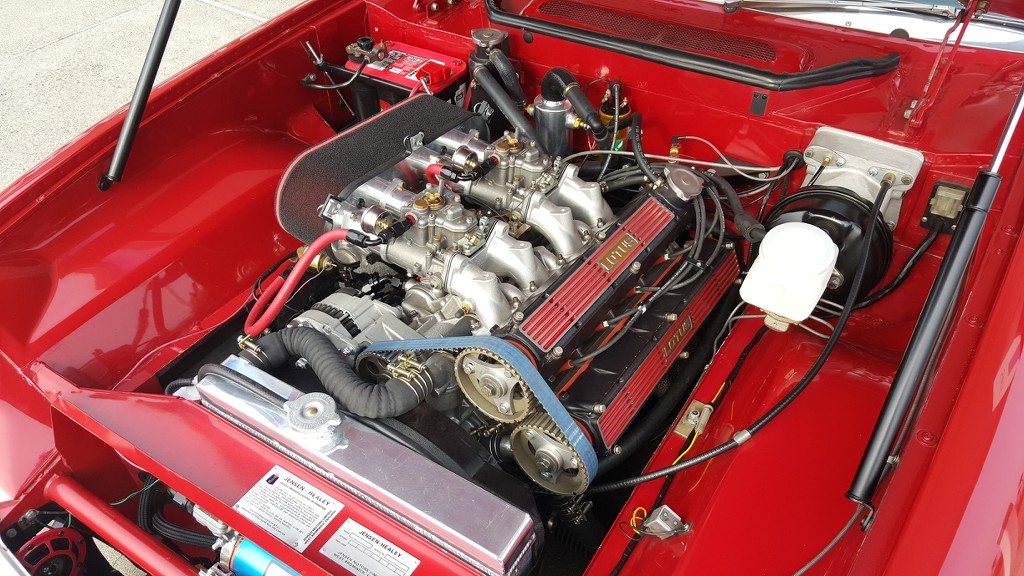 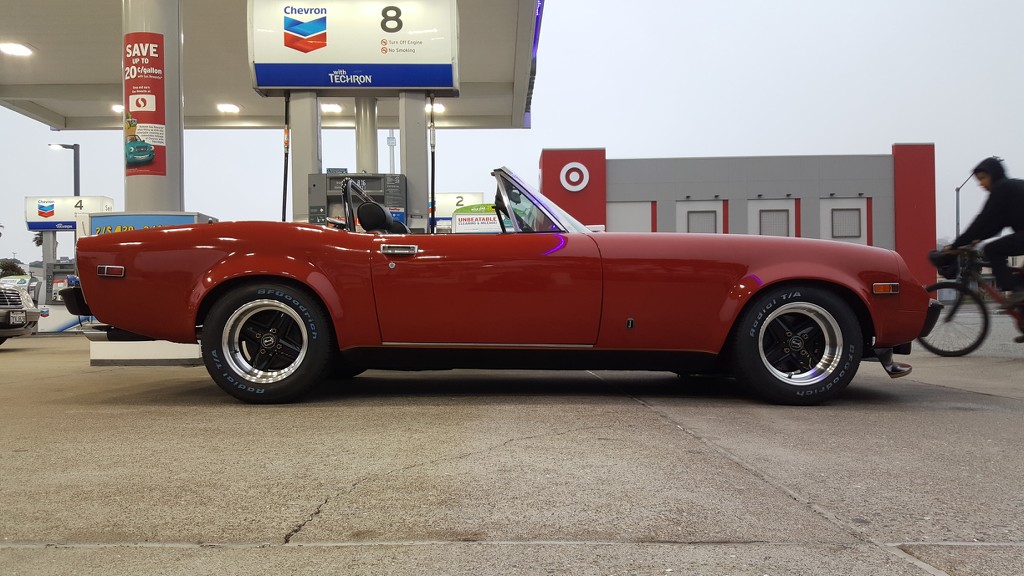  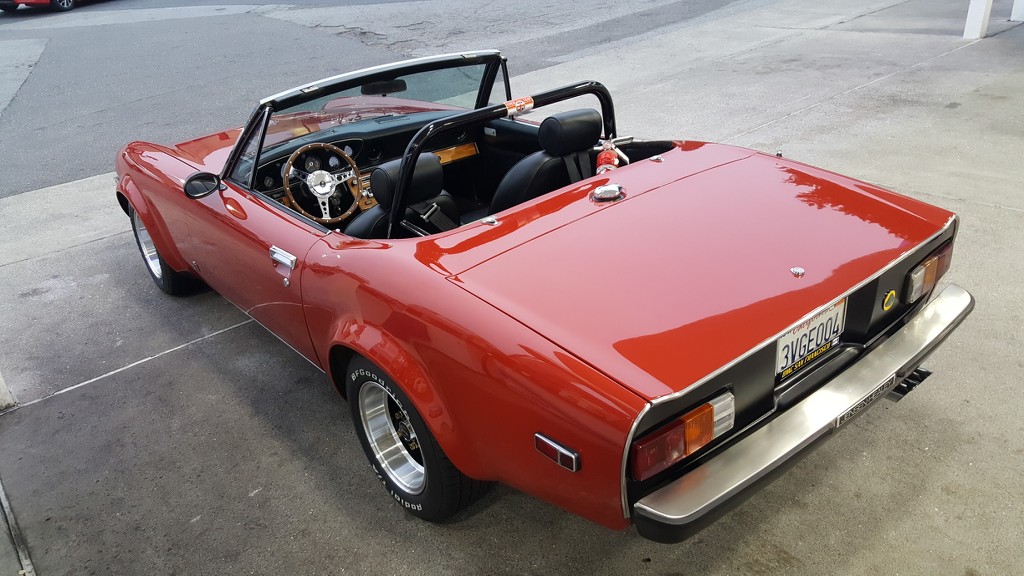 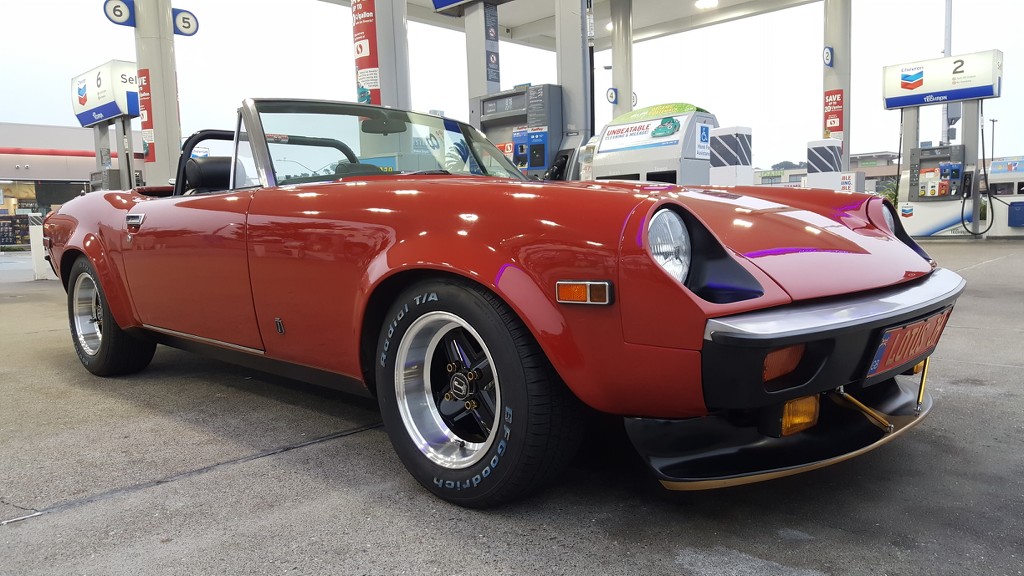 Last edited on 09-22-2020 04:11 am by discogodfather |
|||||||||
|
noomg Member
|
You sure spend a lot of time at that gas station. |
|||||||||