| Moderated by: Greg Fletcher | ||
| Author | Post | |||||||||
|---|---|---|---|---|---|---|---|---|---|---|
|
NigelK Member
|
Dear Forum Users After 8 months of ownership, expenses incurred on parts and labour well in excess of the original purchase price, countless trips to the local auto parts store, 100s of hours Googling how to resolve various technical mysteries, the achievement of under-dash body contortions I did not think were bio-mechanically possible, and the asking of innumerable naive questions posted here and on the JOC forum, I have finally achieved nirvana. Yes, everything (and I mean everything) on my GT works. And it doesn't leak. OK, admittedly the PO had done all the hard mechanical and bodywork yards. My role was, by comparison, going through the punch list and remedying defects. But this is not to say it was not time-consuming. The process has been frustrating at times, but I have learned a great deal. Enormous thanks are due to all of you who have provided invaluable help and advice over the JHPS Forum. I hope my more naive questions have not been too irritating and that, by sharing my experiences (and mistakes) I have given something back. I feel lucky to be part of the Jensen owners' community. It is great. The question now is what to do next? Get out and enjoy the car is at the top of the list. I shall perhaps also perform some sort of rain dance / chant mantras to keep the Lucas Prince of Darkness away. Oh, and then there's the 2.2 litre conversion next month... Photos and more details on works completed to follow... Best wishes, Nigel |
|||||||||
|
NigelK Member
|
Here's a list of major works actually done: Exterior • Front and rear window weatherstrips replaced • Door seals, secondary seals and hinge seals replaced. B pillar seals replaced • Tailgate hatch and tailgate seals replaced. Tailgate glass refitted and resealed • Windscreen refitted and resealed, header seal replaced • Front wing GT badges refurbished and installed. Rear valance Jensen badge installed • Replica Carello front indicator repeaters installed • Tex wing mirrors fitted • Factory fit 185/70 R13 tyres fitted Interior • Factory fit steering wheel refurbished and installed • Tailgate lift struts replaced. Tailgate hinges refurbished. Rear screen demister grid replaced, correct switch fitted • Rear screen washer bottle / pump replaced • Javelin radio/cassette player converted to AM/FM/MP3 player and internal antenna installed • Heater core flushed, blower motor circuitry repaired, correct fan boost switch fitted • Kienzle clock refurbished • Air vent and clock surrounds repainted silver • Rear window weatherstrips replaced • Courtesy light circuitry repaired Under the Bonnet • Timing belt, distributor cap, spark plug leads and plugs replaced • Accuspark points replacement unit and high performance coil fitted • Radiator re-cored and refurbished, hoses replaced • DHLA40E carburettors rebuilt, engine tuned • Replica Lucas 9H high and low note horns fitted Other Mechanical • Spax adjustable shock absorbers fitted front and rear • Front coil springs replaced, n/s front coil spring packer removed • Rear suspension bushes replaced |
|||||||||
|
NigelK Member
|
The works list excludes a lot of cleaning and degreasing, especially the interior and under the bonnet.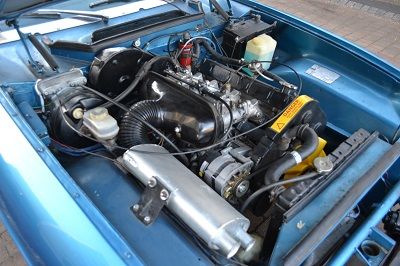 Last edited on 08-08-2015 05:37 pm by NigelK |
|||||||||
|
NigelK Member
|
I think the GT looks best from this angle. Note the (waterproof) seal around the tailgate.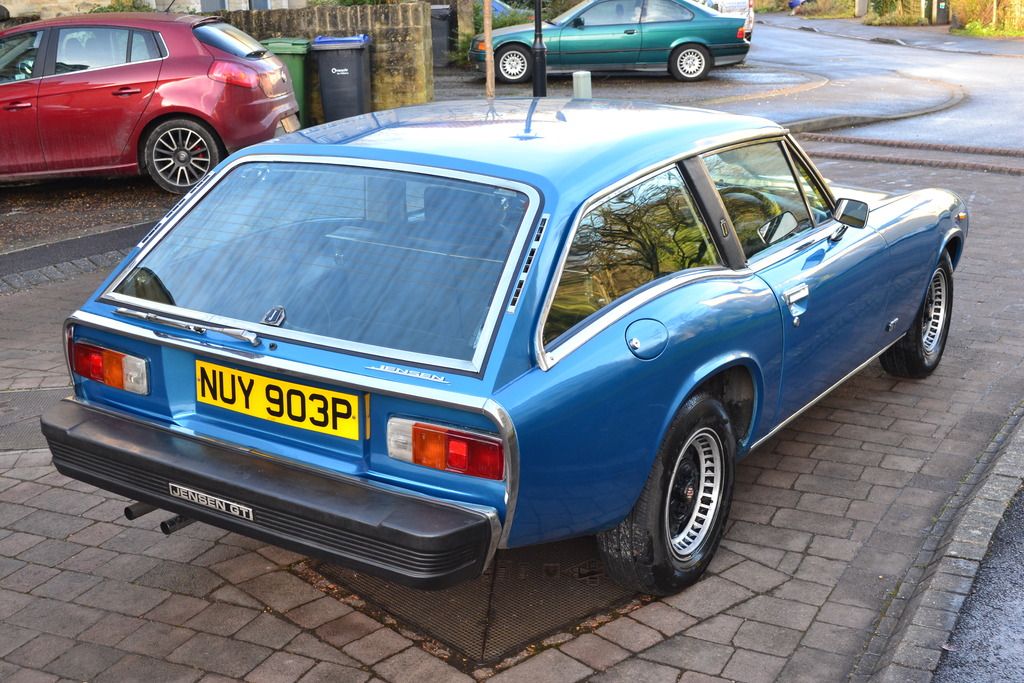 Last edited on 08-08-2015 05:37 pm by NigelK |
|||||||||
|
NigelK Member
|
The seat corduroy looks better here than it really is, and the driver's seat foam is nearly shot. Once I've found the right fabric, the seats will be sent for re-upholstery. Does anyone know of a source in the US of the correct fabric (3.5 wale beige corduory)?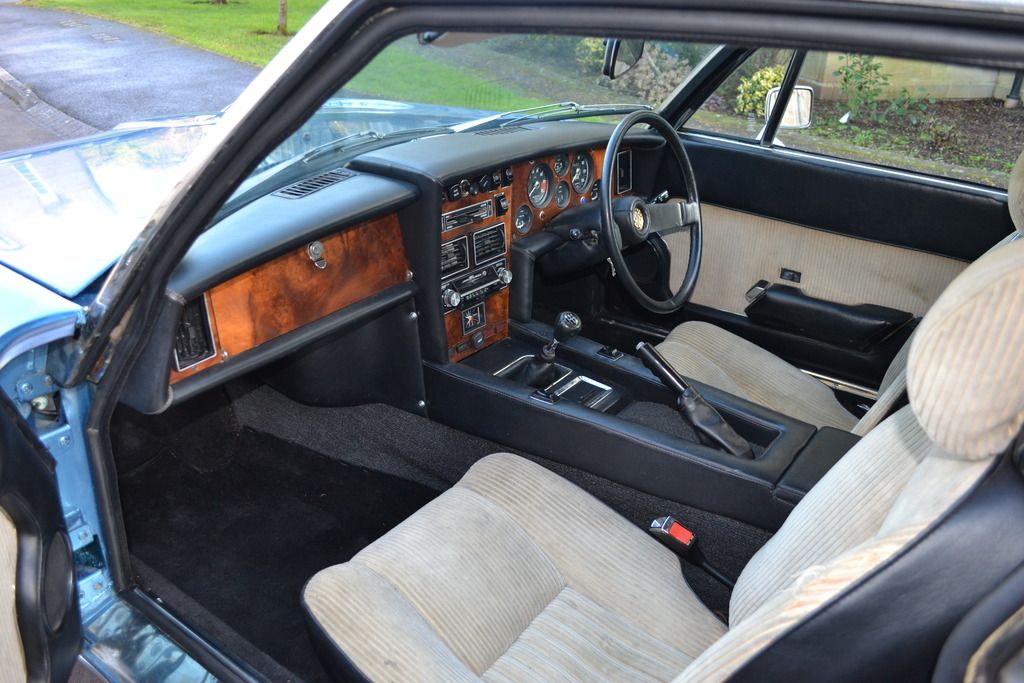 Last edited on 08-08-2015 05:38 pm by NigelK |
|||||||||
|
NigelK Member
|
When I bought the car it had Lucas square 8 driving lamps fitted. I removed them, as they weren't wired correctly and kept blowing the headlight fuse. The headlight surrounds are cracked and need to be repaired, I'll also get the inner surfaces painted satin black, and improve the fit of the front wing beneath the surround.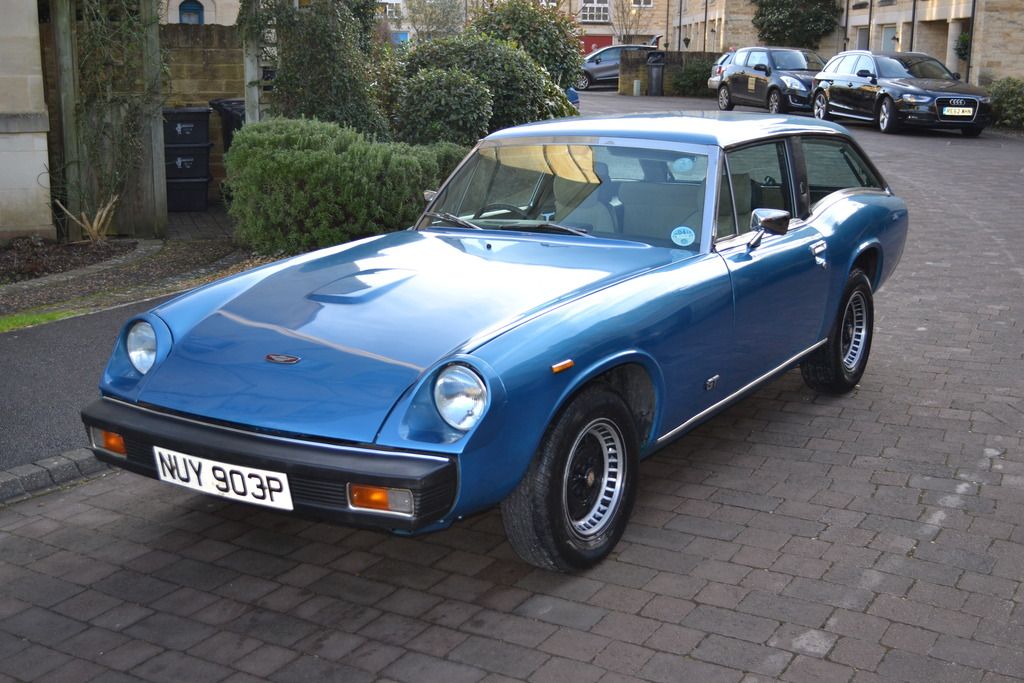 Last edited on 08-08-2015 05:38 pm by NigelK |
|||||||||
|
NigelK Member
|
I replaced the front coil springs and removing a packer which was fitted to the passenger's side front coil spring only. This was apparently done at the factory, but no one has been able to explain why! Replacing the front coil springs has improved the car's previously noticeable lean to the driver's side. It's not perfect now, but it is a lot better than it was. Maybe replacing the rear coil springs will do the trick - then the whole suspension will be new. Last edited on 08-08-2015 05:39 pm by NigelK |
|||||||||
|
NigelK Member
|
I don't like the way the wheels have been painted, and will get them properly refurbished to the original factory appearance in the Spring. I will install the black/chrome body side molding in 2016 after I've had the car resprayed. The current paint job looks OK from a distance, but close up it is pretty horrible with lots of micro-blistering and a few runs. The eagle-eyed among you will have noticed the lack of a spare wheel under the car - I managed to find an original but very rotten spare wheel carrier and yesterday delivered it to my local welding shop for repair / fabrication of an identical replacement.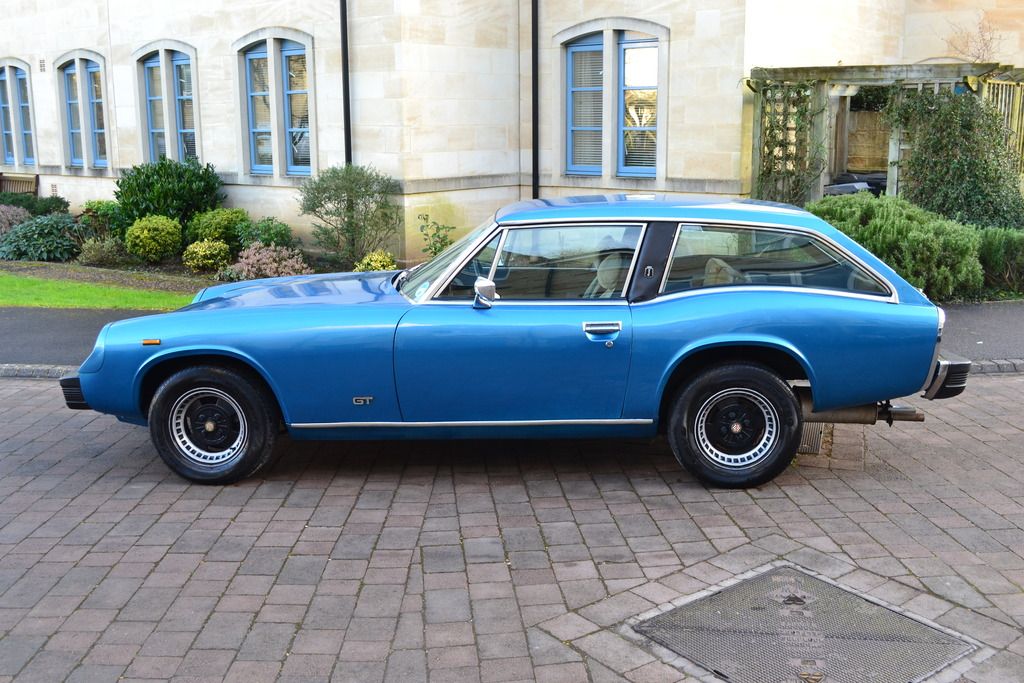 Last edited on 08-08-2015 05:39 pm by NigelK |
|||||||||
|
Screenplay Member
|
Your GT looks great. Congrats on getting it in such roadworthy condition. Last edited on 01-30-2015 02:21 pm by Screenplay |
|||||||||
|
Art DeKneef Member
|
Raises a glass (beverage of choice) to your accomplishment. I know it feels good. |
|||||||||
|
gmgiltd Member
|
Looks Good Nigel, Rejen should be able to match the cord but I believe the OEM material is NLA. Surprised to see that the radiator is like the original JH and not the cross flow type which I thought was fitted to GTs and the last Healey's. Would suggest also that you get your fabricator to gusset the area where the tubes cross under the spare wheel - this is where the assembly tends to crack after a while. Congratulations are definitely in order and hope you enjoy running the car - once the salt is off the roads and the horizontal rain, sleet and snow subside. Gordon |
|||||||||
|
NigelK Member
|
Hi Gordon Nice to hear from you. Jason has some of the original corduroy material, but it's dark blue. Depending on whether I can find the correct fabric at Goldhawk Road in London (the place to find rare fabrics in the UK), I might ask Jason to bleach the dark blue fabric and re-dye it to the correct beige colour. Assuming this is possible with 40 year old fabric... I think some of the early GTs were fitted with the downflow radiator from the 4-speed Healeys. Certainly the GT parts book refers to both the crossflow and downflow types. It does mean I have the conventional Healey fan, rather than the more troublesome viscous coupling fan, which is probably an advantage on the basis of simplicity alone. Good idea re gusseting the spare wheel carrier where the tubes cross. This is exactly the place where the specimen I got from Jason had rotted. Best wishes, Nigel |
|||||||||
|
gmgiltd Member
|
Hi Nigel, Mine came with the cross flow radiator and the standard yellow plastic fan originally. The first time the water pump went at about 20,000 miles, I replaced it with a Kenlow thermostatic fan on the advice of the local Lotus dealer and had no issues since. Gordon |
|||||||||
|
chrisl Member
|
Great work Nigel, car looks mint. I wouldn't bother with repainting - unless you win Lotto! Interestingly to note that a number of the problems you identified were the same on my car (30305) - such as the lean to the drivers side and the interior light circuit. I ended up replacing both the dampeners (shock absorbers) and the springs. There was a short in the wiring in the headlining (which has annoyingly returned). Take it out and drive it for a while before you do any more, you've earned the right! |
|||||||||
|
NigelK Member
|
Thanks Chris. I think the TV advert for the lottery mentions something along the lines of "play makes winning possible"? So I'd better start buying tickets... I notice it's over 35 degrees in Perth at the moment. Did you ever get the heater doova to work, so you don't broil in the cabin? Or are you concentrating on your Mk 1 Healey? It's snowing here in the UK, and I have a long drive next Friday to Lotusbits for the 2.2l conversion. So I'm very glad my heater finally works! Best wishes, Nigel |
|||||||||
|
chrisl Member
|
Hi Nigel Apols for the delay in replying, I managed to fall through a pergola we were re-roofing a couple of weeks ago and busted a couple of ribs. It only hurts when I laugh. I wired the heater inlet valve on the GT shut as a temporary measure. Even on the hottest days here the car copes fine with the heat, I conk out before the car does. I'll get it sorted one day but it doesn't get super cold here anyway even mid winter. Snow?? Eeek Fixing the J-H has stalled due to a lack of time, money and motivation. With 4 rugrats, the missus back at uni and my own business to run the poor old thing doesn't get a look in. Too many toys I think. Only 38C today. |
|||||||||
|
NigelK Member
|
Hi Chris Ouch, that must hurt a lot. I can see the attraction, given busted ribs and 38 degree temperatures, of putting your feet up and cracking open a stubby. As opposed to adopting contorsional poses under the dash or bonnet of a Jensen. Hope the ribs mend soon! Best wishes, Nigel |
|||||||||
|
NigelK Member
|
I have returned to the "nearly everything works on my Jensen" category. Dang... On the way to LotusBits this morning for installation of a 907/912HC hybrid engine and big bore exhaust system, the front washer pump seized and the passenger's side electric window stuck open an inch from the top. I managed to fix the latter (and will apply teflon spray to the window channels in due course), but I'll need a new washer bottle and pump. Incidentally, the Tudor brand bottle fitted to the Lotus Elite/Eclat is exactly the same shape as the square Tudor bottles fitted to the GT, although the Lotus type doesn't have the integral pump. I'll post pictures and bhp/torque curves from the engine upgrade as and when I receive them... |
|||||||||
|
NigelK Member
|
Here's the bhp/torque curve from the pre-engine upgrade dyno run. The dashed lines show what the engine would have originally done. The upgrade to 907/912 HC hybrid should make quite a difference - an extra 60 peak bhp and 45 lb.ft of torque at 5000rpm.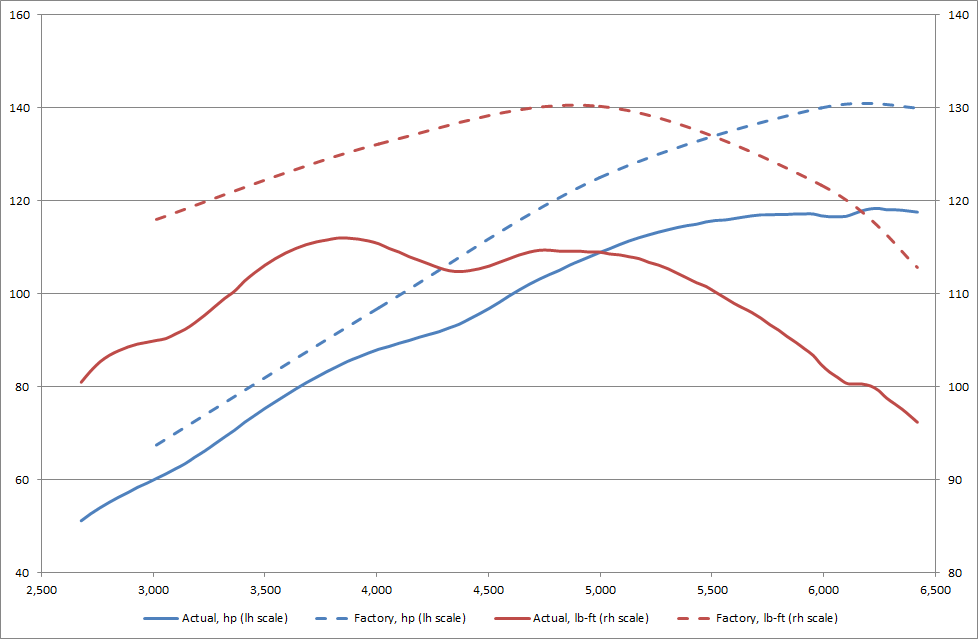 Last edited on 08-08-2015 05:40 pm by NigelK |
|||||||||
|
NigelK Member
|
Progress with the engine upgrade has been slower than expected, largely because the powder coaters took ages to redo the cam covers. Still, the engine arrived back at LotusBits last Thursday and looks very clean (see pictures), and will look even better once the carbs (Dellorto 45s with the power jets) and other ancillaries have been fitted.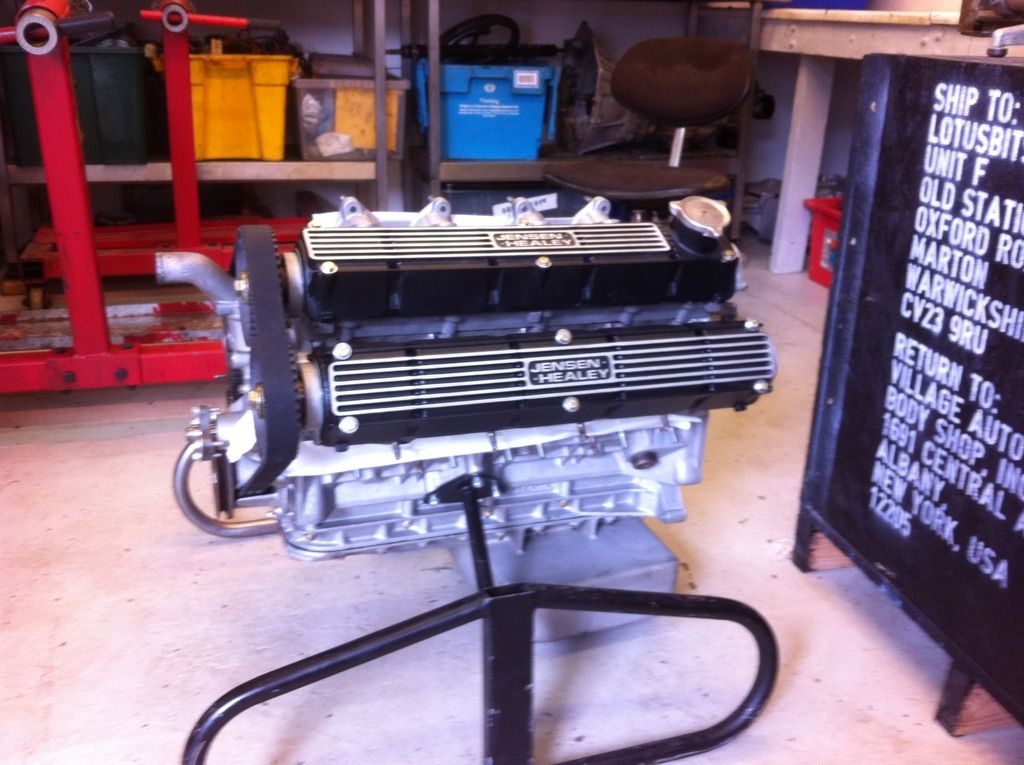 Last edited on 08-08-2015 05:41 pm by NigelK |
|||||||||
|
NigelK Member
|
I finally surrendered to the inevitable and had the Getrag 235/5 removed in favour of a Toyota W58 gearbox from a Lotus Excel. What made the decision for me in the end was the damage to the Getrag input shaft which LotusBits discovered - caused by an incorrectly installed clutch cover. I've had a bespoke leather gear knob made up with the Jensen GT badge, to replace the old one which has the wrong shift pattern it. LotusBits should be cracking on with the W58 installation next week - they'll need to convert it to cable clutch actuation, and fabricate a new gearbox mounting, gear lever extension and propshaft.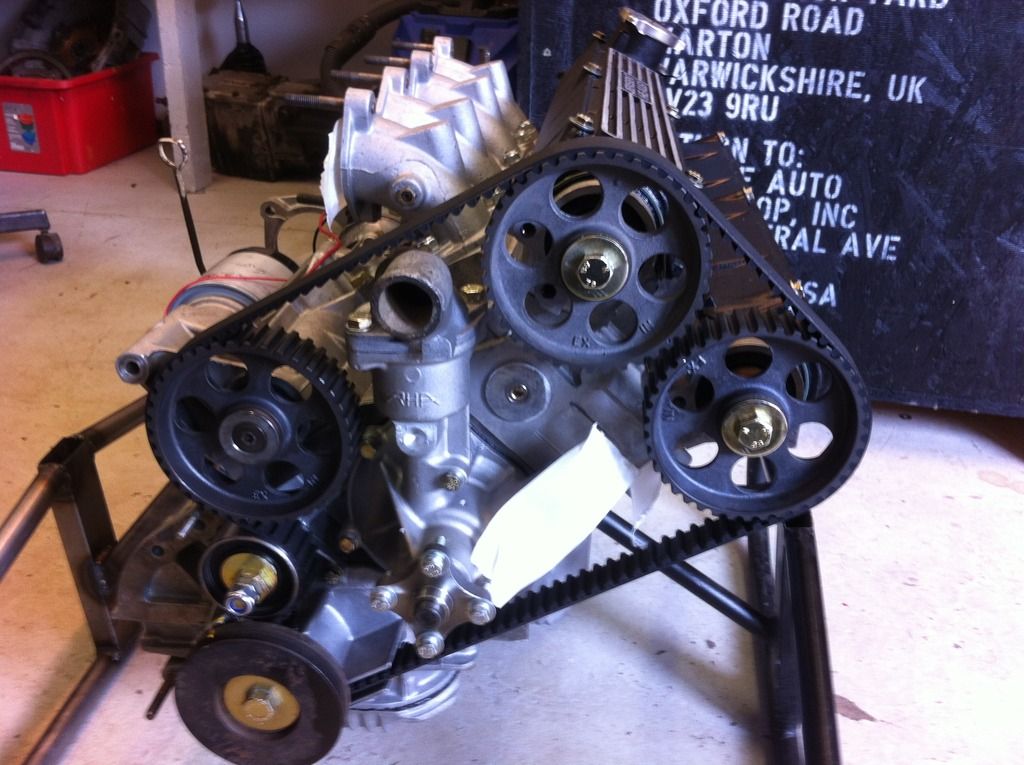 Last edited on 08-08-2015 05:34 pm by NigelK |
|||||||||
|
NigelK Member
|
I'm not yet sure whether the factory fit 3.45:1 cwp diff will be too tall for the W58 gearbox (which is generally taller geared than the Getrag) notwithstanding there'll be more engine torque post upgrade. Different people have different views here, and I reckon it depends whether one's priority is off-the-line performance or quieter motorway cruising. I won't be able to decide until I've got the GT back and lived with it for a while, but as an insurance policy I've just bought a low mileage 3.73:1 cwp axle off a Healey and am cleaning it up, and learning about half shafts and Lockheed drum brakes in the process. So I'll be able to swap out the axle if I want more acceleration off the line.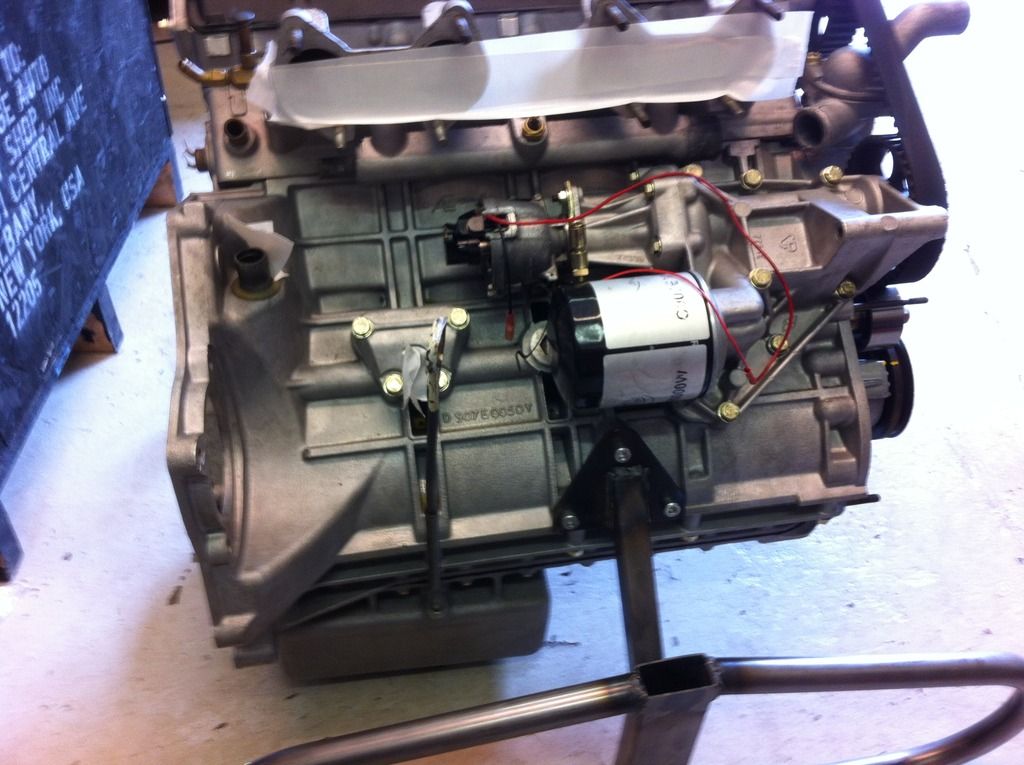 Last edited on 08-08-2015 05:34 pm by NigelK |
|||||||||
|
NigelK Member
|
Nearly finished! I visited LotusBits this morning, and they reckon they're about 2 weeks away from completing the engine rebuild, which has turned into an engine rebuild / gearbox upgrade / major chassis repair job. The rebuilt 907/912HC hybrid is back in the car, the gearbox is installed with the custom gearbox mounting and shifter, the o/s rearmost sub-frame mounting in the chassis rail has been repaired and all the sub-frame / chassis bushings replaced so the car doesn't lean to one side anymore, and the big bore exhaust is trial-fitted.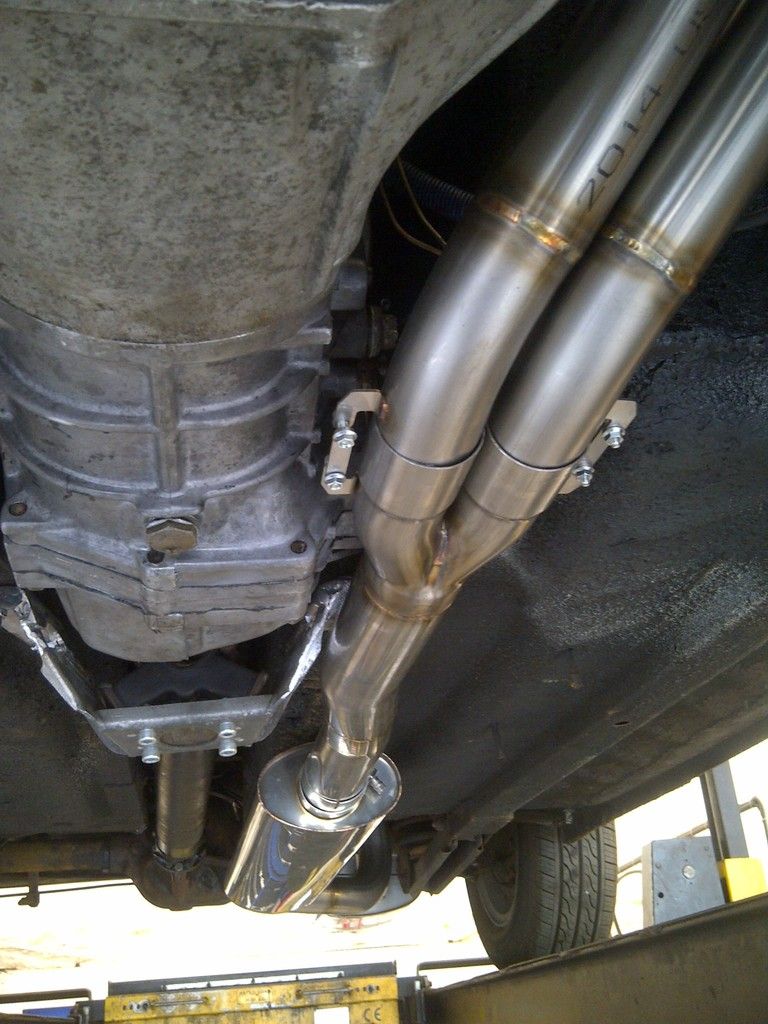 Last edited on 08-08-2015 05:33 pm by NigelK |
|||||||||
|
NigelK Member
|
Mike Taylor and his team have also had to replace the oil cooler which was shot and would have distributed metal particles around my newly rebuilt engine, and discovered that the original engine had 3x Lotus 9.5:1 CR pistons, and 1x JH 8.0:1 piston fitted. I was wondering why the compression readings from one cylinder were a little low. They've also replaced the engine mountings, one of which was held together with silicone sealant. This, together with the incorrectly attached clutch plate which had destroyed the spigot bearing and damaged the gearbox input shaft, which was discovered when the engine and gearbox were first pulled at the start of the job, makes me relieved I decided to get all these major works done before putting some serious miles on the car.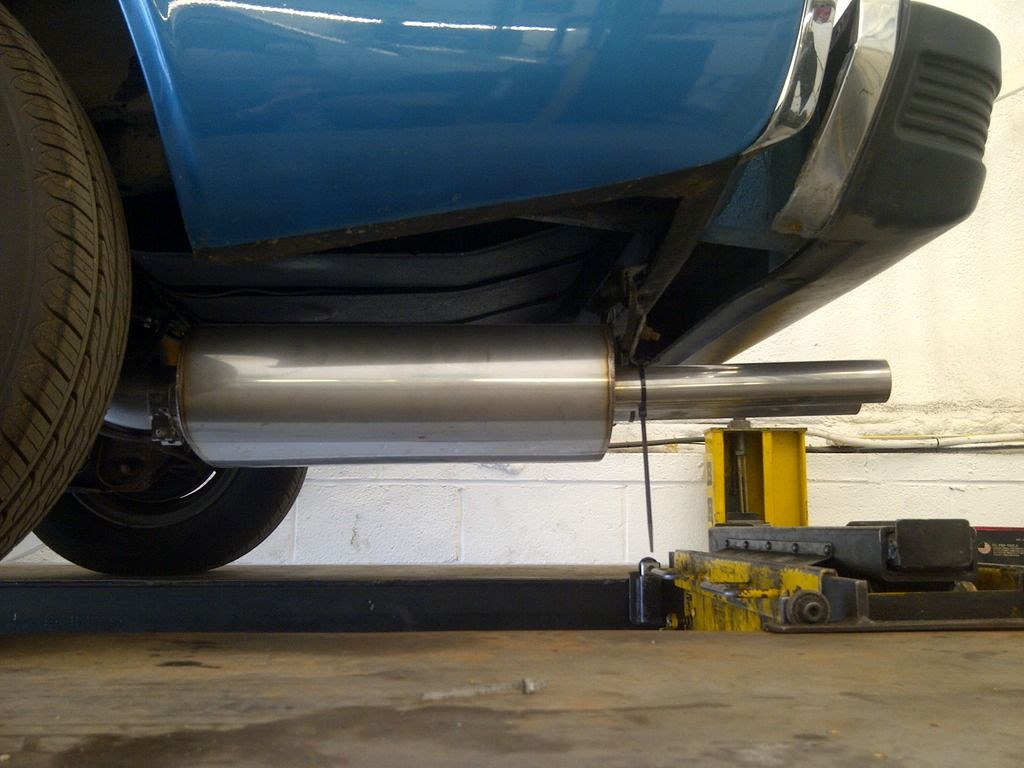 Last edited on 08-08-2015 05:32 pm by NigelK |
|||||||||
|
NigelK Member
|
I am particularly pleased with the new exhaust - it is custom made by LotusBits for the Lotus Excel (http://lotusbits.blogspot.co.uk/2010/11 ... steel.html) but they've also fabricated a version for the Jensen Healey / GT with two boxes (together longer than the original three boxes, so hopefully quieter), which looks pretty much identical from the rear of the car, but looks the absolute bee's knees from underneath, as you can see from the pictures...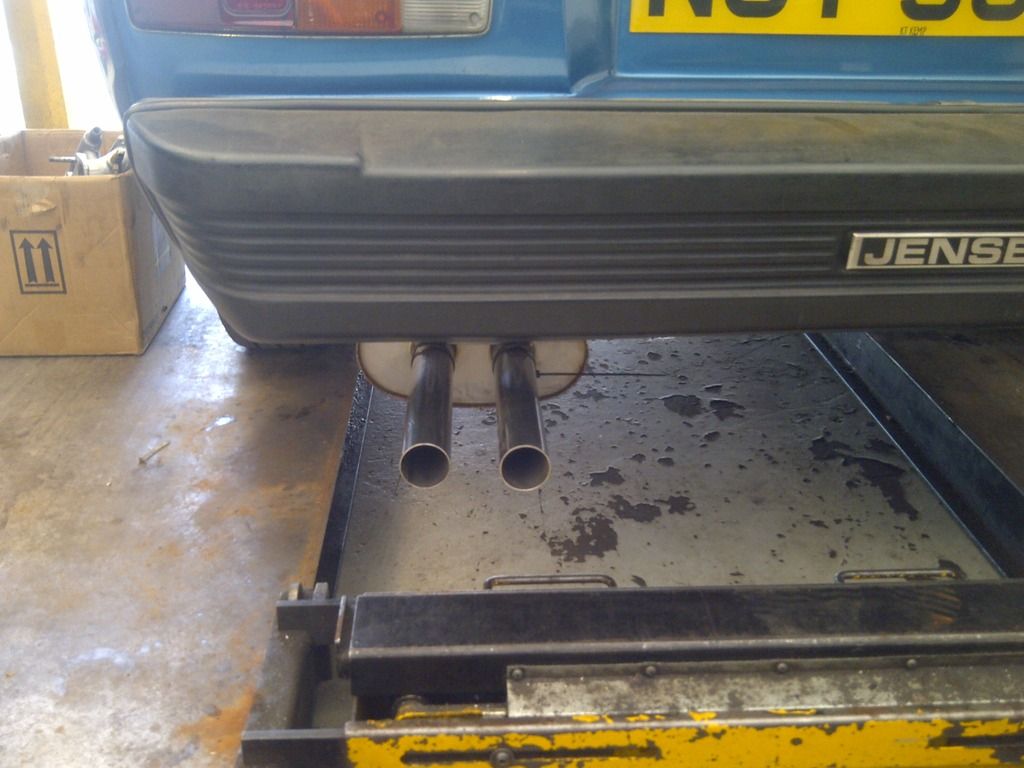 Last edited on 08-08-2015 05:31 pm by NigelK |
|||||||||
|
Michael Fishelson Member
|
Looks lovely, I was thinking of an internal antenna for my car as well. Does yours work well and if so what is the make of the unit? Thanks for your help, Michael |
|||||||||
|
NigelK Member
|
Hi Michael I used one of these - http://www.retrosound.com/product-p/1950-54-hpa1.htm Despite the manufacturer claims that it works "almost anywhere", it did not provide good radio reception when I installed it under the dash. Possibly too much EM interference from the old electrical components under the bonnet. It worked much better when I reinstalled it on the rear inner wing behind the vinyl trim, and ran the cable along the side of the sill under the foot well carpet. The reception is still not 100%, but it's good enough (for what is quite a noisy car), and they are phasing out FM radio here in the UK anyway, so as from next year it'll be MP3 only... Hope this helps. Best wishes, Nigel |
|||||||||
|
NigelK Member
|
Dear All I've just got my GT back from Lotusbits with the latest (and definitely final) engine upgrades. Upgrades as follows - i) gas-flowed CNC ported head with new valve guides and valve seats cut to fit Lotusbits oversized waisted valves, ii) Kent L14 cams inlet and exhaust (similar to Lotus 104 cams), iii) skimmed and matched inlet manifold, iv) Lotus spec 10 ignition system (Lucas 45DM4 distributor / AB14 remote amplifer and coil) replaced with mapped ignition system (crankshaft mounted trigger, DTA S40 Pro ECU with throttle position and temperature sensors, plus coil pack). Troy at Northampton Motorsport, with help from Dave from Lotusbits, then set the car up on the rolling road with tweaks to the ignition and some leaner main jets. The chart shows engine hp, engine torque and lambda before (dotted lines) and after (solid lines) the upgrades. Peak hp has increased substantially from 183.6hp at 6,850rpm to 204.8hp at 7,050 rpm. Peak torque has increased marginally from 167.1lb-ft at 5,000rpm to 171.5lb-ft between 4,900-5,700rpm. Both power and torque are generally lower below 4,500rpm, as would be expected with more airflow in the head and different cams. There is still a significant power and torque dip on the dyno plot, albeit at 200-300rpm higher than before. The lambda figures would suggest this could be an over-fuelling issue, certainly the dip was more pronounced before Troy fitted leaner main jets. There is probably little more I can do to fix this dip, short of going full EFI which I do not want to do. And in any case, I do not notice the dip in everyday driving. In fact there is noticeably increased tractability at lower revs with the mapped ignition. There is a pronounced boost in power and torque at 3,000rpm, although nothing too raucous. However the car now really takes off at 5,000rpm making overtaking a breeze with the large bore exhaust emanating a lovely 4-cylinder snarl. Lots of fun! Best wishes, Nigel Attachment: Dyno results 250718a.jpg (Downloaded 121 times) |
|||||||||
|
jpalmer200 Member
|
Hi Nigel I've just started a GT restoration. Are you able to advise what you did about the seats in the end? Jim P |
|||||||||
|
NigelK Member
|
Hi Jim Yes I managed to get replacement corduroy fabric from SMS auto fabrics in Oregon. Rejen (just up the road from you near Winchester) used the fabric to retrim and replaced the foam too. Am very happy with the results. Best wishes, Nigel |
|||||||||
|
NigelK Member
|
http://www.jensenhealey.com/forums/view_topic.php?id=2369&forum_id=11 |
|||||||||
|
jpalmer200 Member
|
Thanks Nigel - missed the follow on bit - thanks for the pointer. I’m just at the enthusiastic dismantling stage, so any encouragement that there’s an end in sight is really good news!! Jim P |
|||||||||
|
jpalmer200 Member
|
Hi Nigel How did you split the hatchback frame to replace the seal? Jim P |
|||||||||
|
NigelK Member
|
Hi Jim You mean the seal that runs around the edge of the hatch? That’s just two pieces of T-section piece of rubber seal, one which runs along the bottom of the hatch and another longer piece which runs around the rest of the hatch, with mitred joins. The seal slides into a channel in the hatch frame. You cut small notches in it to make it fit better around the curved corners of the hatch. The original seal is NLA but I found a workable replacement which seals better. I’ll look up the reference number tomorrow when I have access to my PC. Best wishes, Nigel Last edited on 12-10-2018 08:54 pm by NigelK |
|||||||||
|
NigelK Member
|
Hi Jim Here is a cross-section showing how I made the hatch on my GT watertight. I used two pieces of a Woolies seal (reference R679) around the hatch itself, plus a new hatch aperture seal from Robeys (Jensen part 98391) glued into place and with additional black silicone sealant applied around the outer edge. Hope this helps. Best wishes, Nigel Attachment: Tailgate cross section.jpg (Downloaded 64 times) |
|||||||||