> Jensen Healey & Jensen GT Tech > Projects > New Restoration Project Started - 13046 - Riverside, CA |
> Jensen Healey & Jensen GT Tech > Projects > New Restoration Project Started - 13046 - Riverside, CA |
| Moderated by: Greg Fletcher | ||
| Author | Post | |||||||||
|---|---|---|---|---|---|---|---|---|---|---|
|
Randallclary@icloud.com Member
|
I purchased my JH in October 2013 then retiring after 40+ years working for GE and Siemens. I have been following the tech forum and really appreciate the way everyone tries to help each other with solving problems that come up with the Jensen Healey. I plan on the following: Engine Rebuild with a 2.2 stroker crank and Delorto Carbs and 10.5:1 compression pistons and a rebuilt ported head. Have all the parts and most machining complete for the engine rebuild. I plan on going thru the transmission and making sure that it is in good condition. Have stripped the body down for a complete paint job for the engine compartment and the complete exterior of the body. Have repaired small rust issues behind the driver side door and under the battery box. I will modify the back of the car to drive without bumpers. Going with a Lexus color "Silver Lining Metallic" with a clear coat finish. The engine compartment will be mostly that color. Interior with reupholstered seats in a maroon leatherette. Dash and side panels to match with black floor carpeting in the passenger and trunk. I purchased a soda blaster from Harbor Freight and used it with a good sized air compressor and removed most all the exterior and engine compartment paint myself. My body shop owner was very appreciative and we are working well together. The car is at the body shop in Lancaster, CA being repaired and painted by Mike Hewitt. I will post pictures of the process on this thread for anyone to view and comment. Attachment: WP_20140828_009.jpg (Downloaded 527 times) Last edited on 09-16-2014 02:57 pm by Randallclary@icloud.com |
|||||||||
|
Dakota123 Member
|
Looks like its going to be a great build! Please do keep us posted. I, for one, need a little motivation once in a while! |
|||||||||
|
Randallclary@icloud.com Member
|
Another pic Attachment: WP_20140908_003-1.jpg (Downloaded 473 times) Last edited on 09-09-2014 06:29 am by Randallclary@icloud.com |
|||||||||
|
Randallclary@icloud.com Member
|
Here is the latest photo from the body shop and the owner Mike Hewitt sent me the photo after he painted the body. The color is a Lexus color "Silver Lining Metallic". Still need to paint the trunk lid and bonnet exterior. Paint will be buffed out and clear coat applied. I'm very happy with the progress so far. Should get the car back late next week. Attachment: WP_20140908_002-1.jpg (Downloaded 471 times) Last edited on 09-09-2014 06:31 am by Randallclary@icloud.com |
|||||||||
|
Randallclary@icloud.com Member
|
As part of my restoration project, I was going to have the dash restored. Not sure whether to use a So Cal source that recovers old dash and hard interior pieces. I was looking at "Just Dashes" in Van Nuys and wanted to know if there were any other sources for this type of work. Attached is a photo of the existing old dash and the plastic aftermarket cover that was installed by the PO. |
|||||||||
|
Randallclary@icloud.com Member
|
Also how do you get the instrument panel out of the dash. The dash is already out of the car.. |
|||||||||
|
Gary Martin JH 15371 Member
|
Remove the two screws at the top of the cluster. In the center of the cluster on the back side, you will see a metal rod, about a quarter inch in diameter and a few inches long. That rod holds the cluster to the dash. If it was like my car the rod was quite rusty. Clean the rod up and oil it. Then push the rod from the back side towards the steering wheel. It is a press fit, but should come loose. |
|||||||||
|
Randallclary@icloud.com Member
|
Thanks - that makes sense. I will try it on Monday. I'm sure that will work. |
|||||||||
|
Randallclary@icloud.com Member
|
I worked great. I'm now going to see if I can restore the old dash myself. I does look possible. I will take some pics and post them right away. I will post them on my restoration page for 13046. |
|||||||||
|
Randallclary@icloud.com Member
|
Interior Painting prep - Some updated photos from the body shop. Just have the doors and hood left to be buffed out and final clear coat applied. I am having the doors and hood and trunk lid fitted prior to picking up the car and bringing it home to start the mechanical portion of the restoration. Attachment: WP_20140914_001-1.jpg (Downloaded 414 times) Last edited on 09-15-2014 06:46 am by Randallclary@icloud.com |
|||||||||
|
Randallclary@icloud.com Member
|
Body after painting - Some updated photos from the body shop. Just have the doors and hood left to be buffed out and final clear coat applied. I am having the doors and hood and trunk lid fitted prior to picking up the car and bringing it home to start the mechanical portion of the restoration. Attachment: WP_20140909_001-1.jpg (Downloaded 410 times) Last edited on 09-15-2014 06:45 am by Randallclary@icloud.com |
|||||||||
|
Randallclary@icloud.com Member
|
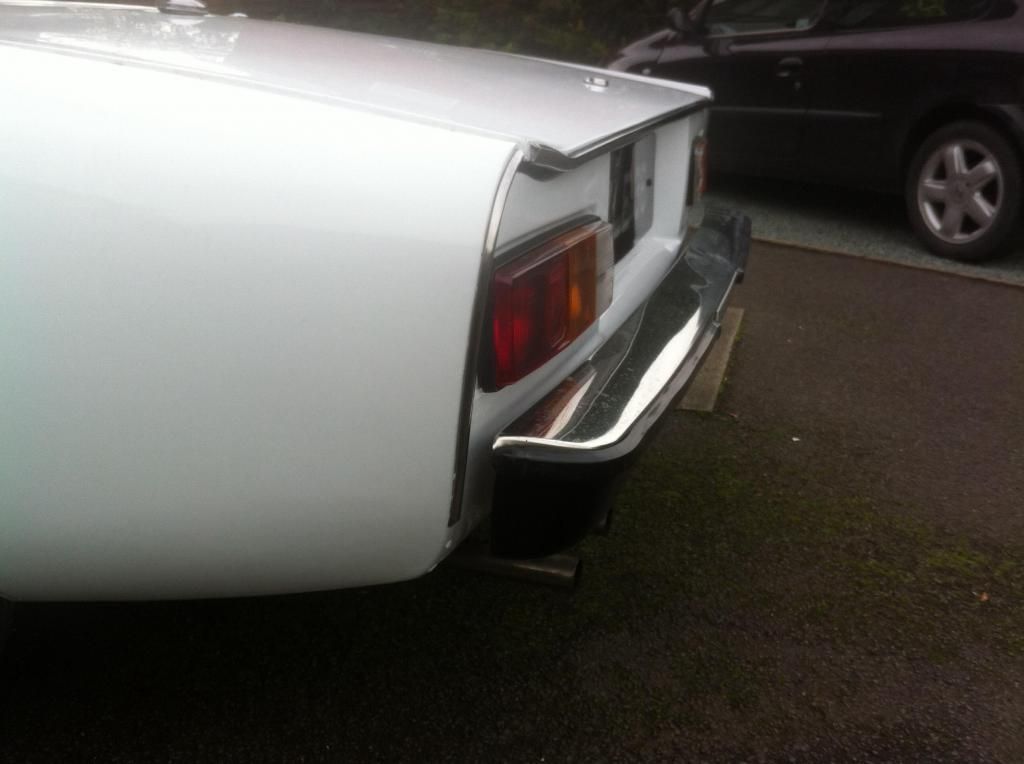
Rear of car - Note that I have had the side panel and the rear panel blended together to make a smooth transition around the corned. I will probably not mount the rear bumper and complete the rear trim down to the bottom of the edge on the rear. Some updated photos from the body shop. Just have the doors and hood left to be buffed out and final clear coat applied. I am having the doors and hood and trunk lid fitted prior to picking up the car and bringing it home to start the mechanical portion of the restoration. Attachment: WP_20140909_003-1.jpg (Downloaded 416 times) Last edited on 09-15-2014 06:45 am by Randallclary@icloud.com |
|||||||||
|
Randallclary@icloud.com Member
|
Front of car with finished engine compartment paint and black details - Some updated photos from the body shop. Just have the doors and hood left to be buffed out and final clear coat applied. I am having the doors and hood and trunk lid fitted prior to picking up the car and bringing it home to start the mechanical portion of the restoration. Attachment: WP_20140914_007-1.jpg (Downloaded 412 times) Last edited on 09-15-2014 06:45 am by Randallclary@icloud.com |
|||||||||
|
Randallclary@icloud.com Member
|
Rear of car with painted interior of trunk compartment - Some updated photos from the body shop. Just have the doors and hood left to be buffed out and final clear coat applied. I am having the doors and hood and trunk lid fitted prior to picking up the car and bringing it home to start the mechanical portion of the restoration. Attachment: WP_20140914_010-1.jpg (Downloaded 414 times) Last edited on 09-15-2014 06:44 am by Randallclary@icloud.com |
|||||||||
|
answerman Member
|
Looking nice! What are you planning on doing with the rear bumper mounting slots if you're not planning on using the bumper? |
|||||||||
|
Randallclary@icloud.com Member
|
two different possibilities: 1. Make some plastic inserts and have them painted the same silver and fit them to cover the openings. This leaves the possibility of reinstalling the restored rear bumper back on to the car if I choose later. OR 2. Leave the spare tire off the car (that's what AAA is for) and then split and route the exhaust out those openings. Maybe make a single square opening over each pair and run the exhaust out. Just thinking. Might be a great looking dual exhaust. As I stated before, if I go without the rear bumper, I will also add additional chrome strips on each side of the rear to go to the bottom of the rear sheet metal Most probable is Option 1 What do you think? Attachment: WP_20140909_003-1.jpg (Downloaded 397 times) Last edited on 09-16-2014 01:37 am by Randallclary@icloud.com |
|||||||||
|
Randallclary@icloud.com Member
|
Have also fabricated a new battery box that will be painted the same silver as the body and engine compartment. It will be removable thus allowing keeping the area under the battery shelf cleaner. I plan on using a rubber liner for the new battery and tie the battery down pretty much the same way as originally designed. If any one has some good ideas here, I would appreciate. Attached is a pic of the newly fabricated battery shelf before painting. I will forward a photo of of the painted installed shelf when completed. Attachment: WP_20140915_001-1.jpg (Downloaded 399 times) Last edited on 09-16-2014 01:26 am by Randallclary@icloud.com |
|||||||||
|
Screenplay Member
|
Nice looking project you have-that's quite a striking color and should really stand out. I look forward to updates and seeing it come together. |
|||||||||
|
Randallclary@icloud.com Member
|
Thanks, a lot of sweat equity and hard cash. Going to Mike Hewitt's tomorrow in Palmdale to do a final inspection and then pick up the car next week. It's fun keeping a record of the restoration on the JHPS Forum. Encouragement is accepted and tips and ideas are also appreciated. Attachment: WP_20140914_010-1.jpg (Downloaded 395 times) |
|||||||||
|
Randallclary@icloud.com Member
|
Went to Palmdale and inspected the car at Mike Hewitt's shop and just a couple of items still left to complete. Trunk lid needs to be buffed out and a couple of rough spots in the engine compartment need more attention. The new battery shelf needs come cosmetic work and then painted and fastened in place. It will be removable. I decided to go ahead and paint the bumpers the same color of the car (silver). I have removed the rubber trim and will reattach after I get the car back. I need to get some slight wrinkles out of the stainless top cover and use new hardware to reattach the rubber trim and stainless tops. Still plan on keeping the rear bumper off the car. I need to come up with a couple of covers for the openings left from the rear bumper brackets that were also remover. See previous photo of the rear of the car. Give me some ideas please. |
|||||||||
|
Screenplay Member
|
I have 1974 JH and still haven't decided how to tackle the rear bumper issue. If there is one area of the JH design-regardless of year-that needs new ideas it's in the area of bumpers. My project isn't as far along as yours so I haven'e been thinking about it great detail, but I do have some beliefs about design in general. I don't think it's an area of the car you would want to draw attention to (or at least you don't want to interrupt the roll of the sheet metal), so it should be discreet. Any kind of fabricated cover should be as thin as possible and likely painted to match. But even then it can looked "tacked on." I think the cleanest, simplest route is rubber grommets. I've used them in the past on small holes (removed a trunk-mounted luggage rack once) and even up high they're not too conspicuous. Finding them in this particular shape could be a challenge but they're probably out there. |
|||||||||
|
Randallclary@icloud.com Member
|
I will let you know what I finally come up with for the covers. Last edited on 09-18-2014 04:00 pm by Randallclary@icloud.com |
|||||||||
|
Jensen Healey Super Moderator 
|
The bumper delete just looks unfinished to me. The chrome finishers don't extend to the bottom of the valance and the spare tire is exposed. How about modifying the bumper brackets to pull the bumper closer to body and painting like the front? |
|||||||||
|
Randallclary@icloud.com Member
|
I plan on having the rear bumper painted the same silver as the rest of the body. I have the option of reinstalling the rear bumper back on the car if my design idea does not look good. I agree with the comment about the chrome strips and I am going to extend the strips to the bottom of the rear panel on each side so it would look complete. Thanks for the comments. Will send photos and get some opinions. |
|||||||||
|
Randallclary@icloud.com Member
|
Also regarding the spare showing, I don't plan on reinstalling the spare, I have AAA for that and I save 40 lbs of weight. I'll replace the weight with my golf clubs in the trunk. |
|||||||||
|
Jensen Healey Super Moderator
|
I do like the "add lightness" aspect of removing the bumper and spare tire and hanger. With less weight in the rear, A lighter sway bar could be used. I drove my car this summer without the spare and tool box. It definitely increased the over steer. I run the Addco rear sway bar and gas Koni shocks from an '83 Toyota Celica so it's pretty stiff. |
|||||||||
|
Rick Willard Member 
|
Great project Randall and thanks for posting the pictures to date! Have you seen the website featuring Ernie Vicencio's Rover V8 conversion? I only ask because one of the cool changes made to that particular car was the shortening the rear bumper brackets to get the bumper closer to the body of the car. It's a subtle change, but a good one. Of course...it's your car and your project. Have a great time with it and do whatever you choose. Thanks again for sharing the photos and progress! Last edited on 09-25-2014 12:05 pm by Rick Willard |
|||||||||
|
Randallclary@icloud.com Member
|
Thanks for the comments. Just got the car back from the shop a couple of days ago. I had the bumpers painted the same color as the car and they look great. I may even remount them. They look so much better than the black. I have one issue with the rubber protector strips and that is how do I either replace them or remount the old ones because I had to cut them off in order to remove. I may glue them back on. Does anyone know a source for new strips? Last edited on 09-28-2014 12:33 am by Randallclary@icloud.com |
|||||||||
|
Screenplay Member
|
I believe the rubber strips are in the Delta Motorsports catalog, listed as "finishers." I haven't seen these replacements in person but I have no reason to question their quality or appearance. |
|||||||||
|
answerman Member
|
I talked to Delta about them last year, Mike told me that they look pretty much identical to stock but that they mount differently. If I remember right it is a two piece unit where the backing channel mounts to the bumper and then the rubber strip snaps into it somehow. I decided not to mess with it till I found a perfect front bumper, since I would be putting a new strip on a not so perfect bumper otherwise. |
|||||||||
|
Randallclary@icloud.com Member
|
My bumpers are perfect except for the rubber strips. I will check with Mike at DMS and find our how much more money I can pour into the car. I will post a pic of the bumpers and strips as will as the stainless steel top ices. The rear is in good shape and the front needs a wee bit of tweaking to be good enough to put back on the car. Thanks for the source at Delta. Last edited on 09-26-2014 07:13 am by Randallclary@icloud.com |
|||||||||
|
Randallclary@icloud.com Member
|
I will attach some pics of the bumpers without the rubber and stainless trim tomorrow. Would appreciate comments. I will talk to Delta MS about the rubber trim. |
|||||||||
|
kart54 Member
|
I'll try and get a picture of mine when I have time but to me it looks like they always should have. The stainless on the trunk was kept the rest was removed and the holes filled. The edges of the fender were also slightly rounded to look better. My car is a 75 but I took the bumper from a 74, painted it to match and then shortened the mounts and sucked it right up against the body with about 3/32 of an inch to spare. Looks much better in my opinion. Kart54 |
|||||||||
|
kart54 Member
|
I should add, for the rubber around the stainless I got a piece of body trim from Pep Boys that is used to run down the center of the side of the car to prevent door dings. It was rubber with a chrome strip in the middle. Only a true Jensen Healey purest would know that that is not the way it came from the factory. Kart54 Last edited on 10-30-2014 09:16 pm by kart54 |
|||||||||
|
roland11a Member
|
Hi I also thought about leaving the rear bumper of when rebuilding my JH. In the end I decided to refit it but modify the brackets to allow the bumper to fit close up to the body work. I'm glad I did as a the bumper a tight fit to the body lookes great. |
|||||||||
|
Randallclary@icloud.com Member
|
Could you please share a photo of the car including a close up of the rear bumper. Thanks |
|||||||||
|
Randallclary@icloud.com Member
|
I would really appreciate a photo of your car that includes the bumper. I will show my car again with the bumpers off and then back on including the front bumper. If I can put them back on tomorrow, I will take the photo and post. |
|||||||||
|
roland11a Member
|
    Bumper moved closer in. I was concidering moving it closer still, but that would have involved much more modifications to the brackets. I like it like this. Last edited on 10-31-2014 09:12 pm by roland11a |
|||||||||
|
Randallclary@icloud.com Member
|
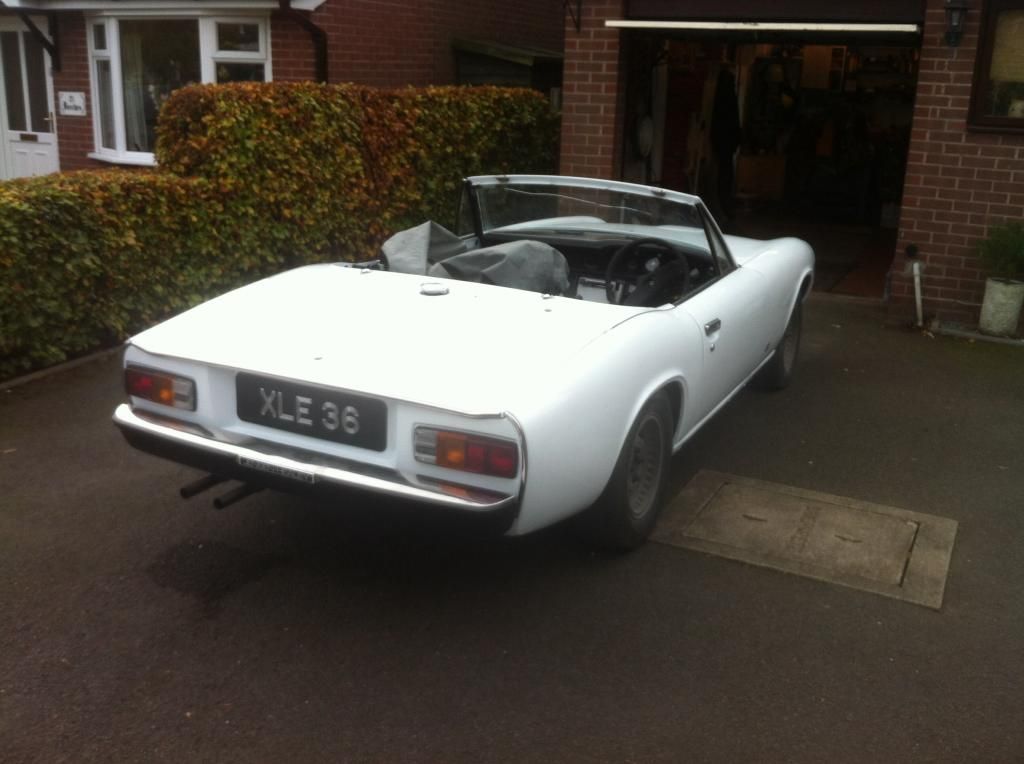
I like the way you did the bumper with it closer. Also noticed that you removed the side lights or was that standard for your car at the time of mfg. My rear bumper on 13046 is slightly wrinkled on the stainless top piece and I'm trying to find someone that can fix the damage. The bumper shell is perfect and painted silver, but the deck needs some work. Last edited on 11-01-2014 03:05 pm by Randallclary@icloud.com |
|||||||||
|
roland11a Member
|
No the lack of side lights is correct for a british spec car. They were only for the American spec I belive? |
|||||||||
|
Randallclary@icloud.com Member
|
Thanks for the info, now I know. |
|||||||||
|
Screenplay Member
|
Another option for side marker lights that looks good but still provides for nighttime visibility is to substitute 1968 Dodge/Plymouth lights (the ones that came on Chargers, Coronets, Darts, etc.). They wire up easily but do require welding or leading in the small holes that hold the stock fixture in place. I think they're effective and they're less obtrusive than the larger, stock units. |
|||||||||
|
Randallclary@icloud.com Member
|
I may go ahead and install the rear bumper closer to the body. The silver paint on both the front and rear bumpers looks great. If I can just get the rear stainless top cover restored I might go that way. I have put the front bumper back on the car and have new interior liner material purchased from Eastwood. I will post pictures in the next couple of days showing progress. Thanks to Terry Morgan and his 74 JH (Melba), I will be using his old dash from his parts car and have that recovered. I will also show some pics of the seats that came with my car from one of the PO's. If anyone recognizes the type of car it came from, it would be appreciated. The status of the engine rebuild is that we are assembling the head which was ported and upgraded at West Coast Racing Heads for the 2.2L - 10.5:1 compression heads. Will be using the old rods which are in great shape. We are in the process of coming up with the proper shim list and should have that complete in the next week or so. |
|||||||||
|
Randallclary@icloud.com Member
|
see my latest posting of the project. Looks like the rear bumper mounted closer to the car will work for me. I just need to repair the top stainless cover on the rear bumper. The front bumper top stainless cover is acceptable at the moment. I also rebuilt the heater and it turned out fairly good. I do need to test the heater core. Any suggestions as the best way to check it? Last edited on 12-02-2014 04:42 am by Randallclary@icloud.com |
|||||||||
|
Brett Gibson JH5 20497 Member
|
Block off one side, put a gauge and air fitting on the other, put a bit of air pressure in it and see if it holds pressure. Not sure what the books say's for the amount of pressure but I used 15 lbs with no issues. Or take it to a radiator shop I'm sure they would do it for you for a small fee. Brett |
|||||||||
|
Randallclary@icloud.com Member
|
Well I've been so very busy over the last year working on the car. Have completed the upgrade project on the engine and am getting ready to put it into the restored body within the next two weeks. The pics that I will post may or may not have explanations. Hopefully they will help if anyone in in the middle of an engine rebuild or restoration. This journey has been quite an experience. How about first a few pics of what I started with and then the condition of the car today. |
|||||||||
|
Randallclary@icloud.com Member
|
Went a little quicker than anticipated and put the engine and transmission back in yesterday. Initially put the transmission back in and then put the engine back in and seemed to have problems getting the transmission spline shaft to engage with the engine. Tried this for about 45 min without success and decided to take everything else out again and instead bolt the engine and transmission together as a single unit and then put that back into the car. I then put back the steering linkage thru the new 4 in 1 manifold and made the connection on both ends. This was a little tricky , but it did fit and looke to be clear thru all degrees of rotation. This went very quickly and was able to slide everything into place quite easily. Got the tail shaft of the transmission connected to the drive shaft and then the other end connected to the differential. Placed the rear transmission crossmember support and realized that the rubber support was broken so ordered a new one from Delta. Expect it in tomorrow. Then I put in the tunnel support and 2 aluminum spacers. This is where I may have a little problem. I have one split space washer on each side motor mount and with the tunnel support in, the forward universal seems to bind up against the support crossmember. Any ideas of how to line up things properly? Last edited on 12-04-2015 06:17 am by Randallclary@icloud.com |
|||||||||
|
Randallclary@icloud.com Member
|
Well today I changed tactics and decided to be a bit more aggressive in getting the clearance for the steering rod thru the headers opened up and the drive shaft more in line with the engine transmission. I opened up the holes in the transmissiom crossmember so I could move the tailshaftt of the transmission toward the passenger side. It seemed to work and all looks good for now. Now to hook up the clutch cable and confirm that the clutch works properly. Goals for tomorrow is that as well as complete the installation of the water pump and alternator. I think those will be fairly straight forward. Last edited on 12-07-2015 06:16 am by Randallclary@icloud.com |
|||||||||
|
Randallclary@icloud.com Member
|
Got the water pump, pulley, fan and alternator all mounted. Got the clutch working and the throttle cable connected. Still need to seal around the peddle housing to keep water from entering the drivers foot area. But you know it never rains in California. Got most of the radiator hoses in as well as the new Aluminum radiator. I need new hose grommets for the oil cooler lines. The lines almost seem a little short, but I will see if all hook up before getting back to Mike at Delta. He has been a lot of help over the last couple of years of this restoration. Tomorrow I am going to start on the fuel system and reinstall the fuel pump and fuel tank. I am going to reverse the feed for the Dellorttos and feed from the rear and not the front. The conversion looks pretty straightforward. My goal is to put power to the ground wheels before the end of December. Looks like it might be possible. |
|||||||||
|
Tom Bradley Member
|
Be careful putting in the oil cooler hoses. I bought a pair with the stainless steel braid from Delta recently. It was definitely a tight fit. In the process of getting them in I think I pulled too much on one of the right-angle ends that connect to the oil cooler so there was a slight oil leak that I did not notice for some time. Pushing the hose back over the metal sleeve seems to have fixed it, but I would have more confidence if it had never leaked in the first place. |
|||||||||
|
Randallclary@icloud.com Member
|
Thank you for the tips,. Today I tightened the cooler hoses on to the cooler and confirmed that I had enough slack to be able to make the connections on the oil filter. Tomorrow I plan to fill the engine and transmission with oil. I plan to first fill the cooler with oil then make up the connections at the filter. I have a new steel braided oil pressure line coming from the local Sunbeam Tiger club. Having problems finishing up the electrical work but I expect with patience and help from my friend Frank Zizzo, Lord Lucas Prince of Darkness will not prevail. Actually got the rear lights working clearing grounding issues and a failed battery replaced. Got the starter working and so we are getting close to trying to get it started and running. Most everything under the dash was a rats nest but it will get fixed. Last edited on 12-11-2015 05:01 am by Randallclary@icloud.com |
|||||||||
|
Randallclary@icloud.com Member
|
Guess what. It started the first time we fired it up. We could not believe it, but caution and the great help from my two friends Dan Walters and Frank Zizzo both of Tiger andShelby Cobra fame made it happen. We got the car runniing with the majority of problems getting the oil pump primed properly to get proper oil pressure. Had to take the timing belt off and drive the oil pump with a drill motor. Still not great pressure, so we filled the oil lines to the cooler and force fed the cooler with oil before reattaching hoses and again priming the pump. Finally got oil pressure and were comfortable enough to start the engine again and let it run for a while. Thats when we found the the cam covers leaked so we ended up taking them off again and used the paper gasket and RTV. Almost no leaks, but I will again take them off and do a super job sealin g them with the paper gasket and a lot more RTV. We will get this fixed soon. Next is to tune the Delorttos and get it running properly. I made a separate post to get info on the proper spark plugs for the 2.2 stroker crank motor with the 10.5:1 JE pistons. Would like the proper gap also. Can anyone help here. Get this behind us and can complete the interior door panels and ge the rebuilt dash and interior completed. Still ahve to put the new windshield in and then finally install the hood and complete buttoning up the car. Really getting close. My goal is to get the car road worthy and drive it to the next JH meeting about 50 miles away without the need for a tow or breaking down. That will be an accomplishment! I know that I've promised getting photos out of this rebuild, but using the JH forum is a pain. Any ideas where I could post pics for all to be able to view? Last edited on 12-25-2015 05:45 am by Randallclary@icloud.com |
|||||||||
|
Randallclary@icloud.com Member
|
New status post on progress: Interior almost complete with the exception of the door panels. Doors and windows work fairly well. Dash is complete and started to check all instruments. The tach seems to work, Oil pressure and gas gage have been fixed and are working. Voltage meter is working. Temp seems be be steady and within limits. Speedometer was pretty gummed up and needed to be freed up. Got a new cable from the Club Store and need to get it properly hooked up to the trans and get the cable turning at the speedo input. Had the dash and crush liner recovered. Looks great. The car runs like a rocket. Unbelievable the difference in torque thru the gears. I know I'll never get my investment back today except in the form of crazy acceleration. I replaced the exhaust system with the Delta 4 in 1 header and had it heat treated with a silver coating and then replaced the muffler with a single resonator (middle) and resonators (2) on the split tailpipe. Sounds great. I finally decided to get the thick rubber cam cover gaskets and that seems to have cured the oil leaks on the cam covers. I painted the cam covers to match the silver color of the car. Looks much cleaner than before. I painted the set from a spare engine and put those in to replace the cam covers that had been put in with RTV and the thinner paper gaskets. I think if I had installed those gaskets properly it would not have leaked. Lesson learned. I still have a nightmare of wires to figure out under the dash and heater controls as well as coming up with a modern sound system. Still have to fit the front lights and bumper which I'm still trying to figure out. I've added a Accusump prelube system from Summit Racing and just need to complete the plumbing from the intake of the oil filter to the accumulator of the Accusump. Still have to electrically connect the control valve to the starting circuit of the car. That seems fairly simple (i hope). I restored the Aluminum alloy wheels and they turned out fairly well. I have JH wheels but do not want to install those wheels on the car. I want to put new mirrors and would appreciate ideas for high quality great looking mirrors. I want chrome mirrors. Finally will attach the bonnet with the addition of gas struts. I got replacement springs and need to put clear covers on the restored springs. I have a 50th HS reunion coming up and want to drive the 250 miles each way in a reliable vehicle. Hopefully it will be my restored 1973 JH 13046. Last edited on 02-28-2016 04:54 am by Randallclary@icloud.com |
|||||||||
|
Screenplay Member
|
Congratulations on the progress; it sounds like you're in the home stretch. If you don't like the stock mirrors, there'e always bullet-style mirrors. Certainly it's subjective, but they have a classic, race car look and they're period correct as well. However, the ones I'd recommend aren't chrome but stainless (though they can be polished up to a mirror-like finish). I like the ones made by Tex in the UK - easily found on ebay, etc. I'm certain a search would yield chrome versions as well. I have the plans to make the gas strut conversion on the hood as well. It's been my understanding that the struts replace the springs and they are no longer needed. Perhaps I'm mistaken but I thought I'd raise the issue. Also, where did you go to recover the dash? I'm looking into that as well and could use a good recommendation. What was the cost? Clinton |
|||||||||
|
Randallclary@icloud.com Member
|
We just recovered the existing dash with new material and added double stitching along the outline of the dash as viewed from the driver's perspective. I will post a bunch of pics as soon as I get some time to do so, I think that you would be impressed. The cost should not be more than $200. It's part of the total restoration of the interior which in total is about $2000. Seats, carpeting, crush liner, carpets and mats, trunk and all trunk walls, door insides with new side panels and armrests, center counsel and shifter cover. Fairly reasonable for the amount of work done. |
|||||||||
|
Randallclary@icloud.com Member
|
Latest update. Pics still to be posted. Had noise when hitting uneven pavement and I suspected that the cover plate that protects the universal did not have enough clearance from the joint. I removed it and found out that it was rubbing. I called some other JHPS members and was told that the part was not on some of the later cars with a single piece drive shaft. I left it off and took it for a spin and no noise. The car seems real sold now. I replaced the cas tank with an aluminum one from Jorge at Jaguar specialities. I drove to Chula Vista and picked it up from his warehouse. He is closing his business after 47 years. He still has a few JH steel and aluminum gas tanks. I was fairly happy with the one that I received from him last week. Quite a bit lighter. Paid $389 for it. The old steel tank was messed up on the inside with some rust and PO had attempted to coat the interior and stuff was flaking off and getting into the fuel. My fuel filter now runs clean. Put in new seat belts found on eBay for $17.50 each. FIt very well. I did not reconnect the seat belt light circuit. Snapped my new speedometer cable when it kinked when putting the instrument panel back it. Have to order a new one and will not make the same expensive mistake again. Got everything working again electrically, well almost. I suspect that I have a bad fuse box and will use a spare one from my parts car if it is in good condition. Otherwise I will make a new fuse box and reconnect cables into the new box. The middle circuit keeps going out, does not blow a fuse, just has a poor connection in the box. This circuit affects the brake lights and heater fan circuit. Put a new stereo in that is iPhone compatible. New skeakers in the doors, new antenna, and new rear speakers. Hooked up the solenoid to my Accusump and just have to complete the plumbing to the incoming line from the oil cooler to the oil filter. This is to prime the engine prior to starting each time I start the engine. Have put a total of 150 nmiles on the rebuilt engine and my only concern is low oil pressure. I am in the process of putting a new oil pressure line and checking the oil pressure with a different gauge. I might have to rebuild the oil pump. Not sure at the moment. Will let you know after I confirm that I really have low oil pressure. Reads less than 5 lbs when at warm idle. About 35 lbs when warm and running above 2000 rpm. The tach seems to waver at 5000 rpm, not sure what is going on and I do not want to go higher at this time until I'm sure about my oil situation. The car is a lot more than I expected as far as HP and torque. Its really a thrill to drive since I got the drive shaft noise to go away with the removal of the universal guard. Promise, pictures to follow. Last edited on 04-27-2016 04:57 am by Randallclary@icloud.com |
|||||||||
|
Screenplay Member
|
Is this the 1/4" steel cover plate that bolts to each side of there transmission tunnel? If so, it has always been my understanding that the primary purpose of this plate is for structural rigidity - it connects the unit body floor pans at a weak spot. Perhaps that was just an assumption on my part. Can anybody else chime in? Clinton |
|||||||||
|
Randallclary@icloud.com Member
|
There is a support under the transmission that secures the transmission to the car frame unibody. It has a rubber support mounted on to to isolate between the support and the bottom of the transmission. The tunnel support I mentioned is directly under the output of the transmission and looks like the purpose was to keep the drive shaft in place if the drive line broke at the spline into the rear of the transmission. |
|||||||||
|
Sander Member 
|
Universal plate? .... Are you talking about the anti pole vault plate. It's at the rear of the tranny and front of the drive shaft ... if the universal joint breaks the drive shaft cradles in the plate so it doesn't hit the ground causing the rear of the car to "pole vault". |
|||||||||
|
Randallclary@icloud.com Member
|
Finally going to update project status. I am almost complete. For the past several months I have had a heck of a time getting this beast to run properly. Sometimes it was running great tand then it would start sputtering and backfire. I looked at everything, well almost everything. Checked timing, plugs, fuel system, fuel pump, fuel pressure, fuel flow into the carburetors. Seems nothing ever changed the problem. Well finally I decided to look into the new Delorttos for the 2nd and 3rd times. Finally figured it was a couple of things. I noticed that the amount of fuel in front carburetor float area was much lower than the rear. The fuel feeds from the rear to the front. I had checked to make sure the needle valves operated by the floats were set properly. They were. That is whenfor the 3rd time I found out that there is a pinkie sized filter in the carburetor just ahead of each needle valve and that the suspect one was indeed clogged. I didn't even know this filter existed. It was plugged with debris and I cleared it. Ran much better, but it still popped and backfired somewhat. It was then that I noticed that the o-rings between the Delorttos and the intake manifold had been pushed out from their respective seats. I removed the carburetors far enough to be able to reseat the o-ring and retighted the carburetor back to the manifold making sure that the o-rings remained seated properly. I remember having a couple of of the backfires feel like they came thru the accelerator cable. This must bave been the ones that dislodged the o-rings. Once these adjustments were completed, I again started the car and everything was a whole lot better. We are still going to final adjust the carbs with a air/fuel minature meter with an O2 sensor. Timeing is set pretty well, but we can final adjust the timing and the adjustable cams if necessary. Still have to put in the new speedometer cable and take care of tack issues with the Pertronix ignition. Lastly, I need to install the new Robbins softtop and cover and hook up the heater. I think that I will put a shutoff for the heater inside the engine compartment and only have it on in the winter. I have been driving the car every day and plan on finally driving it to the JHPS meeting in So CA this next week. Attached are some pics of the completed car so far. Attachment: IMG_0449.jpg (Downloaded 118 times) |
|||||||||
|
Randallclary@icloud.com Member
|
Another pic Attachment: IMG_0002.jpg (Downloaded 166 times) |
|||||||||
|
Randallclary@icloud.com Member
|
Another pic Attachment: IMG_0443.jpg (Downloaded 164 times) |
|||||||||
|
Randallclary@icloud.com Member
|
Another pic Attachment: IMG_0019.jpg (Downloaded 165 times) |
|||||||||
|
Randallclary@icloud.com Member
|
Another pic Attachment: IMG_0006.jpg (Downloaded 165 times) |
|||||||||
|
Randallclary@icloud.com Member
|
Another pic Attachment: IMG_0015.jpg (Downloaded 166 times) |
|||||||||
|
Randallclary@icloud.com Member
|
Another pic before we installed the rebuilt stroker crank engine. I need to find out how to add multiple photos. My photos are only 500 bytes each. Please chime in and I should be able to post several more photos showing the overall progress of the car over the past 34 months. I really appreciate all the help and advice I have received from our JHPS members over that period and look forward to getting and providing information and advice to any of our members Attachment: IMG_1208.jpg (Downloaded 165 times) Last edited on 09-12-2016 05:52 am by Randallclary@icloud.com |
|||||||||
|
subwoofer Member
|
Have the images on an external server (like photobucket et al) and copy the IMG tag from the single photo view into your post. Then you are not limited in resolution or number of images. -- Joachim |
|||||||||
|
dbeliveau74 Member 
|
Randall or Clinton, Do you have any info on the gas strut conversion to the JH Bonnet/Hood? I'd love to update to the gas struts, thanks. Cheers, Dan 74 JH Attachment: DSC_1103 (600 x 397).jpg (Downloaded 143 times) Last edited on 10-02-2016 08:37 pm by dbeliveau74 |
|||||||||
|
Screenplay Member
|
I have a PDF of plans for a gas strut conversion. I don't recall where I downloaded it from, but it was an update of an earlier plan from JH owner Frank Schwartz and is quite detailed. If you'd like to PM me your email I'll forward it to you. p.s. I never did the conversion myself so I cannot offer tips or assistance, but if I were going to I'd certainly start with this template. Clinton |
|||||||||
|
Randallclary@icloud.com Member
|
On #13046 I used Eastwood Dynamat on most of the panels and floors of my car including the trunk and under the fuel tank. I also replaced my old gastank with an aluminum replacement that I purchased on line. There are not many left as the owner is retiring and selling all his auto parts mainly for British cars. Gas tanks for Jensen Healeys included. He may still have some. He also makes steel tanks. I don't think that I will have rust problems because I have sealed the floor of the trunk. Last edited on 12-27-2016 03:34 am by Randallclary@icloud.com |
|||||||||
|
Randallclary@icloud.com Member
|
Hey Guys One of the dangers of driving the JH everyday is having a rock invade your space. Well my JH took a hit last week and I cracked my windshield. I went ahead and bought two new ones at a great price and so I am offering the other new one to fellow JH owners with basically no freight cost since the cost. If anyone is willing to offer me $350 for one of my new windshields, it’s yours. You can have your pick since they are both brand new from Triplex. Just let me know. They will be coming in on the 17th of April. Regards, Randall Clary 909-938-2090 Riverside, CA |
|||||||||