| Moderated by: Greg Fletcher | ||
| Author | Post | |||||||||
|---|---|---|---|---|---|---|---|---|---|---|
|
Scottm5407 Member
|
Hi everybody I just acquired my first JH ( 1973 MK1). In fact, this is my first British sports car. It is the basket case from Bradford Ontario that Stephen Szikora mentioned in his message of 10/11. I was looking for a winter project that would ultimately lead to something that no one else in the local car clubs has.(I am located in Eastern Ontario, near Cornwall ) My other car ( not counting daily drivers) is a '77 Chrysler New Yorker Brougham 2-door coupe, so as you can see, I'm going pretty much from one extreme to the other.( 5 feet shorter, 3000lbs lighter, and 70% of the horsepower) As Stephen mentioned, it looks like the restoration process on this car began in 1982, and was never completed. If I understand the paper trail correctly, it changed hands at least 3 times since. Anyway, its current state is : Framework, brakes, suspension, engine & transmission (supposedly) redone & installed. Rear fenders , trunklid and both doors installed. Came with both a fiberglass and a metal hood ( not installed ), ditto for front fenders. Both metal bumpers are present as well. Interior is completely gutted, although I seem to have 2 of most things needed to rebuild it. A few NOS parts, but it looks like mostly parts salvaged from a few donor cars. I'm still trying to identify what some of these parts are, and if they even belong to this car. ( I suspect that the golf-club covers and Weed-Whacker parts that I found in one of the many boxes of parts were optional accessories.... but I digress) Found the Delta website and a couple of copies of their old catalog, which has helped. Otherwise, it is sort of like a jigsaw puzzle with some duplicated and some missing peices, and no picture. So I guess my first question ( of I'm sure many more to come) is: Is there a publication available that shows how this car goes together ? Thanks ! Scott Mackay |
|||||||||
|
Lash Russell Member 
|
Hi Scott, Welcome to the Jensen craziness, you're gonna love it I'd say the first thing you need is the JH Shop manual. I've seen these on Ebay and maybe Delta has one as well, call Jim there and he could probably set you up. The JHPS has JH service bullitins for sale as well, these are pretty helpful but I'd start with the shop manual. Good luck, Lash |
|||||||||
|
Scottm5407 Member
|
Thanks Lash......I will look into that Scott |
|||||||||
|
Tim Murphy Member 
|
I think the parts catalogue would be the best to see how everything fits together. It has exploded views of every section of the car. |
|||||||||
|
Scottm5407 Member
|
Lash... It turns out I already have the shop manual, however it seems to have very little information on the body and interior, which are the 2 areas I'm trying to sort out. Hi Tim Thanks for the suggestion. I had a talk with Jeff at Delta yesterday, and we talked about the parts catalog as a possible source of enlightenment. He was even kind enough to fax me a couple of pages as examples. I have a couple of old copies of the printed Delta catalog, and what is in there and in various places on the current Delta website are basically copies of most of the exploded drawings in the parts catalog. So it seems that I already have access to much of this information ( and you're right, these have put me light years ahead of where I was ) What these views don't show however is how the various sectons fit together, and Jeff told me that there is really no publication that shows this. My problem lies in the fact that I wasn't the one who took it apart in the first place. So I guess I'm going to have to tackle these issues one at a time and hope that some good-hearted member(s) will have been up the street that I'm trying to navigate at any given stage, and will be kind enough to point me in the right direction. At this point I am trying to get a handle on the dash and instrument cluster. The dash is pretty straightforward. The instrument cluster has been redone and is ready to install, but I have no idea how the instrument cluster attaches to whatever it attaches to. It seems to be a sloppy fit into the oval opening in the dash, but either or both of these parts may not have come from this car, ( or even the same car as each other) I have another complete unrestored instrument cluster, which I stripped down to just the bare plastic bezel, and this seems to fit a little better into the dash opening. In both cases the finisher strip on the instrument cluster in missing...is this essential in putting it all together, or is it just cosmetic ? Should the cluster be assembled to the dash first and then the whole thing installed in the car, or does the dash go in first and the cluster after ?? Sorry if these sound like really dumb questions, but this is the first section of the car I've tried to sort out, and I'm already stumped. Scott |
|||||||||
|
Brett Gibson JH5 20497 Member
|
Welcome aboard Scott, as for pictures of what goes were the parts cat. is a good source or visit web sites members have put up with a "how to do". For the dash your best approach is to install the main dash and then the instrument pod, the pod is only held in by a center ron that slides into a whole in the main dash (put a little oil or grease on the rod makes it easier) then there are two small screws in the upper corners of the pod that hold it, as for the trim piece that goes around the pod that is strickly just for looks and takes up a bit of the gap, some people paint them differant colors to match the car and such. Brett |
|||||||||
|
Scottm5407 Member
|
Hi Brett You have solved the mystery.......thanks !! What threw me here was that on one of the cluster assemblies ( the rebuilt one), there were 3 jagged looking holes, (one above the outboard guage on the left and 2 on the right) , that looked like someone had made them after several attempts with a dull icepick, while the unrestored one has no screw holes anywhere. I suspect that moving forward I'm going to find lots more of this kind of stuff. Thanks to all for your help, and stay tuned for my next set of dumb-sounding questions ! Scott |
|||||||||
|
Frank Schwartz Member
|
Hmmm...looks like you go tyour work cut out for you...I strongly suggest that you find a copy of the Jensen Healey parts book. Every part is shown and part numbers referenced as well. This will go a long way in helping you put things back together. You really need this book...hard to work on the car without it. As for the instrument cluster, it has a 3/8 or so post stciking out the back that goes into a spring clip sort of gadget on the dash, to hold it in place. use a bit of vaseline or white grease on it when installing it as it usually rusts and is hell to get out when it does. There are two mounting holes, at about 2 oclock on the right side instrument cluster housing that uses a long thin screw that goes into a plate fixed to the inside of the dash...same on the left side at about 10 oclock up inside the left side instrument mount. As for the finishing cord...not available. My daughter, a Jensenite can sew up one for you with some serious groveling, as she did for me...and I glue it on with some special (readialy available) glue...the original was attached with ten thousand staples...and with age it cracked and came apart... She makes enough to do the clusster and on the bottom of the dash, too, if yours has it. |
|||||||||
|
Mason Jones Member 
|
Hi Scott, there's actually a place in Ontario, MacGregor British Car Parts, that carries the piping and other interior parts: http://www.macgregorukcarparts.com/Merchant2/merchant.mvc?Screen=CTGY&Category_Code=JH-cockpit In the boxes of new and spare parts that came with my 73 that I haven't gotten to installing yet was a box of new door seals and this instrument cluster piping from this outfit. The piping has a texture to it that I haven't seen in any of the photos of others' cars (the chrome piping usually appears smooth) so it may not be an exact replica. Not sure if you can see the texture here... 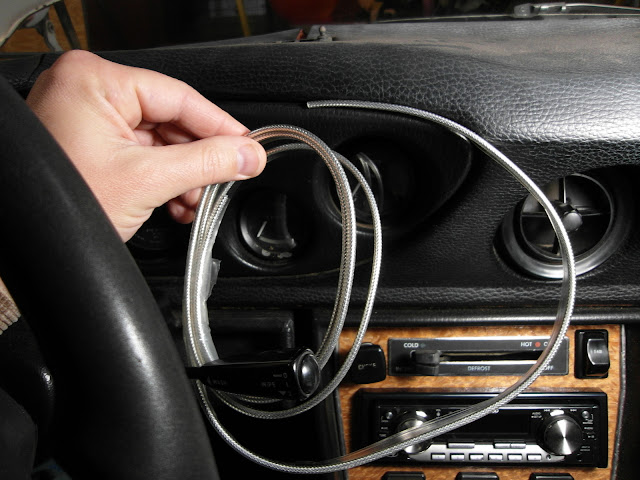 [img]%3Ca%20href=%22https://picasaweb.google.com/lh/photo/sGlZ2rNJ4WVyUhjMSbDtc7KitdVwP0TeqTfAVSYKgxw?feat=embedwebsite%22%3E%3Cimg%20src=%22https://lh3.googleusercontent.com/-StFQWSU-0MI/TtuWrab2JvI/AAAAAAAAAU0/AHN8gNsY0iU/s400/SAM_5157.JPG%22%20height=%22300%22%20width=%22400%22%20/%3E%3C/a%3E[/img]  [img]%3Ca%20href=%22https://picasaweb.google.com/lh/photo/sGlZ2rNJ4WVyUhjMSbDtc7KitdVwP0TeqTfAVSYKgxw?feat=embedwebsite%22%3E%3Cimg%20src=%22https://lh3.googleusercontent.com/-StFQWSU-0MI/TtuWrab2JvI/AAAAAAAAAU0/AHN8gNsY0iU/s400/SAM_5157.JPG%22%20height=%22300%22%20width=%22400%22%20/%3E%3C/a%3E[/img][img]%3Ca%20href=%22https://picasaweb.google.com/lh/photo/sGlZ2rNJ4WVyUhjMSbDtc7KitdVwP0TeqTfAVSYKgxw?feat=embedwebsite%22%3E%3Cimg%20src=%22https://lh3.googleusercontent.com/-StFQWSU-0MI/TtuWrab2JvI/AAAAAAAAAU0/AHN8gNsY0iU/s400/SAM_5157.JPG%22%20height=%22300%22%20width=%22400%22%20/%3E%3C/a%3E[/img] |
|||||||||
|
Frank Schwartz Member
|
Yes...that will work...seems all the substitute trim will have a textured cord in it...however, it looks good...and that is what my daughter uses to make the trim she can be coerced into making. I glue it on, rather than try to find staples like the factory used. I forget the name of the glue, but it is really good...sticks to everything and never lets go. If you wish, ask on this link, and I will go out to my workshop and get youthe name of the glue. Frank |
|||||||||
|
JodyKerr Member 
|
The stuff I use is called "Seal All" comes in a yellow tube. Should be available most anywhere, works really well. |
|||||||||
|
Frank Schwartz Member
|
That's it, Jody !!! You saved me a trip downstairs to the garage shop! Use rubber gloves as it is hard to get off your hands...but it is perfect for this job. Frank |
|||||||||
|
Mason Jones Member
|
The piping came with a bunch of little screws but that seemed like an odd way to attach it. I'll try the glue. |
|||||||||
|
Scottm5407 Member
|
Hi everybody A pleasure to meet you all and thanks for your help ! Delta has the parts book, and I will be ordering one soon. Good to know that there is a supplier in Ontario that I can get in touch with ( getting things across the border from the US can be a pain sometimes) One more seemingly dumb sounding question on the instrument cluster if I may... On both of the assemblies that I have, there is a pilot light with a blue lense at around the 2 o'clock position in front of the oil pressure guage . Why is it there ?? Thanks again! Scott |
|||||||||
|
NickJ Member
|
Hi Scott, I'm one of the new guys too. This board has been super helpful for me, most of the time I dont even have to ask a question because it has already been asked. I am also curious about the oil pressure light, mine is green though. I assume if it is on....that is a good thing? |
|||||||||
|
JodyKerr Member
|
High Beams iirc |
|||||||||
|
NickJ Member
|
JodyKerr wrote:High Beams iirc The high beams is the center light between the signal indicators. This is the one that sits at an angle above the Oil Pressure gauge. |
|||||||||
|
Frank Schwartz Member
|
I think you fellows are confused. The two green lamps in the gauge cluster are for right and left turn signals. The blue one in the center is the high beam light. The little green one in the oil pressure light portion is so you can see the meter at night. All of the gauges are under lighted (is there such a word?) and mostly impossible to see at night. You can buy some bulbs from Delta that really are bright and replace the bulbe in the insturments and actually be able to see them at night. Really! The ones in there are useless at night. Trust me on that...also you shouild bypass the brightness unit that usually does not work anyway. Keep the instruments on bright..even with the new bulbs suggested, that is if you want to be able to see them at night. There is a bulb in the console lighting that is red when the engine is not running and goes out when the engine starts. It is not an oil pressure indicator, but is wired into the alternator circuit. Engine not running>light on. Engine running>light off. And that green light that shines on the oil gauge is even hard to see at night...if you can find a red one from an MG in a junk yard, use it...the red shining on the oil pressure gauge is much easier to see than the green one.... |
|||||||||
|
NickJ Member
|
So what you are saying Frank, is the most simple explanation for the OP light is the correct one? No way, we are talking about Lucas electrics after all. :) Thanks for the tips on the lighting, yeah the rheostat doesnt work in mine either. |
|||||||||
|
Scottm5407 Member
|
Well, that clears up my second dumb question......thanks all ! Nick, you were correct...green, not blue. ( My car is in another building and I was relying on memory.....which apparently isn't as reliable as it once was.) Don't know if any of my stuff actually works or not, as it is in pieces on my workbench at the moment. BTW, I saw the px of your car .....looks great ! Hope mine will look half as good when I'm finished. Scott |
|||||||||
|
Frank Schwartz Member
|
Well, the "Rheostat" is not a rheostat at all. It is a printed circuity board with numerous fingers or wipers that always goes bad. If you ever take one apart, you will see why the man who invented must have gone went stark raving mad. If you can find in a junkyard a Jaguar XJ or XJS series from the 80's or parhaps early 90's you will find a true rheostat for their dimmer and if you can get it out of there, it is a direct drop in for the JH. The knob comes off just like the one in the JH and you can use the Jag knob or your origianl knob. I do a small modification on mine and I think I wrote it up somewhere...but it works great, especially if you are using the bright lamps from Delta. Jaguar gets 273 US dollars for one...which s an outrage for a $5 unit and the junk yards usually get a couple of dollars for one...Glad I don't own a Jag..I'm not wealthyenough to be able to buy parts as needed!!! If you want to read what I wrote about the Jag rheostat contact me off this group. I also had an article on the bright bulbs printed a few years ago in the UK Jensen owners Club publication. I can send you a copy of the article off this group as well if you are interested. On the OP light...inasmuch as the gauges are impossible to see at night anyway with he original bulbs, the OP green light was, I am sure, installed so you could at least see that gauge. But....green lighting is hard to see at night. Find a red one from a junked MG and it works much, much better. |
|||||||||
|
Mason Jones Member
|
The Lucas designers, always planning ahead for failure, provided a pair of connected terminals on each side of the dimmer. So when your dimmer fails you can simply move one of the wires over to the other side and plug it in next to the other one. They will then be connected together. Handy. As dim as the original bulbs are I can't imagine when you would ever want to dim them anyway! |
|||||||||
|
Scottm5407 Member
|
Interesting ! I for one would very much like to read the article on the brighter bulbs if possible. Thanks Scott |
|||||||||
|
Frank Schwartz Member
|
Fine. I would be happy to send you the entire article, but it is too long to put on this group postings. You would need to send me your email address and I will email it to you...and it will take two emails to send it all..ok? mfsjr2@comcast.net Frank Schwartz |
|||||||||
|
JodyKerr Member
|
Hey Frank, If you have longer material that won't fit on the forums you know I'm always happy to host the info on my web site. Jody |
|||||||||
|
Scottm5407 Member
|
No problem, I'll send it over right now. Thanks! |
|||||||||
|
Frank Schwartz Member
|
Jody: I will send yu the copy as well...it is long as printed in the Jensen Owners Club magazine....but I need your email, as I do not have it on file...mfsjr2@comcast.net |
|||||||||
|
NickJ Member
|
Can you include me as well Frank? Would love to read the articles.....email sent. Appreciate all the great info guys! Thanks for the compliments on my car Scott, she's in good shape but she definitely has gremlins. Afraid a nice paint job is in the works. |
|||||||||
|
Frank Schwartz Member
|
I will need your email address...I write rather long treatises (often referred to as b.s.) and I do not want to load up this email group. Frank at mfsjr2@comcast.net |
|||||||||
|
LambandAndy Member 
|
Scottm5407 wrote: On both of the assemblies that I have, there is a pilot light with a blue lense at around the 2 o'clock position in front of the oil pressure guage . Why is it there ?? I can't remember where, but I read that the extra light on the oil pressure gauge was to satisfy a US import requirement that the hazard light switch was illuminated. Sounds crazy enough to be true. Andy |
|||||||||
|
Frank Schwartz Member
|
It is there to illuminate your oil pressure gague as the pilot lamps are so dim you cannot read them at night..so they put a lamp in there...find one iwth a red lens ..it works much better. And contact Delta for bright bulbs for your gauges |
|||||||||
|
Scottm5407 Member
|
Interesting....thanks Andy |
|||||||||